
User Guide

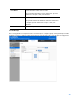
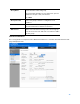
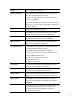

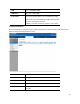
Table Of Contents
- Package Contents
- Access Point Setup Guide
- Setup to manage your access point with Linksys cloud server
- Step 1
- Make sure the access point is powered on and connected with an ethernet cable to your network with internet access. By factory default, the IP address is assigned by a DHCP server. If there is no DHCP server in your network, the default IP address is ...
- Log in to the access point’s browser-based admin tool locally and click the Configure LAN Settings link. Change the IP address or VLAN so the access point can access the internet.
- If the indicator light is off, check that the AC power adapter, or PoE cable, is properly connected on both ends.
- Step 2
- Setup to manage your access point locally with browser-based admin tool
- Setup to manage your access point with Linksys cloud server
- Cloud Management Interface
- Local Management Interface
- Appendix A - Troubleshooting
- Appendix B - About Wireless LANs
- Appendix C - PC and Server Configuration

85
Group Name
Enter the name of the new group.
The group name includes 1 to 32 characters. Special
characters except ':' and ';' are allowed.
Click Add.
Group Selection
Select one group to delete or configure its user
members.
Members
User members of the selected group. You can select
one user and click ">>" button to remove it.
Other Users
Other users which don't belong to the selected group.
You can select one user and click "<<" button to add it
into the group.
Web Customization
Go to Configuration > Captive Portal > Web Customization to customize the authentication web
page of Captive Portal.