
User Guide
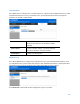
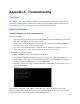

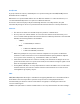


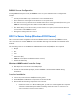
Table Of Contents
- Package Contents
- Access Point Setup Guide
- Setup to manage your access point with Linksys cloud server
- Step 1
- Make sure the access point is powered on and connected with an ethernet cable to your network with internet access. By factory default, the IP address is assigned by a DHCP server. If there is no DHCP server in your network, the default IP address is ...
- Log in to the access point’s browser-based admin tool locally and click the Configure LAN Settings link. Change the IP address or VLAN so the access point can access the internet.
- If the indicator light is off, check that the AC power adapter, or PoE cable, is properly connected on both ends.
- Step 2
- Setup to manage your access point locally with browser-based admin tool
- Setup to manage your access point with Linksys cloud server
- Cloud Management Interface
- Local Management Interface
- Appendix A - Troubleshooting
- Appendix B - About Wireless LANs
- Appendix C - PC and Server Configuration
120
RADIUS Server Configuration
If using WPA2-Enterprise mode, the RADIUS server on your network must be configured as
follows:
•
It must provide and accept certificates for user authentication.
•
There must be a client login for the wireless access point itself.
•
The wireless access point will use its default name as its client login name. (However, your
RADIUS server may ignore this and use the IP address instead.)
•
The Shared Key, set on the Security screen of the access point, must match the Shared
Secret value on the RADIUS server.
•
Encryption settings must be correct.
802.1x Server Setup (Windows 2000 Server)
This section describes using Microsoft Internet Authentication Server as the RADIUS server,
since it is the most common RADIUS server available that supports the EAP-TLS authentication
method.
The following services on the Windows 2000 Domain Controller (PDC) are also required.
•
dhcpd
•
dns
•
rras
•
webserver (IIS)
•
RADIUS Server (Internet Authentication Service)
•
Certificate Authority
Windows 2000 Domain Controller Setup
1.
Run dcpromo.exe from the command prompt.
2.
Follow all of the default prompts, ensure that DNS is installed and enabled during
installation.
Services Installation
1.
Select the Control Panel > Add/Remove Programs.
2.
Click Add/Remove Windows Components from the left side.
3.
Ensure that the following components are selected.
•
Certificate Services—After enabling this, you will see a warning that the computer
cannot be renamed and joined after installing certificate services. Select Yes to
select certificate services and continue