
User Guide
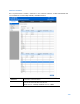

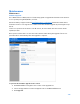
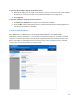
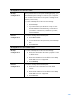
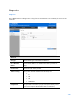
Table Of Contents
- Package Contents
- Access Point Setup Guide
- Setup to manage your access point with Linksys cloud server
- Step 1
- Make sure the access point is powered on and connected with an ethernet cable to your network with internet access. By factory default, the IP address is assigned by a DHCP server. If there is no DHCP server in your network, the default IP address is ...
- Log in to the access point’s browser-based admin tool locally and click the Configure LAN Settings link. Change the IP address or VLAN so the access point can access the internet.
- If the indicator light is off, check that the AC power adapter, or PoE cable, is properly connected on both ends.
- Step 2
- Setup to manage your access point locally with browser-based admin tool
- Setup to manage your access point with Linksys cloud server
- Cloud Management Interface
- Local Management Interface
- Appendix A - Troubleshooting
- Appendix B - About Wireless LANs
- Appendix C - PC and Server Configuration

106
Maintenance
Maintenance
Firmware Upgrade
Go to Maintenance > Maintenance > Firmware Upgrade to upgrade the firmware in the wireless
access point by using HTTP/HTTPS, or TFTP.
Check the Linksys support website (http://www.linksys.com/support
) and download the latest
firmware release to a storage device or PC. Perform the firmware upgrade by following the steps
below.
If an access point works as master of an AP cluster, all slaves within the same cluster will be
updated, as well.
Do not power off the device or disconnect the ethernet cable during the upgrade. The access
point will reboot automatically after the upgrade is complete.
To perform the firmware upgrade from local PC:
1.
Click Choose File to navigate to the location of the upgrade file.
2.
Select the upgrade file. Its name will appear next to the Choose File button.
3.
Click Upgrade.