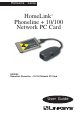
HomeLink™ Series HomeLink Phoneline + 10/100 Network PC Card ™ HPN100 HomeLink Phoneline + 10/100 Network PC Card User Guide
COPYRIGHT & TRADEMARKS Copyright © 1999 Linksys, All Rights Reserved. Linksys is a registered trademark of Linksys. Microsoft, Windows, and the Windows logo are registered trademarks of Microsoft Corporation. All other trademarks and brand names are the property of their respective proprietors. LIMITED WARRANTY Linksys guarantees that every HomeLink Phoneline + 10/100 Network PC Card is free from physical defects in material and workmanship under normal use for one (1) year from the date of purchase.
Contents Introduction About The Hardware How to Get Technical Support Hardware Setup LED Indicators About the Software Windows 98 Setup Windows 95 Setup Windows NT 4.0 Setup Novell NetWare Client32 Setup 2 3 3 4 7 8 11 19 29 36 Linux, Open Source and Beta OSes 38 Appendix Windows NT 4.
Introduction Congratulations on your purchase of the Linksys HomeLink Phoneline + 10/100 Network PC Card. This exciting new technology is being offered in compliance with the standards of the Home Phoneline Networking Alliance (HomePNA). The Linksys HomeLink Phoneline + 10/100 Network PC Card now offers instant connectivity to multiple PC's over a home's existing telephone lines. You can network any notebook computer by connecting it to any standard phone line.
Features • Build A Network Using Your Existing Telephone Line • No Additional Hubs or Cabling Needed • Type II PCMCIA Card (16-Bit) • Card has 2 RJ-11 Modular Telephone Ports and 1 RJ-45 10BaseT/100BaseTX Fast Ethernet Port • 1Mbps Transfer Rate Over Telephone Lines • Also Connects to 10/100 Networks with No Configuration • Perfect for File and Printer Sharing, Email, Web Access, Gaming and More • Dual-Speed RJ-45 Port Automatically Detects Cabling Speed • Works with Your Existing HomeLink Network Cards • H
Package Contents • One HomeLink Phoneline + 10/100 Network PC Card • Cable Coupler with Two RJ-11 Ports and One RJ-45 Port • One Standard Telephone Cable • One Driver Diskette • User Guide and Registration Card If any of the above contents are missing, consult your Linksys retailer. Sharing Your Resources The HomeLink Phoneline card brings the advantages of inexpensive networking to your home or office.
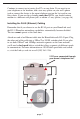
Hardware Setup Before You Begin The HomeLink Phoneline + 10/100 Network PC Card is equipped with two phone wire ports, also known as RJ-11 ports, for use with a Phoneline network that utilizes your existing telephone system. The card also has an RJ-45 10BaseT Ethernet port for use with 10Mbps Ethernet networks. If You Want to Use Ethernet... If you plan on connecting the HomeLink Card to a 100Mbps or 10Mbps Ethernet network, only use Category 3 or 5 twisted-pair cabling.
Installing the Hardware 1. Turn off your PC and any devices attached to it. 2. Snap the flat end of the media coupler into the HomeLink Phoneline +10/100 Network PC Card. It should lock firmly into place. 3. Locate your PC's card slot. The slot is usually located on the side or front of the PC. Slide the HomeLink Phoneline +10/100 Network PC Card into the slot with the triangle on the card facing up. The 68-pin end goes in first. See that the card is seated snugly in place. 4.
Continue to connect up to twenty-five PCs on one chain. If you want to use your telephone or fax machine, add a two-way splitter on your wall’s phone jack or connect the device to the open telephone port on the last card in your daisy chain. If you are daisy chaining more than 2 PCs, you should connect modem to a different wall phone jack, or obtain a 2-way splitter, (see page 46).
About the Software The HomeLink Phoneline + 10/100 Network PC Card requires two different kinds of software in order to work: Socket and card services are special software drivers that allow a PC card to communicate with your computer. Plug and Play operating systems like Windows 98 and 95 already have these services built in. Network drivers allow the card to communicate with your network at large.
Network Driver Setup Follow these instructions carefully. You can view or print the setup directions from your favorite word processor, or if you prefer, use the reader that is included on the 10/100 card's disk. To access the reader, put the HomeLink 10/100 PC Card disk into drive A and run the README.EXE program. To run the program from DOS, for example, you would type: a:\readme.exe and press Enter. If you are using Windows 3.x, you could click on File and Run in the Program Manager, type a:\readme.
Windows 98 Setup Boot up your Windows 98 PC with the HomeLink Phoneline + 10/100 PC Card hardware installed. Follow the instructions below. 1. Windows 98 will automatically detect the presence of the HomeLink Phoneline + 10/100 Network PC Card in your computer. If Windows 98 goes directly to the windows desktop and does not display the New Hardware Found window, refer to the Troubleshooting section of this guide. 2.
4. A window will appear asking where you would like Windows 98 to search for the driver. Make sure that Floppy disk drives is selected, and click Next to continue. 5. Windows will begin searching your drives for the correct device drivers. A message will appear that reads Windows found the Linksys HomeLink + 10/100 PC Card driver. Click on Finish. If Windows cannot find the driver for the card, skip to the Troubleshooting section on page 51. 6.
7. Double-click on the Network icon. The Network window will appear. Click on the Configuration tab. 8. Make sure that the following network components are installed: Client for Microsoft Networks Linksys HomeLink + 10/100 PC Card (PCM100TH) NetBEUI TCP/IP There may be other components listed in addition to the ones shown above. This is fine. Different components are required for different network configurations. If you are missing required components, you'll need to install them manually.
9. In the Primary Network Logon box, select Client for Microsoft Networks. 10. Click on the Identification tab. Type the name of your computer in the Computer name box. Make up a name that is unique from all the other computers' names on the network. Call it whatever you'd like, (ex: Ace, Master, etc.), as long as you keep the name under 15 characters long and you don’t use spaces or special characters, (like dashes). 11. Type the name of your workgroup in the Workgroup box.
15. Once Windows is done copying the necessary files, the System Settings Change window appears. Remove all disks from your computer and click on Yes to restart your PC. If you don't see this window, simply close down Windows 98 and restart your computer. The installation is complete. Remember to remove the installation disk from the floppy drive. Look at the HomeLink Card's cable coupler.
Client Setup Before enabling File and Printer Sharing, you should prepare your computer to be used with any file servers that may be on the network. Turn to the next page. If you are not using Windows 98 with an NT or NetWare file server, skip the next two paragraphs. Otherwise: • Connecting to a NetWare File Server Click on My Computer, Control Panel, and Network. Change the Network Logon to Client for NetWare Network. Next, double-click on the client for NetWare networks.
Preparing to Use File and Printer Sharing. The instructions below explain how to turn on file and printer sharing in Windows 98 so that your computer can be accessed by others and vice-versa. 1. Start up Windows 98. If you are asked to log in, be sure to give your correct username and password. 2. To set up sharing for the first time on a computer, click on Start, Settings, Control Panel, then double-click on Network. 3. Click on the Configuration tab, followed by the File and Printer Sharing button.
Use your mouse to select the type of file sharing access that you want other users to have. If you want to assign access password(s), type them into the Password box(es). If you are sharing a cable modem or DSL braodband connection that you will be using to access the Internet, you should protect all of your shared drives and printers with private passwords. When you're done, click on the Apply button, followed by OK.
Windows 95 Setup After installing the HomeLink Phoneline + 10/100 Network PC Card hardware in your computer, follow the instructions below to install the HomeLink Phoneline + 10/100 Network PC Card's Windows 95 network driver from the card's program disk. Please keep in mind that the installation procedure for the network driver will vary slightly depending on the version of Windows 95 you are using and your current system configuration. To install the network driver, Start up your computer and Windows 95.
3. Windows will begin searching your drives for the correct device drivers. A message will appear that reads Windows found the Linksys HomeLink + 10/100 PC Card (PCM100H1) driver. Click on Finish. If Windows cannot find the driver for the card, skip to the Troubleshooting section on page 51. 4. Windows 95 will begin copying a number of files onto your computer.
7. Double-click on the Network icon. The Network window will appear. Click on the Configuration tab. 8. Make sure that the following network components are installed: Client for Microsoft Networks Client for Netware Network Linksys HomeLink Phoneline + 10/100 Network PC Card (PCMPC100) IPX/SPX-compatible Protocol NetBEUI TCP/IP There may be other components listed in addition to the ones shown above. This is fine. Different components are required for different network configurations.
9. In the Primary Network Logon box, select Client for Microsoft Networks. 10. Click on the Identification tab. Type the name of your computer in the Computer name box. Make up a name that is unique from all the other computers' names on the network. Call it whatever you'd like, (ex: Tardis, Leela, etc.) 11. Type the name of your workgroup in the Workgroup box. The name you type should be the same workgroup name in use by all of the other PCs on the network. The Workgroup box is case sensitive.
14. Click on the OK button. Your system may or may not ask you for your Windows 95 CD-ROM or the location of the 95 installation files. Direct Windows to the appropriate location, (D:\win95, C:\windows\options\cabs, etc.). 15. Once Windows is done copying the necessary files, the System Settings Change window appears. Remove all disks from your computer and click on Yes to restart your PC. If you don't see the System Settings Change window, simply close down Windows 95 and restart your computer.
Client Setup Before enabling File and Printer Sharing, you should prepare your computer to be used with any file servers that may be on the network. If you are not using Windows 95 with an NT or NetWare file server, skip the next two paragraphs. Otherwise: • Using the Card to Connect to a NetWare File Server Click on My Computer, Control Panel, and Network. Change the Network Logon to Client for NetWare Network. Next, double-click on the client for NetWare networks.
Preparing to Use File and Printer Sharing. The instructions below explain how to turn on file and printer sharing in Windows 95 so that your computer can be accessed by others and vice-versa. 1. Start up Windows 95. If you are asked to log in, be sure to give your correct username and password. 2. To set up sharing for the first time on a computer, click on Start, Settings, Control Panel, then double-click on Network. 3. Click on the Configuration tab, followed by the File and Printer Sharing button.
Use your mouse to select the type of file sharing access that you want other users to have. If you want to assign access password(s), type them into the Password box(es). If you are sharing a cable modem or DSL braodband connection that you will be using to access the Internet, you should protect all of your shared drives and printers with private passwords. When you're done, click on the Apply button, followed by OK.
Windows NT 4.0 Setup The instructions below explain how to install HomeLink Phoneline + 10/100 Network PC Card's softwarer drivers for an NT 4.0 server/workstation. You must know the type of PCMCIA controller that you have in your notebook -- PCIC compatible or CardBus. Refer to your PC’s user guide or contact the manufacturer if you are not sure. Before you begin the installation, you should have your original Windows NT CD-ROM handy.
Install NT Networking and the HomeLink Phoneline + 10/100 Network PC Card Together 1. Choose Wired to the Network and click Next. 2. When asked to provide the name of the network adapter, choose Select from list... 3. When the list appears, click on the Have Disk button. 4. Put the PC Card disk into drive A and type a:\ in the location window. Click OK. 5.
6. Setup may need to copy some Windows NT files from your original Windows NT CD-ROM. If a window appears asking for your NT setup files, type in the location of your Windows NT CD-ROM. For example, if your CDROM is designated as D:, then type D:\i386. 7. Setup may also need drivers from the Linksys diskette. Type a:\ or the location of the floppy disk if this window appears. 8. NT will ask you to supply the I/O Base, Interrupt, Memory and Connection Type values for the card.
When the Network Setup Wizard reappears, configure your bindings. See your Windows NT User Guide for more information on bindings. 11. When the bindings are configured, click Next, followed by Next again to start the network. 12. When the Network Wizard window reappears, enter a name for your computer. You can name it whatever you would like, (Mary's Computer, Tardis, etc.). 13. Next, choose either Workgroup or Domain, then enter the workgroup or domain name that you want your PC to connect to.
Install the HomeLink Phoneline + 10/100 Network PC Card (NT Networking is Already Installed) 1. When the Network window appears, click on the Adapters tab. 2. Click on the Add button, followed by Have Disk. Put the PC Card disk into drive A. 3. When asked to supply the path to the disk, type a:\ and click OK. 4. NT will ask you to supply the I/O Base, Interrupt, Memory value, and Connection Type for the card. You can choose Auto for I/O, Interrupt, and Memory. Choose Autosense for the Connection Type. 5.
If You Have Problems If the EtherFast card's coupler doesn't light up after you restart your computer, you may need to change your slot's boot setting in NT. Follow these instructions: Click on Start, Settings, Control Panel. Double-click on the Devices icon. Scroll down in the Devices list to PCMCIA. Click on Startup. Verify that the Startup Type is set to Boot. If it isn't, use your mouse to select it. Click OK, then Close. Choose to restart your computer.
Changing the Card Settings For most users, the HomeLink default settings will be perfect for both Phoneline and Ethernet networking. However, you can make any necessary changes to your system's network settings by clicking on your taskbar's Start button, then Settings, then Control Panel, and then the Network icon. Note: Only change these settings if you know what you are doing. 1.
Ethernet Configuration This option allows you to choose the duplex and speed performance of the HomeLink Card’s RJ-45 Ethernet port. In order to change the port settings, the Mode Selection option must be set at 10BaseT Only, or 10/100BaseTX Only, or the mode must be set at Auto Detect with a valid link on the 10BaseT Port. • 10Mbps Half Duplex sets the 10BaseT port to half duplex mode. This is the default setting. • 10Mbps Full Duplex sets the 10BaseT port to full duplex mode.
Mode Selection You can set the HomeLink Phoneline + 10/100 Network PC Card to default to either a 10BaseT connection or Phoneline connection. Since there are three ports, the card is set to Auto Detect an active connection. Auto Detect will look first for a connection on the 10BaseT port, and if one is not found, the card will default to the Phoneline connection. You can configure the card to use only one connection type.
Phoneline Configuration You can set the Phoneline port to operate in several different modes. The phoneline port will default to Auto Config mode. This mode automatically sets the port to High Power/High Speed mode. These port settings will only take effect if and when the Phoneline port is selected as the default port or if the card is in Auto Detect mode and the Phoneline link is active.
Twisted-Pair Cabling There are different grades, or categories, of twisted-pair cabling. Category 5 is the most reliable and widely compatible, and is highly recommended. Category 3 is a good second choice. Straight-through cables are used for connecting computers to a hub. Crossed cables are used for connecting a hub to another hub (there is an exception: some hubs have a built-in uplink port that is crossed internally, which allows you to uplink hubs together with a straight cable instead).
Telephone Cable The telephone cables you use can be either crossed over or straight-through. Standard telephone cables like the ones you use everyday in your home should do the job. Note: If you are only sharing Internet access between 2 PCs, you can connect your modem directly to your HomeLink Card using a standard telephone cable.
Troubleshooting Troubleshooting Hints for Windows Problem: Windows doesn't detect new hardware with the HomeLink Card hardware installed, or it continues to detect the card each time I restart the PC. Solutions You might not have inserted the PCMCIA card correctly or securely into the appropriate slot of your computer. Check that the card is securely inserted into the appropriate slot.
Verify that the HomeLink Card’s Phoneline configuration is set to Auto Configuration. See the chapter entitled Changing the Card Settings on page xx for instructions on how to do this. Try connecting your PCs using only the phone wire provided with the HomeLink card. Disconnect your PCs from any phone jacks and remove any telephone, modem, or other device that you have conencted to the HomeLink cards.
If all computers are using the same protocol(s) and Workgroup name, and Windows 95 computers can't see Windows 98 computers, enable NetBIOS on all the computers using Windows 95 and 98. IPX/SPX-compatible Protocol should be installed on all computers. Bring up the properties of the IPX/SPX-compatible Protocol. To do this, click on Start, Settings, Control Panel, then open Network and click on the Configuration tab. Highlight IPX/SPX-compatible Protocol (only one of them) and click on Properties.
Multiple Network PC Cards The following information is supplied to you for reference only. Linksys does not provide technical support on the setup or troubleshooing of multiple Network PC Cards or enabling or setup of routing in an operating system. Please refer to the documentation of your operating system in order to find out more on how to setup two Network PC Cards in a PC to communicate with each other.
Using a Cable Modem or DSL Modem and the HomeLink PC Card If you are currently using a HomeLink Phoneline + 10/100 Network PC Card with a cable or DSL modem, it is recommended that you connect your cable modem to a 10BaseT/100BaseTX hub for faster access speeds. Keep in mind that some cable modems may not be connected to a hub and require a direct connection to a Network PC Card. Check with your provider if you have any questions regarding this matter.
Linux, Open Source and Beta Operating Systems Linksys does not provide technical support for Linux, *BSD, or other freeware and open source operating systems. Although many Linksys products have been proven to perform well under Linux and other freeware OSes, technical support for setup and troubleshooting is not provided. For information on where to find device drivers and setup instructions for Linux and other freeware OSes, visit the support pages and FAQ files on the Linksys website at www.linksys.com.
Manually Installing the Network Components in Windows There may be times when you might need to manually install missing Windows networking components. 1. Click on Start, Settings, then Control Panel. 2. Double-click the Network icon. The Network window appears. 3. Click on the Configuration tab. Linksys recommends that the following network components are installed for you to properly connect to your HomeLink network.
Adding Client for Netware Networks If you plan on connecting to a Novell NetWare workstation, click on the Add button. Highlight Client and click on Add. In the Network Client window, select Manufacturer and choose Microsoft. Click OK. Adding IPX/SPX-compatible Protocol Click on the Add button. Choose Protocol and click on the Add button. Select Manufacturer and choose Microsoft. Under the Network Protocol box, highlight IPX/SPX-compatible protocol. Click OK.
How to Use the HomeLink 10/100 Notebook Network Card's Generic Services Under DOS-Based Systems The software disk provided with the HomeLink Phoneline + 10/100 Network PC Card includes generic socket and card services that can be used to enable the card. The card's hardware-specific client enabler will only enable the HomeLink Phoneline + 10/100 Network PC Card.
Enabling PCMCIA Services in Windows NT To enable card and socket services in NT, click on Start, Settings, Control Panel. Double click on Devices. Scroll down the list until you find PCMCIA. Highlight it and click Startup and choose Boot from the options. After you are done click on Close and restart your computer. After the PC is restarted go to the same window and make sure the service is Started.
Specifications Standards IEEE 802.3 IEEE 802.3u, HPNA 1.0, 1.1 Transfer Rate Phone Line Half Duplex: 10BaseT Half Duplex: 10BaseT Full Duplex: 100BaseTX Half Duplex: 100BaseTX Full Duplex: LEDs Link/Act, 10/100, Phone Line Ports 1 Auto-Sensing 10Mbps/100Mbps RJ-45 Port 2 Standard Modular Telephone RJ-11 Ports Cabling Phone Line: 10BaseT: 100BaseTX: 1Mbps 10Mbps 20Mbps (Aggregate) 100Mbps 200Mbps (Aggregate) Standard Modular Phone Cable 150 Meters (500 feet) Max.
Customer Support For help with the installation or operation of your HomeLink Phoneline + 10/100 Network PC Card, contact Linksys Customer Support at one of the phone numbers or Internet addresses below. Customer Support Fax Email Web FTP Site 949-261-1288 949-261-8868 support@linksys.com http://www.linksys.com ftp.linksys.
h t t p : / / w w w. l i n k s y s . c o m © Copyright 1999 Linksys, All Rights Reserved. Printed in the USA.