Instant EtherFast® Series EtherFast® 10/100 PrintServers Use this Guide to install the following products: EPSX3 ver. 2 EtherFast 10/100 3-Port PrintServer PPSX1 ver.
COPYRIGHT & TRADEMARKS Copyright © 2002 Linksys, All Rights Reserved. Instant EtherFast is a registered trademark of Linksys. Microsoft, Windows, and the Windows logo are registered trademarks of Microsoft Corporation. All other trademarks and brand names are the property of their respective proprietors.
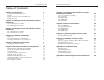
Instant EtherFast® Series EtherFast 10/100 PrintServers Table of Contents Chapter 1: Introduction The EtherFast 10/100 PrintServers Features Package Contents for the 3-Port PrintServer Package Contents 1 1 1 2 2 Chapter 2: Getting to Know the EtherFast 3-Port PrintServer The 3-Port PrintServer’s LEDs The 3-Port PrintServer’s Ports 3 3 4 Chapter 3: Getting to Know the EtherFast 1-Port PrintServer The 1-Port PrintServer’s LEDs The 1-Port PrintServer’s Ports 5 5 6 Chapter 4: Hardware Installation Overv
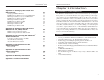
Instant EtherFast® Series EtherFast 10/100 PrintServers Chapter 1: Introduction Appendix C: Setting Up the TCP/IP and IPX Protocols Setting Up TCP/IP in Windows TCP/IP Setup for Windows 95, 98, and Millennium IPX Setup for Windows 95, 98, and Millennium TCP/IP Setup for Windows NT 4.0 IPX Setup for Windows NT 4.0 TCP/IP Setup for Windows 2000 IPX Setup for Windows 2000 IPX Setup for Windows XP TCP/IP Setup for Windows XP 57 57 58 58 59 59 60 60 61 61 Appendix D: Setting Up the LPR Port in Windows NT 4.
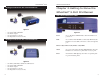
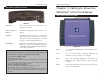
Instant EtherFast® Series Package Contents for the 3-Port PrintServer EtherFast 10/100 PrintServers Chapter 2: Getting to Know the EtherFast® 3-Port PrintServer The 3-Port PrintServer’s LEDs • • • • • Figure 1-1 One Linksys EtherFast® 10/100 3-Port PrintServer One Setup Utility CD-ROM One Power Adapter One User Guide (not shown) One Registration Card (not shown) Package Contents for the 1-Port PrintServer Figure 2-1 Power Green. The Power LED illuminates when the PrintServer is powered on.
Instant EtherFast® Series The 3-Port PrintServer’s Ports EtherFast 10/100 PrintServers Chapter 3: Getting to Know the EtherFast® 1-Port PrintServer The 1-Port PrintServer’s LEDs Figure 2-2 Power Port This port on the back of your unit connects your Switch’s power adapter. Printer 1, Printer 2, Printer 3 These three parallel (LPT) ports connect to your printers.
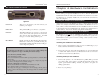
Instant EtherFast® Series The 1-Port PrintServer’s Ports EtherFast 10/100 PrintServers Chapter 4: Hardware Installation Overview Before starting your physical installation, be sure to find the PrintServer’s Default Name and Node Address. This information may be hard to access after the PrintServer is completely installed in your network and surrounded by wires and computers. Figure 3-2 Power Port This port on the back of your unit connects your Switch’s power adapter.
Instant EtherFast® Series Connecting the Power 1. Plug the power adapter cord into the PrintServer’s Power port on the back of the PrintServer. 2. Plug the power adapter into the wall. The PrintServer’s Power LED should light up green. EtherFast 10/100 PrintServers Chapter 5: Windows Driver Setup Installing the Windows Drivers 3. The Link or LAN LED will become active. If the LED does not light up, see “Appendix A: Troubleshooting” for more information.
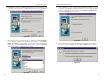
Instant EtherFast® Series 3. Click Next to accept the default Destination Directory, shown in Figure 5-3 (recommended). If you choose to utilize another directory, click the Browse button, and choose the appropriate directory. Then, click the Next button. EtherFast 10/100 PrintServers 5. Driver installation is now completed, but the Print Driver still needs to be configured. The PrintServer will not function properly until the Print Driver is configured.
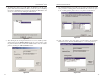
Instant EtherFast® Series 7. The Printer Port Setup screen will display the PrintServer and all of the printers with which it communicates. Here, you have the option of installing the printer by highlighting its description and clicking the Next button. You can also close this screen by clicking the Close button. EtherFast 10/100 PrintServers 9. The Add Printer Wizard screen will come up at this point. Follow the standard procedure for adding printers under Windows.
Instant EtherFast® Series 11. The Printer Port Setup screen will appear again, displaying the printers which are now communicating with the PrintServer. Click the Next button to add any more printers or Close to complete the installation and configuration procedure. EtherFast 10/100 PrintServers Chapter 6: Bi-Admin: PrintServer Management The PrintServer is managed by a utility program called Bi-Admin on the PrintServer CD.
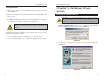
Instant EtherFast® Series EtherFast 10/100 PrintServers Using Bi-Admin Bi-Admin Using 2. When you see the screen shown in Figure 6-1, click the OK button. Obtaining Device Information: The Device Information Icon Figure 6-1 3. When the Bi-Admin program appears, it will automatically scan the network for available Linksys PrintServer hardware. Any hardware found on the network will appear in the Default Name, Device Name, and Printer Port categories on the right hand side of window.
Instant EtherFast® Series You can save this information to a text file by clicking the Save to Text button in the Device Information window and giving Bi-Admin the location to which the file should be saved. EtherFast 10/100 PrintServers Your PrintServer only shows as many parallel port icons as it has ports. For example, with this model, only two parallel port icons will show. Because Linksys PrintServers do not support serial printing, the serial port icon will always remain gray and inaccessible.
Instant EtherFast® Series Enabling and Disabling Protocols If you are not using multiple protocols on your network, you may want to disable one or more of the PrintServer’s internal protocols; this may help reduce unwanted network traffic. Important: Always leave at least one protocol enabled on the PrintServer. Disabling all protocols could leave you without a way to communicate with the unit. Unless you require TCP/IP to be disabled, leave it alone.
Instant EtherFast® Series Chapter 7: Configuring the PrintServer Using the Webbased Utility EtherFast 10/100 PrintServers The Server Page Accessing the Web-based Utility Use the following directions to utilize the PrintServer’s built-in Web-based Utility to configure your PrintServer. Open your web browser and type http:// followed by the PrintServer’s IP address in the browser’s Address box. Use the Bi-Admin software to find the IP address. Then, press the Enter key.
Instant EtherFast® Series The TCP/IP Page EtherFast 10/100 PrintServers The Status Page Figure 7-5 Click the TCP/IP tab to view or change the PrintServer’s TCP/IP values. If you are using DHCP to assign IP addresses, select DHCP Client. If you need to assign the PrintServer a Fixed IP Address (also known as Static IP Address), select this option and enter the appropriate values under Device IP Address, Gateway IP Address, and Subnet Mask.
Instant EtherFast® Series EtherFast 10/100 PrintServers Chapter 8: Advanced Properties The Advanced Properties section of the Web-based Utility is for users who have a thorough understanding of networks and network settings. Changing these settings can cause interruption of network communication and make the PrintServer cease functioning properly. To access the Advanced Properties, click the Advanced tab in the Web-based Utility.
Instant EtherFast® Series The Logical Printers Page Figure 8-2 Click the Logical Printers tab to view or change the PrintServer’s logical printer settings. For each Logical Printer, the following fields are available: Logical Printer(Port) Select the Logical Printer Port you wish to configure (L1 to L8). Click the Get Data button to update the display with the current data for the selected logical printer. Port Select the Printer Port used by the Logical printer.
Instant EtherFast® Series EtherFast 10/100 PrintServers Novell Printer Server for P3 NetWare print server to service the PrintServer's parallel port 3. The NetWare Page Print Server Mode NDS Tree Name (NDS mode only) The File Server's NDS tree name (root name). NDS Context (NDS context) Path to the NDS Context. This does not include the Context itself, and each OU should be separated by a period (e.g. department.company).
Instant EtherFast® Series The SNMP Page EtherFast 10/100 PrintServers Management Stations Station No. Select the Management station (1-4) and click the Get Data button to update the display for the selected item. IP Address Enter the management station’s IP Address, which has the SNMP program installed. Community This is a text field. Enter the name of the community, normally public or private. Access Select the desired level of access, Read-only, Read-Write, or Not Accessible.
Instant EtherFast® Series Chapter 9: Internet Protocol (IPP) Printing EtherFast 10/100 PrintServers IPP Client Configuration for Windows 95, 98, Millennium, and NT 4.0 1. Run the Add IPP Port program entry created by the installation. A screen like the one shown in Figure 8-1 will be displayed. IPP (Internet Printing Protocol) is a new standards-based system to allow remote printing from a PC to any accessible printer.
Instant EtherFast® Series 5. Click Save to create the IPP port on your system. You will see a message confirming that the port has been created and then Figure 8-2. EtherFast 10/100 PrintServers 3. Click the Port Settings or Configure Port button (Details or Port tab, depending on your version of Windows). The Configure IPP Port screen (shown in Figure 8-3) will appear. Figure 9-2 6. Perform one of these steps. Select an existing printer to use the new port, and click OK.
Instant EtherFast® Series IPP Client Setup for Windows 2000 and XP Windows 2000 and XP have their own IPP Client, and there is no need to install the supplied IPP Client Software. To use this IPP Client with the PrintServer, follow this procedure: EtherFast 10/100 PrintServers 4. If the connection can be established, and the printer on that port is online, the dialog box shown in Figure 8-5 will be displayed. This screen notifies you that the printer driver is not installed. Click the OK button. 1.
Instant EtherFast® Series Chapter 10: NetWare Services Setup Overview The PrintServer provides fully functional printing services in NetWare 5.x, 4.x, and 3.x network environments. The PrintServer communicates through the TCP/IP (for NetWare 5.x) and IPX/SPX protocols, which are built into the NetWare operating system software. This section explains how to configure your computers to print from the PrintServer in a NetWare 5.x, 4.x or 3.x environment.
Instant EtherFast® Series To enable printing from the PrintServer on a pure IP NetWare 5.x network: • • • First, create an NDPS Manager on your server. This only needs to be done once, even if you create more than one NDPS printer. Create NDPS printers with NetWare Administrator. Configure Public Access Printers for your computers to print from. EtherFast 10/100 PrintServers 7. Click the button that looks like three dots beside the Resident Server field.
Instant EtherFast® Series 6. Select the available printer. If your printer is not available, select None. 7. Select Remote (LPR on IP) in the “Connection Type” field. EtherFast 10/100 PrintServers IPX Printing in NetWare 5.x, 4.x and 3.x Print Server Mode 8. Click the Next button. Type the IP address assigned to the PrintServer. In the “Printer Name” field, give your printer a name, e.g., L1. 9. Click the Finish button. A window will appear, asking you to select drivers. 10.
Instant EtherFast® Series This example installs the PrintServer SC0C8A02 as a NetWare PrintServer in the current location. The PrintServer’s default name is now "PS," and “epson” is the name for the first printer queue. Remote Printer Mode The instructions below configure the PrintServer for Remote Printer Mode, and establish communication between it and your NetWare 4.x network.
Instant EtherFast® Series NetWare Printing Issues 1. The PrintServer prints garbage. • Print a diagnostic file using PSCONFIG or Bi-Admin program. a. Run PSCONFIG and select your PrintServer from the list. Then, select Print Diagnostic Report b. Select each port in turn and print a diagnostic report. c. Check to see if the diagnostic report printed. If the diagnostic report printed, the problem may be caused by incorrect system configuration. Go to the next step.
Instant EtherFast® Series • Make sure the master file server name is assigned correctly. • Check the Current Status of Your_File_Server: Connected: No action required No file server: Assign a master file server using PSCONFIG or Bi-Admin Connecting to Server: Wait and check if the file server exists Password Mismatch Clear the NetWare password with PCONSOLE, or set the correct password for the PrintServer using PSCONFIG or Bi-Admin.
Instant EtherFast® Series b. Enable the PrintServer's frame type to the frame type that the master file server uses and disable all other frame types. 9. I cannot receive “Notify message” in the NetWare 4.x environment. • Make sure you are a Notify member of the PrintServer. • Run NetAdmin and set the name of the Default Server to receive notification. 10. I cannot use PCONSOLE or Bi-Admin to see Printer Status or the current server status in PrintServer Information is showing Down in the NetWare 4.
Instant EtherFast® Series h. If the printer is connected and powered On, the printer icon should no longer be grayed out, and you should be able to print. 3. I connected and configured a WPS (Windows Printing System) printer as described, but I can't get the print job to print. • WPS printer drivers poll the printer before sending print data. Since the printer is networked, the printer is not found and no data is sent. The solution is to add your printer as a network printer as described in Issue Two.
Instant EtherFast® Series Appendix B: DHCP Support for the PrintServer EtherFast 10/100 PrintServers Appendix C: Setting Up The T C P/IP and IPX Protocols Setting Up TCP/IP in Windows To use DHCP, which assigns non-static IP addresses, you must have a DHCP server. Otherwise, the PrintServer's IP address will remain unknown and connecting to it will impossible. In this case, ignore DHCP and configure the PrintServer for a static IP address. DHCP is enabled by default.
Instant EtherFast® Series TCP/IP Setup for Windows 95, 98, and Millennium The following instructions are provided as examples for reference only. For complete instructions on installing and troubleshooting TCP/IP and IPX, consult your Windows operating system documentation. 1. Click the Start button, select Settings, and open the Control Panel. Inside the Control Panel, double-click the Network icon. 2. If the TCP/IP Protocol is listed for your network adapter, go to step four.
Instant EtherFast® Series 2. When the Network window appears, click the Protocols tab. Then, click the Add button. 4. Select NWLink IPX/SPX/NetBIOS Compatible Transport Protocol from the list and click the OK button. 3. Find the IPX/SPX protocol in the Select Network Protocol field. Click on it once and click the OK button. 5. When the Network window reappears, click the OK button. Restart your computer. NWLink IPX/SPX/NetBIOS Compatible Transport Protocol has now been successfully installed.
Instant EtherFast® Series EtherFast 10/100 PrintServers Appendix D: Setting Up the LPR Port in Windows NT 4.0, 2000, and XP Standard TCP/IP Print Port Setup in Windows 2000 and XP LPR Port Setup in Windows NT 4.0 3. Click the Ports tab. To use the Windows NT 4.0 LPR port as an alternative to the EtherFast PrintServer port, complete the following procedure. 4. Click the Add Port... Button. 1. Click the Start button, select Printers and choose Faxes. 2. Right click on the printer you want to set up.
Instant EtherFast® Series Appendix E: Tips on Using the EtherFast 10/100 PrintServer Connecting to Other Switches and Hubs A switch, hub, or similar device is connected to the LAN port with regular UTP Category 5 cabling. Connect one end of the cable to the LAN port, then connect the other end to an uplink port on your hub or other device. Linksys does not provide any technical support for connections made with crossover cables.
Instant EtherFast® Series Please be aware that although Linksys provides instructions for the setup of the TCP/IP protocol, these instructions are provided for reference only. Linksys will not provide technical support for the configuration and troubleshooting of the TCP/IP protocol. For full instructions on using TCP/IP, consult your operating system’s documentation.
Instant EtherFast® Series Appendix G: Specifications for the 1-Port PrintServer Appendix H: Warranty Information Model Number Standards Protocol Topology Ports BE SURE TO HAVE YOUR PROOF OF PURCHASE AND A BARCODE FROM THE PRODUCT'S PACKAGING ON HAND WHEN CALLING. RETURN REQUESTS CANNOT BE PROCESSED WITHOUT PROOF OF PURCHASE. Port Speed (Mbps) Memory Cabling Type LEDs Button PPSX1 ver. 2 IEEE 802.3, IEEE 802.
Instant EtherFast® Series Appendix I: Contact Information For help with the installation or operation of this product, contact Linksys Technical Support at one of the phone numbers or Internet addresses below. Sales Information Technical Support RMA Issues Fax Email Web FTP Site 800-546-5797 (LINKSYS) 800-326-7114 949-271-5461 949-265-6655 support@linksys.com http://www.linksys.com ftp.linksys.
http://www.linksys.com © Copyright 2002 Linksys, All Rights Reserved.