Instant EtherFast® Series ® EtherFast 10/100 LAN Card Use this guide to install: LNE100TX ver.
COPYRIGHT & TRADEMARKS Copyright © 2001 Linksys, All Rights Reserved. EtherFast is a registered trademark of Linksys. Microsoft, Windows, and the Windows logo are registered trademarks of Microsoft Corporation. All other trademarks and brand names are the property of their respective proprietors.
Linksys Instant EtherFast® Series EtherFast® 10/100 LAN Cards Table of Contents Introduction The EtherFast® 10/100 LAN Card Features Package Contents for the EtherFast® 10/100 LAN Card 1 1 1 2 Getting to Know the EtherFast 10/100 LAN Card LEDs The RJ-45 Port 3 3 3 Installing the EtherFast® 10/100 LAN Card Overview Installing the Network Card and Cabling 4 4 4 Windows 95 Installation and Setup Overview Network Component Configuration 7 7 11 Windows 98 Installation and Setup Overview Installing the
Linksys Instant EtherFast® Series Introduction EtherFast® 10/100 LAN Cards Package Contents for the EtherFast® 10/100 LAN Card The EtherFast® 10/100 LAN Card Fast Ethernet is a relatively new standard of networking built specifically for speed-intensive network applications like video-conferencing, multimedia development, imaging, and complex databases.
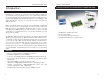
Linksys Instant EtherFast® Series Getting to Know the EtherFast® 10/100 LAN Card EtherFast® 10/100 LAN Cards Installing the EtherFast® 10/100 LAN Card Overview Each EtherFast® 10/100 LAN Card is equipped with an RJ-45 port that automatically adjusts to either 10Mbps or 100Mbps speeds, allowing your PC to attach to either Fast Ethernet (also known as 100BaseTX) or regular 10BaseT Ethernet network segments without additional hardware or software. LEDs 100 Amber.
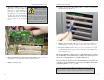
Linksys Instant EtherFast® Series 3. Open your computer and locate the PCI slot(s) on your motherboard. PCI slots are easily identified by their beige or white color. Remove the metal slot cover on the back of the PC, then insert the EtherFast® 10/100 LAN Card into an empty PCI slot, as shown in the photograph below. Note: When installing the network card, be sure to press the card solidly into the PCI slot.
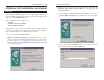
Linksys Instant EtherFast® Series Windows 95 Installation and Setup Overview After installing the EtherFast hardware in your computer, follow these instructions for installing the network device driver. For troubleshooting tips during setup, refer to the Troubleshooting section. EtherFast® 10/100 LAN Cards 3. While the Update Device Driver Wizard window is visible, put the EtherFast® 10/100 LAN Card Driver Disk into your floppy drive and click the Next button. 4.
Linksys Instant EtherFast® Series 6. Windows will show that the files have been found. Click the Finish button to continue. Then, when you are prompted, verify that the “Linksys LNE100TX (v5) Fast Ethernet Adapter Drivers” diskette is in your floppy drive. EtherFast® 10/100 LAN Cards 8. The following screen will prompt you for the driver location. In the Copy Files From: field, type A:\WIN95. Then, click the OK button. 9. Windows 95 will begin copying files to your PC.
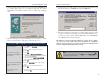
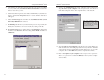
Linksys Instant EtherFast® Series 3. Click the File and Print Sharing button. The Note: If you do not enable File and Printer Sharing, File and Print Sharing window will appear. Network Component Configuration 1. Once you are back at the Windows 95 desktop, click on your taskbar's Start button, then Settings, then Control Panel, and then double-click the Network icon.
Linksys Instant EtherFast® Series 6. After making sure that all of the listed network components are installed on your system, verify that Client for Microsoft Networks is listed in the Primary Network Logon box. EtherFast® 10/100 LAN Cards 11. Click on the Identification tab and the following window will appear. Type the name of your computer in the Computer Name box. Choose a name that is unique from the other computer names on the network. 7.
Linksys Instant EtherFast® Series 14. The Access Control tab should be set at Shared-level access control. Make sure that Shared-level access control is selected. If the setting is on UserLevel access control and you can’t change it, skip to the Troubleshooting section. EtherFast® 10/100 LAN Cards 17. A Logon window will appear, requiring you to enter a username and password. Make up a username and password and click the OK button.
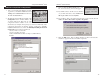
Linksys Instant EtherFast® Series Windows 98 Installation and Setup EtherFast® 10/100 LAN Cards 4. Select "Search for the best driver for your device (Recommended)” and click the Next button. Overview After physically installing the EtherFast® 10/100 LAN Card in your computer, follow these instructions to install the network device driver. The installation procedure for the network driver will vary depending on which version of Windows 98 you are using, and on your current system configuration.
Linksys Instant EtherFast® Series 6. A window will open, notifying you that Windows is searching for the Linksys LNE100TX Fast Ethernet Adapter driver. When the window notifies you that it is ready to install the driver, click the Next button. 7. Windows will begin copying the EtherFast Card’s driver files to your PC. Refer to the chart below to help guide you through the process.
Linksys Instant EtherFast® Series EtherFast® 10/100 LAN Cards Network Component Configuration 3. Click the File and Print Sharing button. The File and Print Sharing window will appear. 1. Once you are back at the Windows 98 desktop, click on your taskbar's Start button, then Settings, then Control Panel, and then double-click the Network icon. 4a. If you'd like others to be able to access the files on your PC's hard drive, select I want to be able to give others access to my files. 2.
Linksys Instant EtherFast® Series 6. After ensuring that all of the listed network components are installed on your system, in the Primary Network Logon box select Client for Microsoft Networks . EtherFast® 10/100 LAN Cards 10. Choose the Access Control tab. Verify that Shared-level access control is selected. Note: Your Computer and Workgroup Names must both be fewer than 15 characters, and should only consist only of numbers and letters. 7. Click on the Identification tab.
Linksys Instant EtherFast® Series EtherFast® 10/100 LAN Cards 13. A Logon window will appear, requiring you to enter a User name and Password. Make up a user name and password (if you haven’t already) and click the OK button. Do not click the Cancel button or press the Escape key. Clicking either of these buttons will prevent you from logging into the network. If the logon does not appear or if it does not allow you to log on, refer to the Troubleshooting section.
Linksys Instant EtherFast® Series 5. Select "Search for the best driver for your device (Recommended)” and select "Specify a location". Then, type “A:\WINME” in the drop-down box and click the Next button. EtherFast® 10/100 LAN Cards 8. If Windows asks you to supply any drivers beginning with “lne” or “netlne”, re-direct Windows to your floppy drive (A:\WINME). 9. Windows will finish installing the software onto your PC. Click the Finish button. 6.
Linksys Instant EtherFast® Series EtherFast® 10/100 LAN Cards Network Component Configuration 3. Click the File and Print Sharing button. The File and Print Sharing window will appear. 1. Once you are back at the Windows Millennium desktop, click on your taskbar's Start button, then Settings, then Control Panel, and then doubleclick the Network icon. 4a. If you'd like others to be able to access the files on your PC's hard drive, select I want to be able to give others access to my files. 2.
Linksys Instant EtherFast® Series 6. After ensuring that all of the listed network components are installed on your system, in the Primary Network Logon box select Client for Microsoft Networks . EtherFast® 10/100 LAN Cards 9. Enter a description of your computer in the Computer Description box. This box is optional, and can be left blank. 10. Choose the Access Control tab. Ensure that Shared-level access control is selected. 7. Click on the Identification tab.
Linksys Instant EtherFast® Series 13. A Logon window will appear, requiring you to enter a User name and Password. Make up a user name and password (if you haven’t already) and click the OK button. Do not click the Cancel button or press the Escape key. Clicking either of these buttons will prevent you from logging into the network. If the logon does not appear or if it does not allow you to log on, refer to the Troubleshooting section. 14.
Linksys Instant EtherFast® Series Installing NT Networking and the EtherFast Card Driver EtherFast® 10/100 LAN Cards 4. At the Select Network Adapter screen, click the Have Disk button and insert the EtherFast® 10/100 LAN Card Driver Disk into drive A. 1. After clicking on the Yes button, the Network Setup Wizard window will appear. 2. When the screen below appears, put a checkmark next to Wired to the network and then click the Next button. 5.
Linksys Instant EtherFast® Series 6. Highlight the Linksys LNE100TX(v5) Fast Ethernet Adapter entry in the window that appears and click the OK button. EtherFast® 10/100 LAN Cards 7. Make sure there is a check mark beside TCP/IP Protocol X(v5) Fast Ethernet Adapter. Uncheck any others that may be checked and then click the Next button to continue. Note: If you install the TCP/IP protocol, refer to your Windows NT documentation when installation steps that aren’t listed in this User Guide appear.
Linksys Instant EtherFast® Series 10. NT will ask you to choose a media type for the EtherFast card. Choose AutoSense. You can change these settings later if needed. Then, click the Continue button. EtherFast® 10/100 LAN Cards 12. When you reach the following screen, choose either Workgroup or Domain, depending on the type of network you're setting up. (Your Microsoft documentation explains the difference between Workgroups and Domains.) Click the Next button to continue. 11.
Linksys Instant EtherFast® Series Installing the EtherFast Network Driver if Networking is Already Installed EtherFast® 10/100 LAN Cards 3. When the list of available network adapters appears, click the Have Disk button. The following steps are for NT PCs that have networking already installed according to the Windows NT documentation. If you have not already installed networking onto your NT PC, please refer to your Windows documentation.
Linksys Instant EtherFast® Series 5. Highlight the Linksys LNE100TX(v5) Fast Ethernet Adapter entry in the window that appears. Then, click the OK button. EtherFast® 10/100 LAN Cards 10. Remove your Driver Disk and CD-ROM and click the Yes button to restart your PC. 11. Once your PC has rebooted, double-click the Network Neighborhood icon on your desktop. Make sure that you have access to the network. If you do, your card has been properly installed. 6. When NT asks you for the media type.
Linksys Instant EtherFast® Series Windows 2000 Installation and Setup EtherFast® 10/100 LAN Cards 3. The Install Hardware Device Drivers dialog box will appear. When Ethernet Controller is displayed, select Search for a suitable driver for my device (Recommended) and click the Next button. Overview After physically installing the EtherFast® 10/100 LAN Card in your computer, follow these instructions to install the network device driver.
Linksys Instant EtherFast® Series EtherFast® 10/100 LAN Cards 5. When the Found New Hardware Wizard box appears, insert the “Linksys LNE100TX (v5) Fast Ethernet Adapter Drivers” diskette into your floppy drive. In the “Copy manufacturer’s files from“ field, type “A:\WIN2000” and click the OK button 7. The Completing the Found New Hardware Wizard dialog box will appear. Click the Finish button to complete the installation. 6. The Driver File Search Results dialog box will appear.
Linksys Instant EtherFast® Series Troubleshooting Troubleshooting hints for Windows can be found below. If you are using Windows NT, NetWare, or another network operating system, skip to the Card Diagnostics instructions in this section. Common Problems and Solutions 1. Windows doesn’t detect new hardware with the EtherFast Card hardware installed, or it continues to detect the card each time you restart your PC.
Linksys Instant EtherFast® Series 9. You receive DHCP Errors in Windows. • If you are connecting to a DHCP server, check your cabling and connection. If you require TCP/IP to be configured, check with your network administrator or your Windows documentation for proper settings. • If you don’t have a DHCP server on your network and your network setup doesn’t require TCP/IP, you may remove the TCP/IP component from Windows’ networking.
Linksys Instant EtherFast® Series Running the Card’s Diagnostics If you suspect that there may be a problem with the Fast Ethernet Card, or if you need to identify the card’s MAC address, you can use the DIAG diagnostic program on the EtherFast® 10/100 LAN Card Driver Disk. To run the program, start up your computer in DOS. The program only works in standard “real DOS mode” DOS – it will not work in a Windows DOS window. To get into “real DOS mode,” do the following: • In Windows 95, start your computer.
Linksys Instant EtherFast® Series 6. If you want to assign access passwords, type the passwords into the Password boxes. 7. When you're done, click on the Apply button, followed by the OK button. Repeat steps 1-7 for any drive or folder you desire to share on the network. EtherFast® 10/100 LAN Cards Installing the Driver in Windows 95 Version A 1. Windows 95 will detect the EtherFast card and display a New Hardware Found window. You have successfully enabled File Sharing on your PC.
Linksys Instant EtherFast® Series EtherFast® 10/100 LAN Cards Novell NetWare 3.x Client Setup for Windows 95 or 98 Windows 95, 98 or ME Client for Windows NT The instructions below explain how to set up the regular Novell NetWare 3.x client for use on a Windows 98 or 95 PC. If you are installing NetWare’s Client32 software instead, follow the instructions in that chapter .
Linksys Instant EtherFast® Series 3. Optional: Click on the Access Control tab. Make sure that Share-level access control is selected; do not choose User-level access control. If Access Control is grayed out and cannot be selected, refer to the Troubleshooting section. 4. When you’re done, click OK. When asked if you want to restart your PC, choose to do so. The NT portion of the Windows setup is complete.
Linksys Instant EtherFast® Series 5. For PCs with Dial-Up Networking and/or an AOL adapter, remove any instance of the name Linksys, all IPX/SPX protocols, all NetBEUI, all Clients, and File and Printer Sharing for Microsoft Networks. Do not remove Dial-Up Adapter, AOL Adapter, TCP/IP-Compatible Protocol-AOL Adapter or TCP/IP-Compatible Protocol-Dial-Up Adapter. EtherFast® 10/100 LAN Cards 11. Remove all devices with the name Linksys in its description.
Linksys Instant EtherFast® Series 5. Right-click on LNE100TX Fast Ethernet Adapter. The following menu box should open. EtherFast® 10/100 LAN Cards 9. The Network Adapters category should be removed from the Device Manager listing. 10. Click the OK button, and restart your computer. Manually Installing the Network Components in Windows 95, 98 and ME There may be times when you will need to manually install missing Windows networking components. 1. Click on Start, Settings, then Control Panel. 2.
Linksys Instant EtherFast® Series IPX/SPX-compatible Protocol Click the Add button. Choose Protocol and click the Add button. Select Manufacturer and choose Microsoft. Under the Network Protocol box, highlight IPX/SPX-compatible protocol. Click OK .The computer will begin copying files to your system. When the installation is complete, you will be asked if you want to reboot. Click OK. NetBEUI Click the Add button. Select Protocol, then click Add. Under Manufacturer, highlight Microsoft.
Linksys Instant EtherFast® Series 5. Repeat steps two through four to install other protocols such as NetBEUI or IPX/SPX. From the screen in step two, you can also press the Properties button. From this screen, you can verify that the drivers are working under Enhanced Mode on the Driver Type tab or reconfigure the card on the Advanced tab. At this point, you must restart your computer. Installation is complete.
Linksys Instant EtherFast® Series Glossary CPU (Central Processing Unit) - The computing part of the computer. Also called the "processor," it is made up of the control unit and ALU. 10BaseT - An Ethernet standard that uses twisted wire pairs. CSMA/CD (Carrier Sense Multiple Access/Collision Detection) - The LAN access method used in Ethernet. When a device wants to gain access to the network, it checks to see if the network is quiet (senses the carrier).
Linksys Instant EtherFast® Series Hub - The device that serves as the central location for attaching wires from workstations. Can be passive, where there is no amplification of the signals; or active, where the hubs are used like repeaters to provide an extension of the cable that connects to a workstation. IEEE - The Institute of Electrical and Electronics Engineers.
Linksys Instant EtherFast® Series Software - Instructions for the computer. A series of instructions that performs a particular task is called a "program." The two major categories of software are "system software" and "application software." System software is made up of control programs such as the operating system and database management system (DBMS). Application software is any program that processes data for the user.
Linksys Instant EtherFast® Series EtherFast® 10/100 LAN Cards Warranty Information Contact Information BE SURE TO HAVE YOUR PROOF OF PURCHASE AND A BARCODE FROM THE PRODUCT'S PACKAGING ON HAND WHEN CALLING. RETURN REQUESTS CANNOT BE PROCESSED WITHOUT PROOF OF PURCHASE. For help with the installation or operation of this product, contact Linksys Customer Support at one of the phone numbers or Internet addresses below.
h t t p : / / w w w. l i n k s y s . c o m © Copyright 2001 Linksys, All Rights Reserved. Printed in the USA.