
Quick Start Manual

EEtthheerrFFaasstt
®®
CCaabbllee
MMooddeemm
wwiitthh UUSSBB aanndd
EEtthheerrnneett CCoonnnneeccttiioonn
Instant Broadband™
BEFCMU10 ver. 2
System Requirements
• Windows 98, Me, 2000, or XP equipped
with USB port (to use the USB connection)
and a CD-ROM drive
or
• PC with 10/100 Network Adapter with RJ-
45 Connection
• DOCSIS 1.0 Compliant MSO Network
(Cable Internet Service Provider) and an
Activated Account
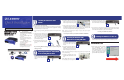
Package Contents
• One EtherFast
®
Cable Modem with USB
and Ethernet Connection (1)
• One Power Adapter (2)
• One USB Cable (3)
• One Ethernet (RJ-45 CAT5 UTP) Cable (4)
• One Setup CD-ROM with User Guide (5)
• One Registration Card (not shown)
B. Connect the other end of the Ethernet
Cable to the RJ-45 port on your PC’s
Ethernet adapter or networking device.
C. With your PC turned off, connect the
included power adapter to the Power Port on the back of the Cable Modem. Plug
the other end of the power cord into a standard electrical outlet. The Power LED
on the front of the Cable Modem should light up and remain on.
Note: Always use the included power adapter. Using any other power adapter
could cause product damage.
Go to Step 5 to activate your account and finish the installation.
A. With your PC turned off, connect the
included power adapter to the Power
Port on the back of the Cable
Modem.
B. Plug the other end of the adapter into a
standard electrical wall socket. The
Power LED on the front of the Cable
Modem should light up and remain on.
Note: Always use the included power adapter. Using any other power adapter could
cause product damage.
C. Connect the rectangular end of the
included USB cable to the PC’s USB
Port.
Note: Multiple USB Ports may be locat-
ed on the front, side, or back of your PC.
D. Connect the square end of the includ-
ed USB cable to the USB port on the
back of the EtherFast
®
Cable Modem.
E. Turn on your PC. During the boot up process, your computer should recognize
the device and ask for the driver installation for your Windows software. Make
sure to follow the instructions for your version of Windows.
Go to Step 4 to install the USB driver.
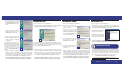
Follow the instructions for the version of Windows that is installed on your PC.
A. After you start up your PC, Windows
will automatically detect the
EtherFast
®
Cable Modem if it has
been connected properly. The Add
New Hardware Wizard screen will
appear. Insert the Setup CD into
your CD-ROM drive. Click Next.
Make sure that your PC is turned off.
A. Make sure that you have TCP/IP installed on your computer. If you don’t know
what TCP/IP is or you don’t have it installed, refer to “Appendix B: Installing
the TCP/IP Protocol” in the User Guide.
B. If you are replacing an existing cable modem, disconnect it from your PC at this
time.
C. Connect the coaxial cable from your
ISP/Cable Company to the Cable Port
on the back of the Cable Modem.
Connect the other end of the coaxial
cable in the manner prescribed by
your ISP/Cable Company.
D. Determine which cable type you will
use to connect your Cable Modem to
your PC.
Ethernet Cable USB Cable
If you are using Ethernet Cable, go to Step 2. If you are using USB
Cable, go to Step 3.
A. Connect one end of the included
Ethernet (UTP CAT5) Cable to the
LAN port on the back of the Cable
Modem.
Continued on Back
B
This Quick Installation is meant to help you install theCable Modem quickly and easily. For detailed instruc-
tions on installation and configuration and further setup options, please consult the User Guide
Installing the EtherFast
®
Cable
Modem
C
C
Installing the USB Driver on Your PC
Windows 98
A
Connecting the EtherFast
®
Cable Modem
to Your PC Using Ethernet Cable
Connecting the EtherFast
®
Cable
Modem to Your PC Using USB Cable
A
D
1
2
34
5
A
D