
Installation Guide

Function
The LED light will switch on during twilight or darkness when the motion detector
detects infrared radiation given off by people passing by.
User can turn the control knob TIME to adjust the duration of the illumination from approx. 3 seconds to 7
minutes (+/-10%).
User can turn the control knob LUX to adjust the daylight level at which to activate the motion detector.
Note: Once the light is activated by the motion detector, any subsequent detection will restart the timed
period again from the beginning.
Note: The motion detector responds to heat radiation. When outdoor temperatures are low, it is more
sensitive to body heat than when outdoor temperatures are warm.
Note: If the light is not activating during nighttime, a street light, house light or other ambient light could
be affecting activation. Turn the control knob LUX towards position to increase the daylight level. If
the light is unnecessarily activating in daytime, turn the control knob LUX towards position to
decrease the daylight level.
Note: Regularly clean the motion detector to ensure proper functionality (refer to “Cleaning and Care“).
Installation
When selecting the mounting location, pay attention to the following:
Note: The included mounting material is suitable for solid concrete or masonry construction. Other wall
substrates may require additional fastening materials.
Note: An electric drill is required
CAUTION! RISK OF INJURY! Please read the operating instructions for your drill.
CAUTION! Ensure that you do not damage any electrical cables in the wall or ceiling.
1. To choose the mounting location, make sure the LED light illuminates the desired area and that the
product will not be directly exposed to rain.
2. Depending on the mounting height (roughly at 6.5ft) the motion detector has a detection range of max.
32.8ft with a detection angle of 140°.
3. Be sure the motion detector is not illuminated by street lighting at night. This can influence the light.
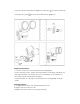
4. Loosen the screw
1
on the bottom of the main unit with a suitable cross-head screwdriver. Remove
the mounting plate
2
from the back of the product
5. Use the holes on the mounting plate
2
intended for the screws to mark the positions for drilling.
6. Drill two holes on the mounting location, insert wall plugs and fix the mounting plate
2
with screws.
7 . Loosen the clip on the battery cover
3
to remove it from the main unit.
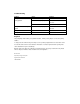
8. Insert three AA batteries to the battery compartment inside in correct direction. The correct polarity is
shown in the battery compartment.
9. Put back the battery cover and close it.
10. Press the main unit onto the plate and fix it by the screw
1
.
11. Turn the control knob TIME to adjust the duration of the illumination. The lighting duration can be
adjusted from approx. 3 seconds to 7 minutes (+/-10%).