
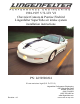
Owner manual
Parts List
# PartNumber Description
1 LN0041_001 LPE plastic air intake tube
1 L660010493 LPE high ow air lter with hose clamp
1 LN0041_005 plastic block-off plate
3 AV14010 plastic fasteners
4 6483 hook and loop tape, inches
(used for Firebird installations only)
1 EO decal
1 LPE decal
1 Installation instructions
Recommended Tools
• blade type/athead screwdriver
• Phillips-head screwdriver (for Firebird installations only)
• 5/16" socket
• 8 mm socket
• 10 mm socket
• ratchet
• petroleum jelly or similar lubricant
• electric drill
• 5/16" drill bit
Optional Items
• LPE air lter service kit (SB-88-0005)
• Replacement air lter (L660010493)
Page 1 of 4
Instructions:
• Read instructions completely before beginning installation.
• Installation should take less than one hour with the proper tools.
• As you remove the stock components, pay careful attention to how things were attached or located.
In many cases, the components will be reinstalled in the same way as they were removed.
• Set parking brake and open hood. If you have been using the car, allow it to cool before beginning
installation.
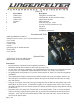
• The original plastic intake is mounted to the radiator shroud with a two piece plastic fastener. Pry
the center piece out with the screwdriver and the other part of the fastener should come out easily.
Save this fastener.
• Using the screwdriver, loosen the worm-gear clamps near the air lter box and on both sides of the
MAF (Mass Air Flow sensor). It should take roughly six (6) complete turns of the screw to loosen
the clamps enough (make sure that the threads are catching and loosening the clamp and not backing
out the screw).
• Disconnect the A.I.R. pump hose from the back of the original intake. To do so, loosen the plastic
collar by carefully prying under the plastic tabs (pry between the bottom and second from the bot-
tom parts). After you have loosened the plastic collar, slip it down the tube. Now work the tube
loose from the plastic intake.