Lingenfelter 2005-2006 Pontiac GTO High Flow Air Intake Installation Instructions L650060505 1557 Winchester Road Decatur, IN 46733 260-724-2552 260-724-8761 FAX www.lingenfelter.
Parts List # 1 1 1 3 1 8 4 8 1 1 1 1 1 1 1 Part Number LN-GTO-AB-05 L660060505 AV15330 12335 A143 23-923X KP82440 47392 47213 XX09112-0001 XX09531-0005 XX09531-0002A XX09531-0001 1402 Description Airbox wall piece Air filter with hose clamp M6 x 1 flange nut Airbox seal, 15-1/2” Cable tie, black M5 X 0.8 X 16, stainless button head M5 stainless steel flat washers M5 stainless steel Nylock nuts Airbox bracket #1 Airbox bracket #2 Airbox flange Tube assembly, 4.
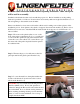
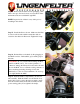
Read the entire instruction manual before beginning installation. Some stock parts will be used in reassembly. Installation should take less than one hour with the proper tools. Before installation, set the parking brake and open the hood of the car. If car has been used recently, make sure engine has had time to cool before beginning to disassemble stock air intake. Please note that the hood was removed from the vehicle used for taking some of these pictures of the installation process.
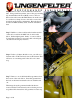
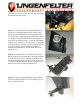
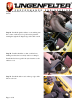
Step 4 - Remove valve cover breather tube from the air tube. Using a small screwdriver, remove the grey retaining clip from the Mass Air Flow (MAF) sensor connector. Press tab and disconnect the MAF harness from the sensor. Loosen the hose clamp closest to the airbox, remove the air tube from the engine compartment. Place the factory air tube and MAF assembly aside, it will be reinstalled later.
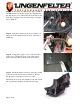
Step 8 - The smooth rounded side of the new air box piece will be referred to as the backside. The front side is the side that faces the engine. Step 9 - Locate the 4.0” tube assembly with the flange welded to it. Push it through from the outside of the airbox. The weld should be towards the outside of the box (engine side). Align the cutout in the flange with the “U” shaped cutout of the airbox. Insert the four button head screws from the front side.
Step 12 - If the vehicle is a 2005 model, skip to STEP 15. On 2006 model year vehicles, inspect the aluminum AC line that travels on top of the frame rail in the airbox area. If the line is straight, as shown in the image to the right, skip to STEP 15. Step 13 - If the line is shaped as shown (see image), you must remove the small perforated section of the air box (STEP 14). Step 14 - Using pliers, grasp a corner of the perforated section.
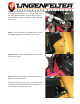
Step 16 - If your vehicle has a wiring harness as shown in the image, use a fork type pry tool or equivalent to free the wiring harness from the vertical radiator support beam. The airbox will rest against the support beam at this location. Step 17 - Now install the box by tilting the front downward while moving it towards the front of the car. Step 18 - Make sure this harness routes to the inside of the airbox as shown. Step 19 - The Torx head will push into the grommet on the inside of the fenderwell.
Step 20 - Now, install the supplied black plastic push-in fastener to secure the bottom. This should line up with an existing hole in the body. Install the fastener in the hole with the center locking pin not pressed in and then once the fasteners is in place, press down on the center locking pin to secure the fastener. On this type of threaded locking fastener, the screw is only used when removing the locking pin (not when installing).
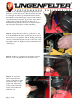
Step 24 - Remove the air filter from its packaging. This filter comes pre-oiled and is ready to be installed. Filter maintenance kits are available through LPE. NOTE: Inspect inside of filter for any debris prior to installing in the vehicle. Step 25 - Install the filter as shown. Make sure the filter is sealed on the air tube with the metal tube fully inserted into the rubber air filter neck. Tighten the clamp. Step 26 - Reinstall the stock airtube by first plugging in the MAF connector.
Step 28 - Reinstall the valve cover breather tube to the airtube. Step 29 - Install the plastic radiator cover, making sure the coolant overflow hose is positioned as pictured, running through the U-shaped edge of the airbox wall. Step 30 - Double check the coolant overflow hose, making sure that it moves freely and is not crimped. Install the five factory push lock style fasteners to the radiator cover. Step 31 - Install the airbox seal on the top edge of the airbox as shown.
Step 32 - Start the vehicle and check to make sure everything is running properly. Close the hood and release the parking brake. Congratulations - you have completed the installation of your LPE air intake. Filter service - A filter service kit is available from LPE for cleaning and re-oiling the air filter (part number SB-88-0005). The correct amount of oil for this filter element is 21 grams (0.74 ounces) of oil. Replacement filters are also available from LPE (filter part number L660060505).