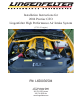
Installation Instructions for 2004 Pontiac GTO Lingenfelter High Performance Air Intake System (5.7L LS1 engine) PN: L650030504 1557 Winchester Road Decatur, Indiana 46733 260 724 2552 phone 260 724 8761 fax www.lingenfelter.
Quantity Part Number 1 LN-GTO-AB 1 LPE-01-WIRE-110 1 L660030504 1 50-350-188-110 1 EST-0653-26012 1 AV15330 3 12335 A143 1 53990110 4 53980100 1 23-923X 4 KP82440 4 47392 8 47213 1 XX09112-0001 1 XX09112-0002-A 1 XX09112-0004-B 1 XX09112-0005 1 1402 20” 1778 2” 1784 1 L920010000 1 Recommended Tools: • small flathead screwdriver • fork type pry tool or equivalent • T-30 Torx head screwdriver • 3 mm Allen wrench • ratchet • 10 mm socket / wrench • 8 mm so
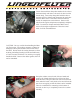
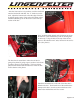
Read the entire instruction manual before beginning installation. Some stock parts will be used in reassembly. Installation should take less than one hour with the proper tools. Before installation set the parking brake and open the hood of the car. If car has been used recently you may want to make sure the engine has had time to cool before beginning installation. First remove the plastic radiator cover on the front of the engine compartment using a flathead screwdriver and a pry tool.
Loosen the metal hose clamp that attaches the air tube to the throttle body and remove the stock air tube from the throttle body. Loosen the clamp that holds the tube to the Mass Air Flow (MAF) and disconnect the stock tube from the MAF sensor. Disconnect the MAF harness and the air temperature sensor harness. Remove this tube from the engine compartment completely and place aside. Loosen hose clamps attached to MAF sensor, remove from engine compartment.
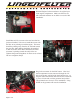
The stock air box will unfasten in a manner similar to the coolant reservoir. Remove the air box and the section of black plastic that mated up to the airbox and the headlight housing. Tilt the top of this piece toward the back of the car to remove piece more easily. In the void where the air box was, you will see a fastener with a T-30 Torx head, remove this fastener. Remove the rubber grommet that is on the mounting arm located on the bottom of the stock air box.
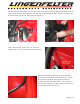
The smooth rounded side of the new air box piece will be referred to as the backside. The front side is the side that faces the engine. Located the 3 ½ Inch tube with the flange welded to it. Push it through from the outside of the air box. The weld should be hidden by the plastic box. Insert 4 button head screws from the front side. Locate the large flange with the 3 5/8” Inch hole as shown. Slide it over the tube from the backside of the air box. Secure with 4 nylock nuts as shown.
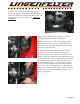
After the front section is in position, work the rear down onto the fenderwell and slide the “L” bracket over the stud. Adjust the bottom seal so that the edge of the box is pushing on the center of the seal at all contact points. Install the M6 flange nut on the stud to secure the top section of the box. Now, install the black plastic push-in fastener to secure the bottom. (This should line up with an existing hole in the body.
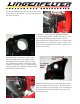
Reinstall Engine Coolant container to its original spot in the engine compartment. Make sure all hoses are still connected and there are no leaks as a result of this installation. Install Mass Air Flow sensor to the new hose that has just been installed. Take care to install the sensor with the flow arrow pointing toward the engine. The arrow should be pointing away from the air wall and toward the new tube.
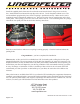
Install the LPE high flow air intake tube using the largest hose clamp on the throttle body end and the remaining smaller hose clamp on the MAF sensor end. Tighten the hose clamps on either end, but do not overtighten. Remove the air filter from its packaging. This filter comes pre-oiled and is ready to be installed. NOTE: Inspect inside of filter for any debris prior to installing in the vehicle.
Install the supplied plastic loom onto the coolant hose and seat the hose in the grooves on the air box. Install the black seal around the top edge of the air box. Test fit the plastic radiator cover. The seal should butt up against this piece when everything is positioned correctly. Make sure the seal is completely seated. Reinstall the radiator cover. Take care to notice the two small prongs on the front of this panel. These prongs go into two slots on the front of the car.