2010-2013 Chevy Camaro 2009-2013 Cadillac CTS-V Clutch Pedal Return Spring Kit PN: L360091410 Revision - 1.2 Lingenfelter Performance Engineering 1557 Winchester Road Decatur, IN 46733 (260) 724-2552 (260) 724-0422 fax www.lingenfelter.
Parts List # 1 1 1 1 1 1 • • • • Clutch Return Spring and Bracket kit Description Camaro/CTS-V clutch return spring bracket, stainless Return spring, stainless w.
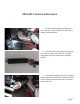
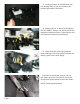
2010-2013 Camaro Instructions 1. Locate the hole behind the Diagnostic Link Connector (DLC) OBD-II port in the driver footwell under the dash. 2. One side of the spring has a longer loop on it than the other. Insert the free end of the spring with the longer loop into the supplied bracket. 3. Insert the remaining free end of the spring with the shorter loop into the hole in the bracket on the vehicle and make sure that it is hooked around the hole. Page 2.
. Pull the bracket and hook it around the clutch pedal as shown. 5. Insert the set screw and, using a 1/8” hex key, tighten down the set screw to secure the clutch return spring bracket to the clutch pedal. 6. Install the nut on the end of the set screw and, using a 7/16” socket and torque wrench, torque the nut to 89 in-lb. 7. The installation of the clutch return spring kit is now complete on your Camaro.
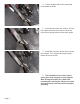
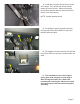
2009-2013 Cadillac CTS-V Instructions 8. One side of the spring has a longer loop on it than the other. Insert the free end of the spring with the longer loop into the supplied bracket. 9. Remove the two (2) screws located on the right side of the Diagnostic Link Connector (DLC) OBD-II in the driver footwell under the dash. 10. Remove the screw located on the left side of the DLC OBD-II in the driver footwell under the dash.
11. Gently pull down on the kick panel until it is hanging freely to give you access to the location that needs to be drilled. 12. Mark a spot 1/4” to the left of the edge of the DLC OBD-II. Using a 1/8” drill bit, drill a hole through the aluminum frame. Insert the free end of the spring into that hole as indicated. 13. Hook the clutch return spring bracket around the top of the clutch pedal just below the factory (yellow) over center spring.
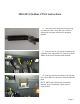
14. Install the nut on the end of the set screw and, using a 7/16” socket and torque wrench, torque the nut to 89 in-lb. Make sure that the clutch spring bracket does not interfere with the factory over center spring. NOTE: Camaro pedal pictured. 15. Re-install the two (2) screws located on the right side of the (DLC) OBD-II in the driver footwell under the dash. 16. Re-install the screw located on the left side of the DLC OBD-II in the driver footwell under the dash. 17.
For additional product installation information and technical support, contact LPE or your LPE products distributor. You can also find technical support and usage discussions regarding this product and many other LPE products in our Internet forums: http://www.lingenfelter.com/LPEforumfiles Join us on Facebook! http://www.facebook.com/lingenfelter#!/lpehp Photo by SDW Photography Lingenfelter Performance Engineering 1557 Winchester Road Decatur, IN 46733 (260) 724-2552 (260) 724-0422 fax www.lingenfelter.