2009-2014 Cadillac CTS-V Lingenfelter High Flow Intercooler Pump Upgrade Kit Installation Instructions (6.2L LSA Engine) PN: L330030709 Revision - 1.0 Lingenfelter Performance Engineering 1557 Winchester Road Decatur, IN 46733 (260) 724-2552 (260) 724-8761 fax www.lingenfelter.
Parts List Lingenfelter CTS-V High Flow Intercooler Pump Upgrade Kit (PN: L330030709) # Part number Description 1 1 1 1 TAFX410110 XX05102-0016 XX05102-0015 12047835 VariMax pump CTS-V VariMax intercooler pump bracket CTS-V to VariMax intercooler pump adapter harness Connector mounting clip Tools & Materials Required • Jack • 16 Gauge wire (orange)* • Jackstands or vehicle hoist • 15 amp rated switch* • Hose clamp pliers (or equivalent) • Ratchet extension (if needed) • Drain bucket (or
Page 2.
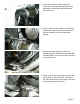
1. If you have been driving the vehicle, make sure to allow a couple hours for the engine to cool down before beginning installation. 2. Raise the vehicle with a vehicle hoist or a jack and jackstands. Be careful to follow the GM lifting procedures for the CTS-V. 3. Locate the intercooler pump. This pump should be located just inside of the passenger side engine brace, just behind the radiator. 4. Using a pair of hose clamp pliers, loosen the hose clamp on the inlet hose.
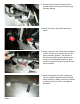
. Locate the connector on the rear of the intercooler pump body and disconnect it by pinching the metal clips while pulling away from the pump. 6. Using a 13mm socket, ratchet, and extension if necessary, remove both M8 nuts that hold the Adel clamps to the factory mounting bracket. 7. Remove the intercooler pump from the mounting bracket, which will expose both M8 mounting studs, as well as the end of the wire loom retaining clip. 8.
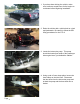
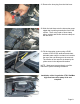
9. Disconnect the harness connector that is located behind the factory intercooler pump mounting bracket. 10. Using hose plugs, cap off the intercooler hoses. 11. Using a small pry tool or flat head screwdriver, remove the wire loom retaining clip from the factory mounting bracket. The location of the wire loom retaining clip is shown by the red arrow in the adjacent illustration. Next, remove the factory intercooler pump harness from the vehicle. 12.
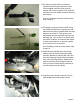
13. If a manual overide switch is not being installed, install the plug seal into the end of the supplied connector, and close the retainer clip on the connector.Then install the connector on to the single connector that is on the harness. If you are installing a manual overide switch, skip to step 14. 14. If installing a manual override switch, crimp the female terminal onto 16 gauge wire and make sure the seal is crimped under the large tangs on the terminal.
17. Remove the hose plug from the outlet hose. 18. Work the outlet hose onto the intercooler pump nipple that is pointing upward. Then, using a pair of hose clamp pliers, position and secure the hose clamp on the outlet hose. 19. Place the VariMax intercooler pump bracket onto the two studs that portrude out of the factory intercooler pump mounting bracket. Using a socket wrench and a 13mm socket deep socket, secure the Varimax intercooler pump bracket to the factory intercooler pump mounting bracket.
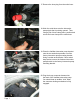
21. Remove the hose plug from the inlet hose. 22. Work the inlet hose onto the intercooler pump nipple that is pointing towards the front of the vehicle. Then, using a pair of hose clamp pliers, position and secure the hose clamp on the inlet hose. 23. Fill the intercooler system using a 50/50 mixture of DEX-COOL antifreeze and clean, drinkable water until the coolant level reaches the top of the cold fill range on the reservoir.
For additional product installation information and technical support, contact LPE or your LPE products distributor. You can also find technical support and usage discussions regarding this product and many other LPE products in our Internet forums: http://www.lingenfelter.com/LPEforumfiles Lingenfelter Performance Engineering 1557 Winchester Road Decatur, IN 46733 (260) 724-2552 (260) 724-8761 fax www.lingenfelter.com L330030709 CTSV high flow intercooler pump upgrade kit v1.0.indd Page 9.