
User Guide


EP Series User Programming Guide 16
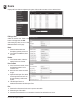
Card Holder (Cont.)
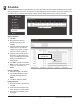
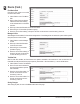
Card Holder Options
1. Select ADA Timing for extended timing
for the door relay.
2. Select Exempt to allow the Card
Holder to bypass Anti-Passback rules
(except occupancy rules) if the Card
Holder is allowed access to the region.
3. Select a Web User Account to give the
Card Holder operator privileges to the
server software.
4. Choose the highest Threat Level
that the Card Holder will be allowed
access.
» NOTE: A Card Holder cannot access a door
if either the Door Threat Level or the System
Threat Level is greater than the Card Holder
Threat Level.
5. If desired, click Vacation Mode then
set the Start and End Date. Enter a
phone number.
6. If desired, click Directory Listed then enter the Directory Code.
7. Click Save.
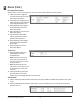
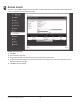
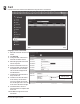
Assigning a Card to an Existing Card
Holder
1. Select the Card Holder from the main
window.
2. Click Add Card.
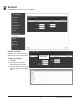
Card Format
3. Select the appropriate card format
from the drop-down eld.
Card Number
4. Enter the Card Number, or use the
Auto Scan feature.
Auto Scan
5. Choose the Auto Scan door reader
where the card will be presented.
» NOTE: Card scanner can only be used with
doors 1 - 4.
6. Click Card Scan and present the card
to the reader. The new card number
will populate the data eld.
Choose the card format
Click Add Card
Enter the card number or
click Card Scan
Choose the auto scan door