
Setup Guide
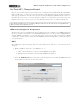


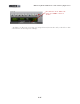


Table Of Contents

MIDI Setup Guide: MIDI Control with 3rd Party Applications
4•29
• You should see the MIDI Channel and other settings in the Fader 1 row change, indicating
it has “Learned” the MIDI CC message the KB37 knob 1 is transmitting. (Note that KB37/
UX2/UX8 always transmits these MIDI commands on MIDI Channel 1).
• Now look at the Cubase Mixer window and watch the channel strip for track 1 - you should
see its fader respond to the KB37 knob moves.
• Repeat the above steps to map other controllers from your device to other Cubase parameters in
the list.
• Note that you’ll need to use knobs or pedal controllers to map to Cubase’s fader, knob and
slider type parameters, and buttons to map to Cubase’s switch type parameters.
• Also, these Cubase parameters typically need to receive MIDI CC type commands, so you’ll
want to make sure that the controller on your Line 6 device is sending this type of MIDI
command (see “MIDI Controller Settings Dialog” on page 4•7 for how to change these).
The lower right panel also allows you to map to more channel strip parameters, beyond track 1 - 16.
It is also possible to customize these Generic Remote parameter lists using the other options in this
dialog. Please see the Cubase Help documentation for details.
Cubase Transport Control
Cubase allows control of its transport by way of a simple MIDI Machine Control Slave option -
meaning it will listen for MMC commands from a selected device and respond accordingly. Since we
assigned MMC commands to the KB37 transport buttons (and/or optionally to your device’s Footswitch
controllers), all we need to do is set Cubase to listen to your Line 6 device for the MMC commands.
Go to Cubase’s Transport menu and select Project Synchronization Setup...
Check the box for MMC Slave Active.
Choose your Line 6 device for the MIDI
Input.
Click OK to exit the dialog
Now try your KB37 transport buttons, or any other controllers that you assigned to transmit MMC
commands, and you should see Cubase’s transport respond.