
Setup Guide
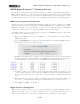
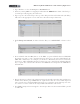
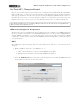


Table Of Contents

MIDI Setup Guide: MIDI Control with 3rd Party Applications
4•27
• Your settings should now look like the above for KB37. If you are using UX2 you’ll see only the
Footswitch 1 &2 rows, and for UX8 the Footswitch 1 & 2 and Expression Pedal rows. If you are
using KB37, you do not need to edit any of the settings in the MIDI Control Settings dialog.
• If you are using UX2 or UX8, you can optionally change one or both of your Footswitch controller
settings in the MIDI Controller Settings dialog, if you want your Footswitch controllers to control
any different Cubase transport functions.
• To change Footswitch 1, select “MMC” in the To MIDI Out field, and then choose your
preferred transport function from the MIDI CC/Action field.
• Note that Footswitch 2 is already set for “MMC” and to control the Record Punch transport
button. You can keep this or change the MIDI CC/Action field to select a different transport
function.
• Click Apply after making changes to commit them to your device. Click OK to exit the dialog.
The above steps assign MIDI commands to all the device’s MIDI Controllers for us so that we can then
map them in Cubase. The steps also congure all KB37’s transport button controllers to transmit the
necessary MMC (MIDI Machine Control) commands to control Cubase’s transport, and MIDI CC
messages to trigger other Cubase functions.
Cubase MIDI Port Setup
Since you are using your Line 6 device as a MIDI controller device, you’ll want to exclude it from
Cubase’s “All Inputs” MIDI Port settings. This way, if you choose the “All Input” option for one of your
MIDI tracks, the track will not receive input from your Line 6 device and record it into the track. To
configure this setting, go to Cubase’s Devices > Device Setup dialog...