
Setup Guide
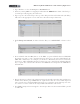
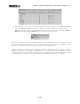
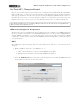


Table Of Contents

MIDI Setup Guide: MIDI Control with 3rd Party Applications
4•19
MOTU Digital Performer™ - Transport Control
Here we’ve provided a step-by-step tutorial here for how to configure a Line 6 POD Studio/TonePort
KB37, UX2 or UX8 device to remotely control the Transport of the Mark of the Unicorn’s Digital
Performer™ 5 software. (The steps are similar for other Digital Performer versions as well). It can be
very helpful to have remote or foot control over your Transport functions for recording and punch-ins!
MIDI Control Assignment Configuration
The first step, before even launching Digital Performer, is that we’ll need to configure a set of MIDI
assignments for the footswitches and pedals of our KB37/UX2/UX8 device. Digital Performer utilizes
MIDI CC commands to access its Transport functions remotely. We can assign these MIDI CC
commands to our Line 6 device using the Line 6 MIDI Controller Settings dialog...
For a UX2 or UX8, you can set your Footswitch controllers to send MIDI CC messages to have them
each control a Logic Transport function.
• With your UX2/UX8 connected to your USB port, go to System Preferences > Line 6 Audio-
MIDI Settings dialog
• Select the No Mapping preset, then click on the Settings button to launch the MIDI Controller
Settings dialog so that we can edit the settings.
• For KB37, you’ll likely want to congure your on-board transport buttons to control the Digital
Performer transport functions. Therefore, in the MIDI Controller Settings dialog, you’ll want to
set all the Transport controllers’ settings to send MIDI CC commands, as shown here:
• For UX2 or UX8, you can congure your Footswitch 1 and Footswitch 2 controllers to each
control a transport function. Look at the above MIDI Controller Settings for KB37’s Transport
keys and choose the functions you want, then copy these settings to your Footswitch 1 and 2
rows.
• When all the above settings are complete, in the Preset field at the top right of the dialog, type
in a title (e.g. - “Digital Performer Transport”) and click the button to save this as a preset.
• Click Apply, then OK to exit the dialog’
Digital Performer Configuration
With your Line 6 device connected to your computer’s USB port, launch the Digital Performer
application and open or create a new project. The first step is to locate each transport function you
wish to map to and allow it to “learn” the command from your controller button or footswitch.