
Setup Guide


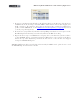
Table Of Contents

MIDI Setup Guide: MIDI Control with 3rd Party Applications
4•9
KB37 Transport Buttons
To set your KB37’s onboard transport buttons to control Logic’s transport controls, you need to set
Logic to “listen” for the MMC commands that these KB37 buttons are now congured to transmit...
• With KB37 connected to your computer’s USB port, launch Logic and go to Preferences >
MIDI.
• Select the Sync tab.
• Click the MIDI Sync Project Settings… button at the bottom right of the Sync tab - this
launches the Song Settings dialog.
• In the section labeled MIDI Machine Control (MMC), check the Listen to MMC Input option.
Note that this is a per-Song option in Logic. To make this option “global”, you must modify your Logic
template file with this MMC setting.
Mapping Controllers with Logic’s MIDI Learn Function
Logic Pro includes support for several MIDI “Control Surface” devices, which are typically large
hardware units including faders, knobs, and other controls to emulate a large analog mixing console.
The Line 6 KB37/UX2/UX8 are not included as Logic supported Control Surface devices, however,
you can still easily map any of your Line 6 MIDI controllers to Logic or Plug-In parameters by using
Logic’s MIDI Learn feature! To follow we’ll show you how to map your Expression Pedal to control
the Wah Position parameter of an inserted GearBox Plug-In. These same steps can be followed to
map any other button, knob or footswitch on your Line 6 device, to any Logic parameter as well. It is
recommended that you read through Logic’s Control Surface Support documentation as well to learn
more about Logic’s MIDI Learn and controller capabilities.
First, here’s a handy tip in Logic... The Logic Pro transport always shows you when MIDI data is
being received, and specifically the MIDI Channel, command type and value. For example, watch the