
Setup Guide


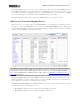
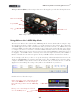

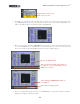
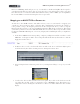
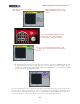
Table Of Contents

MIDI Setup Guide: Controlling Ableton Live
TM
3•4
Press Footswitch 1. The numbers 1/2
appear inside the Play Button. This is
telling you that the button is “mapped”
to respond to MIDI Channel 1, MIDI
CC 2
Click on the Stop button then press
Footswitch 1 again. Since we configured
the Footswitch to toggle between
transmitting CC 2 & CC 3, this button
now receives the CC 3 value
Now click on the Record button, then
press Footswitch 2. This now maps
MIDI CC 6 to toggle Record on/off
Click on the MIDI button when done, to exit
MIDI Map Mode
You’re done! Give the footswitches a try and you should see Live’s transport trigger accordingly. Using
the same procedure, you can now map any of your POD Studio/TonePort controllers to other Ableton
Live functions. Read on for more examples.
Mapping the Expression Pedal Controller
Next, we’ll map the Expression Pedal controller to one of Live’s software parameters so that we can
control it hands-free! The Expression Pedal transmits a stream of MIDI CC values, so you can map to
any available Live parameter that has a range, such as an effect knob or slider. We’ll first map the pedal
to Live’s Chorus effect - Dry/Wet parameter. This will allow us to change the Dry/Wet mix of Live’s
Chorus effect in real-time. Note that this also makes it possible to “write” parameter automation in
real-time using the Expression Pedal - more on that later...
• Connect an Expression Pedal into the Expression jack on your UX2/UX8/KB37, and launch the
Line 6 MIDI Control Settings and configure the Expression Pedal controller to send a MIDI CC
- we’ll use CC 5. Your settings should look like this (and remember to click the Apply button
when done):
• In Ableton Live, first record or load an audio file in an audio track so that you have something
to play and hear your effect in action.
• Load the Chorus as an insert effect on this audio track - You can do this by selecting
Effects>Chorus>Chorus in the Live Devices panel and then drag this Chorus effect on top of
your audio track to insert it.