
Setup Guide


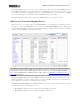
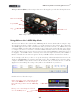

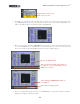
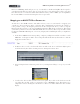
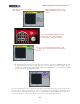
Table Of Contents

MIDI Setup Guide: Controlling Ableton Live
TM
3•3
Transport buttons (KB37) - The transport buttons are all mapped to provide the following behaviors:
Play
Metronome On/Off
Loop On/Off
Stop
Global Record
KB37’s transport buttons - Ableton Live Lite Line 6 Edition “pre-mapped” functions
Using Ableton Live’s MIDI Map Mode
All versions of Ableton Live include this “MIDI Map Mode” feature, which makes it simple to map
any switch, knob, wheel or pedal controller to a specific parameter in the software. Note that many
other DAW applications also offer a similar functionality (sometimes referred to as “MIDI Learn”) and
your Line 6 MIDI controllers will work similarly in those applications as well. The first step is always
to configure your device’s controllers to transmit a MIDI command, such as we already did by simply
selecting the Ableton Live preset in the previous steps. Live utilizes MIDI CC commands for most of
its mappings - other DAW software commonly does as well, but might alternatively utilize MMC or
Mackie commands for some functions (please check your DAW software’s documentation details).
As an example, we’ll show you how to set up the Start/Stop and Punch In/Out functions for the
TonePort UX2/UX8/KB37 footswitches manually. In the Line 6 MIDI Control Settings dialog,
configure the MIDI settings shown below for the Footswitch 1 & 2 controllers. Be sure to click the
Apply button after making the settings or they will not be established on your device!
In Ableton Live, follow these steps…
In the upper right corner of the main window,
click on the MIDI button. It should light up
blue, indicating you have entered “MIDI Map
Mode”
Then go over to the Transport and click
once on the Play button