
Setup Guide


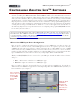
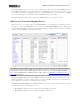
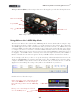

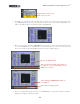
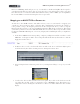
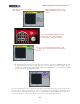
Table Of Contents

MIDI Setup Guide: Controlling Ableton Live
TM
3•2
*For UX2 & UX8, it is not necessary to turn the Track button On, since this enables MIDI input into
Lives MIDI tracks, which you typically need only for a MID keyboard controller to allow you to record
notes. We’re purposely not assigning anything to “output” MIDI back to your Line 6 device’s MIDI
port, since we’re only concerned with transmitting MIDI data from your device.
Close the Preferences dialog - this completes the MIDI input device configuration steps.
Ableton Live Controller Mapping Preset
The easiest way to get started using your UX/2UX8/KB37 as a controller device with Ableton Live
software is to select the Ableton Live preset in the Line 6 Controller Mapping dialog. This preset
loads the following MIDI controller settings (UX2 will display only Footswitch controllers, and UX8
only Footswitch and Expression Pedal controllers):
Note that this preset has all the GearBox Control fields set to “None”, which means your device will not
transmit any commands to the GearBox application. It is possible to do so to control GearBox and Ableton
Live or another DAW software simultaneously if you like - please see “MIDI Control Configuration” on
page 2•1
for details.
If you are using the Live Lite - Line 6 Edition version, the following settings of this preset are “pre-
mapped” already for you in the software. (If you are using a full Ableton Live version, we’ll show you
how to map these controllers yourself in the next sections).
Footswitch Controller Behaviors - With this Ableton Live preset loaded, the Footswitches provide
the following behaviors for hands-free control:
• Footswitch 1: Toggles the Live transport between Play/Stop functions.
• Footswitch 2: Toggles the Live transport Punch Record function.