POD Studio™ & TonePort™ MIDI Setup Guide Configuring KB37, UX2 & UX8 MIDI Functionality with Line 6 and 3rd Party Software Mac® OS X, Windows® Vista® & Windows® XP®
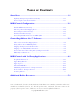
Table of Contents Start Here.................................................................................................1•1 Updating & Registering with Line 6 Monkey................................................................. 1•1 Connecting Footswitches and Pedals.............................................................................. 1•3 MIDI Control Configuration....................................................................2•1 Default MIDI Control Settings........................
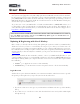
MIDI Setup Guide: Start Here Start Here Congratulations if you’ve obtained a Line 6 POD StudioTM or TonePortTM UX2, UX8 or KB37, since you are now equipped not only with a high performance USB audio interface and tone machine, but also built in power for remote, hands-free control of the Line 6 GearBox software, as well as 3rd party MIDI/DAW software! This document will walk you through setting up and using your Line 6 POD Studio/TonePort* Footswitch, Pedal & controller features for use with GearBox and 3r
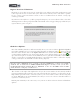
MIDI Setup Guide: Start Here Register Your Line 6 Hardware Registration of your Line 6 gear may be required for some updates and product authorizations, and is also important because it ensures that you’re dialed in for warranty service and makes it possible for us to contact you if new software versions or other cool enhancements are offered - cutting edge technology and such! If you have not already done so, you’ll be prompted to Register your connected Line 6 device.
MIDI Setup Guide: Start Here Connecting Footswitches and Pedals The UX2, UX8 and KB37 devices include two 1/4-inch Footswitch jacks for connecting optional footswitches. You’ll want the non-latching, “momentary” type footswitch for these connections (such as those commonly sold as “sustain pedals” for keyboard controllers). You can connect to either or both of these jacks to utilize the independent Footswitch 1 and Footswitch 2 controllers.
MIDI Setup Guide: Start Here Connect up to two footswitch pedals into these Footswitch 1 & 2 jacks Connect an expression pedal to the Expression jack UX8 Footswitch and Expression Pedal connections Connect an expression pedal to the Expression jack Connect up to two footswitch pedals into these Footswitch 1 & 2 jacks KB37 Footswitch & Expression Pedal connections KB37 Wheel, Knob & Button Controllers In addition to the Footswitch and Expression controllers, POD Studio/TonePort KB37 offers a whole set
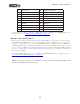
MIDI Setup Guide: Start Here 1 2 3 4 5 6 7 8 9 10 Octave Up Octave Down Pitch Bend Wheel Modulation Wheel Sound Select (Previous) Sound Select (Next) Knob 1 Knob 2 Knob 3 Knob 4 11 12 13 14 15 16 17 18 19 Transport - Rewind Transport - Forward Transport - Stop Transport - Play Transport - Record Button 1 Button 2 Button 3 Button 4 For information on how to map these MIDI Controllers to GearBox and MIDI/DAW software parameters, please see “MIDI Control Configuration” on page 2•1.
MIDI Setup Guide: MIDI Control Configuration MIDI Control Configuration In this chapter we’ll show you how to configure specifically what MIDI Control messages your POD Studio/TonePort’s controllers transmit when you access them. This is all accomplished using the Line 6 MIDI Control Settings dialog, where you can view and edit these settings, as well as create and save your own customized preset control mappings to load any time.
MIDI Setup Guide: MIDI Control Configuration POD Studio/ TonePort Model KB37. UX8, UX2 KB37. UX8, UX2 Controller Name GearBox Parameter MIDI Control Message Footswitch 1 Stomp – toggle on/off CC 64 (Sustain) Footswitch 2 Tuner MMC Record Punch Choosing a Controller Mapping Preset In addition to the default GearBox and MIDI Default preset described above, there are also several presets for specific MIDI/DAW software applications as well.
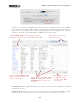
MIDI Setup Guide: MIDI Control Configuration To follow is an example of the MIDI Control Settings dialog, as displayed with a connected KB37 device. Note that if you have a UX2 or UX8, you’ll see only the Controllers offered by those devices (Footswitch 1 & 2 for UX2 and Footswitch 1 &2 and Expression Pedal for UX8). See the following descriptions for details on the fields within the MIDI Control Settings dialog.
MIDI Setup Guide: MIDI Control Configuration To MIDI Out - Allows you to select from a menu the type of MIDI Control message transmitted to the device’s USB MIDI Out port to control your MIDI/DAW software from each controller. The options are as follows (note that the Mod Wheel, Knobs, and Expression Pedal controllers are limited to MIDI CC or MIDI CC 14 bit options only): • None: Sends no MIDI data. Basically, this is to disable the controller.
MIDI Setup Guide: MIDI Control Configuration • Momentary - Sends a single MIDI message and value (127 - typically interpreted as “on”) only while switch is held down only, and then sends a single MIDI message and value (0 - typically interpreted as “off”) when switch is released. A common use for this type of switch behavior is for a piano/synth Sustain pedal footswitch. * Note – The Mackie Control protocol uses MIDI note events to activate specific functions.
MIDI Setup Guide: MIDI Control Configuration Guitar Port Online Player Transport Control In addition, the following MIDI events are recognized for the Guitar Port Online (GPO) Player transport control within the GearBox software. These 3 byte MIDI short messages (not SysEx) are based on the Mackie control specification.
MIDI Setup Guide: Controlling Ableton LiveTM Controlling Ableton Live™ Software This chapter includes instructions for using your Line 6 UX2/UX8/KB37 with the Ableton Live software, including the Ableton Live Lite - Line 6 Edition, which comes included with some Line 6 devices. The special Line 6 Edition of this software offers some pre-defined MIDI controller functions with your Line 6 hardware.
MIDI Setup Guide: Controlling Ableton LiveTM *For UX2 & UX8, it is not necessary to turn the Track button On, since this enables MIDI input into Lives MIDI tracks, which you typically need only for a MID keyboard controller to allow you to record notes. We’re purposely not assigning anything to “output” MIDI back to your Line 6 device’s MIDI port, since we’re only concerned with transmitting MIDI data from your device. Close the Preferences dialog - this completes the MIDI input device configuration steps.
MIDI Setup Guide: Controlling Ableton LiveTM Transport buttons (KB37) - The transport buttons are all mapped to provide the following behaviors: Play Metronome On/Off Loop On/Off Stop Global Record KB37’s transport buttons - Ableton Live Lite Line 6 Edition “pre-mapped” functions Using Ableton Live’s MIDI Map Mode All versions of Ableton Live include this “MIDI Map Mode” feature, which makes it simple to map any switch, knob, wheel or pedal controller to a specific parameter in the software.
MIDI Setup Guide: Controlling Ableton LiveTM Press Footswitch 1. The numbers 1/2 appear inside the Play Button. This is telling you that the button is “mapped” to respond to MIDI Channel 1, MIDI CC 2 Click on the Stop button then press Footswitch 1 again. Since we configured the Footswitch to toggle between transmitting CC 2 & CC 3, this button now receives the CC 3 value Now click on the Record button, then press Footswitch 2.
MIDI Setup Guide: Controlling Ableton LiveTM Drag the Chorus effect to your Audio track to insert it. • You’ll then see the Chorus effect module appear in Live’s lower effects panel. Now place Live into MIDI Map Mode (see the instructions in the previous section). Once in Map Mode, you will see the Chorus effect’s “map-able” parameters highlighted. • We’re going to map to the Chorus Dry/Wet knob. Just click on the knob and Live will then wait to receive a MIDI Control command.
MIDI Setup Guide: Controlling Ableton LiveTM Exit Live’s MIDI Map Mode and give it a try - You should see the Chorus Dry/Wet knob respond to your Expression Pedal’s movement! You can repeat the above steps and map the pedal to any other Live effects’ knobs or even the Live Mixer faders & knobs. Or, if you have a KB37, you can map KB37’s knob or Mod Wheel controllers following the above steps as well.
MIDI Setup Guide: Controlling Ableton LiveTM Click the arrow here to expand the effect module... Click the Configure button to add a POD Farm Plug-In parameter to this module Now, in the POD Farm Plug-In window, click directly on the Wah edit panel’s Position knob to select this parameter. Once you’ve selected the Plug-In parameter, you’ll see a slider appear in the Line effects module for that parameter.
MIDI Setup Guide: Controlling Ableton LiveTM Control Automation Recording with your Expression Pedal Once you have a parameter mapped to your Expression Pedal (or KB37 knob or Mod Wheel controller), in many cases the DAW software will also allow you to “record” your controller’s moves in real-time as an automation envelope on your track.
MIDI Setup Guide: Controlling Ableton LiveTM • In the Live MIDI Track I/O settings header, set the Input to receive from either Channel 1 or All Channels, since KB37 is always transmitting on MIDI Channel 1. Then click the Record Arm button to arm the track. You should then see the MIDI input meters on the track respond when you hit note keys on your KB37. Set the Channel input and arm the MIDI track. You’ll see the MIDI meters flash when you hit a note key.
MIDI Setup Guide: MIDI Control with 3rd Party Applications MIDI Control with 3rd Party Applications In this chapter, we’ll cover how to setup several popular DAW applications to utilize your POD Studio/ TonePort UX2/UX8/KB37 as a MIDI controller device, as well as a few handy tips for some of these applications. If you have not already done so, please read through “Controlling Ableton Live Software” on page 3•1 since it includes MIDI control aspects that are common to many DAW applications.
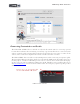
MIDI Setup Guide: MIDI Control with 3rd Party Applications • In Reason, open the “Control Surfaces and Keyboards” page in Reason’s Preferences dialog, click ‘Add’, then select “Line 6” from the Manufacturer list: Voila! You should see the KB37 picture appear in the Model box. Select KB37 for the In Port. • Select your KB37 device for the In Port, click OK to exit the Control Surface dialog, then exit the Preferences.
MIDI Setup Guide: MIDI Control with 3rd Party Applications Tip - You can get an overview of which Reason parameters are assigned to a given mapping variation by selecting “Remote Override Edit Mode” from Reason’s Options menu. Also see the Remote Override section page 4•4 for information on how to customize your KB37 controller mappings.
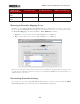
MIDI Setup Guide: MIDI Control with 3rd Party Applications • You should now see your UX8/UX2 device configured accordingly. Exit the Preferences if all settings appear as shown here: Please see the next section for how to map your UX8/UX2 controllers to Reason parameters.
MIDI Setup Guide: MIDI Control with 3rd Party Applications • Here you can see the UX8’s Expression Pedal is already set to transmit MIDI CC 11. We’ll next show how to map the Expression Pedal to a Reason parameter. • In Reason, right-click (Windows) or Ctrl-click (Mac) on any knob or slider that you want to control with your Expression Pedal. We’ll choose the FREQ knob of one of Reason’s synth devices... Right-click/Ctrl-click directly on the knob you want to control...
MIDI Setup Guide: MIDI Control with 3rd Party Applications Apple GarageBand™ POD Studio/TonePort KB37 works automatically with GarageBand to record MIDI notes and trigger the Software Instruments within a GarageBand Instrument track - all that is needed for this is to connect the KB37 to your Mac’s USB port and then launch GarageBand.
MIDI Setup Guide: MIDI Control with 3rd Party Applications Apple Logic™ POD Studio/TonePort KB37 can be used as a keyboard controller with Apple Logic™ Pro or Express to record notes and play software instruments in Logic’s Instrument tracks.
MIDI Setup Guide: MIDI Control with 3rd Party Applications • Above shows the MIDI Default preset settings for a KB37. For UX2 you’ll see only the Footswitch 1 &2 rows, and for UX8 the Footswitch 1 & 2 and Expression Pedal rows. We don’t need to make any changes, but should you want to change any MIDI commands sent by your device’s controllers, this is where to do it. Remember to always click Apply after making changes to commit them to your device. Click OK to exit the dialog.
MIDI Setup Guide: MIDI Control with 3rd Party Applications KB37 Transport Buttons To set your KB37’s onboard transport buttons to control Logic’s transport controls, you need to set Logic to “listen” for the MMC commands that these KB37 buttons are now configured to transmit... • With KB37 connected to your computer’s USB port, launch Logic and go to Preferences > MIDI. • Select the Sync tab.
MIDI Setup Guide: MIDI Control with 3rd Party Applications transport indicator and move a knob, pedal or footswitch on your KB37/UX2/UX8, and you’ll see this MIDI In information displayed.
MIDI Setup Guide: MIDI Control with 3rd Party Applications • As you can see by the name of the “Learn Assignment...” menu command, Logic automatically detected the GearBox Plug-In “Wah - Position” parameter since it was the last item you selected with your mouse in the previous step. TIP: Alternatively, you can use the Command+L key shortcut instead of going to the Logic Preferences menu. • When you now select this “Learn Assignment...
MIDI Setup Guide: MIDI Control with 3rd Party Applications Cakewalk SONAR™ POD Studio/TonePort KB37 can be used as a keyboard controller in Cakewalk SONAR™ to record notes and play software instruments in MIDI & Instrument tracks.
MIDI Setup Guide: MIDI Control with 3rd Party Applications • Your SONAR preset settings should now look like the above for KB37. If you are using UX2 you’ll see only the Footswitch 1 &2 rows, and for UX8 the Footswitch 1 & 2 and Expression Pedal rows. • Click Apply after making changes to commit them to your device. Click OK to exit the dialog. The above steps assign MIDI commands to all the device’s MIDI Controllers for us so that we can then map them in SONAR.
MIDI Setup Guide: MIDI Control with 3rd Party Applications KB37 as a Keyboard Controller Once you’ve selected KB37 as a MIDI Input device in the previous step, all you need to do to utilize KB37 as a MIDI keyboard is to activate the Record Arm button on a SONAR MIDI track and set the track’s Input option KB37 (from MIDI Channel 1 or Omni). You should then see the MIDI track’s meters detect the MIDI note input when you hit your KB37 note keys. Press record and your performance should record in the track.
MIDI Setup Guide: MIDI Control with 3rd Party Applications • In the ACT Controllers toolbar options, click the Controllers/Surfaces Properties button that is at the right end of the Control Surfaces toolbar.
MIDI Setup Guide: MIDI Control with 3rd Party Applications If you are using KB37, you can go ahead and try the knobs, sound select button & transport button controllers on your KB37 device and they should control the following SONAR functions: • Knobs - These knobs map to different SONAR functions, depending on what “Bank” you have selected in the Act MIDI Controller dialog.
MIDI Setup Guide: MIDI Control with 3rd Party Applications Here is an example of how to map the Expression Pedal controller to the Wah Position parameter of the GearBox Plug-In, allowing you to remotely control the GearBox Wah in real-time as you hear the input monitor recording signal or playback of your audio track. These mapping steps are the same to map any knob, button, footswitch controller to any other available parameter in the ACT MIDI Controller dialog as well...
MIDI Setup Guide: MIDI Control with 3rd Party Applications • Now move your Expression Pedal and you should immediately see the Rotary 1 cells switch out of MIDI Learn mode, meaning your Pedal’s MIDI command was “learned”, thus mapping your Pedal controller to the parameter. (Note that we had previously configured your Expression pedal to transmit MIDI CC 11 - see the “MIDI Controller Settings Dialog” on page 4•7 if you need to check your pedal assignment).
MIDI Setup Guide: MIDI Control with 3rd Party Applications MOTU Digital Performer™ - Transport Control Here we’ve provided a step-by-step tutorial here for how to configure a Line 6 POD Studio/TonePort KB37, UX2 or UX8 device to remotely control the Transport of the Mark of the Unicorn’s Digital Performer™ 5 software. (The steps are similar for other Digital Performer versions as well).
MIDI Setup Guide: MIDI Control with 3rd Party Applications • Type or select the Setup menu, Commands item. • Clear any existing MIDI note mappings found within the MIDI Event column of the dialog to avoid unexpectedly triggering other functions. • Type ‘stop’ into the search string at the top of the dialog window and click ‘Search’ (the dialog will scroll to the appropriate section of the list to show the transport functions).
MIDI Setup Guide: MIDI Control with 3rd Party Applications • Alternatively, you can map to the other available transport functions, such as Slow Forward rather than Fast Forward, if you prefer to trigger one of those with your button/Footswitch. • Important: Scroll to the top of the Commands list and click the square box to the left of ‘Master Master’ under the heading ‘MIDI Masters’, so it’s in a grey (active) state.
MIDI Setup Guide: MIDI Control with 3rd Party Applications Pro Tools LE™ - Transport Control Here we’ve provided a step-by-step tutorial for how to configure a Line 6 POD Studio/TonePort KB37, UX2 or UX8 device to remotely control the Transport of the Digidesign Pro Tools LE™ 8 software. (The steps are similar for other Pro Tools versions as well).
MIDI Setup Guide: MIDI Control with 3rd Party Applications The settings in this preset configure all KB37’s transport button controllers to transmit the necessary MMC (MIDI Machine Control) commands to control the Pro Tools transport. Click OK to exit the dialog. UX2 and UX8 For a UX2 or UX8, you can set your Footswitch controllers to send MMC messages to have them each control a Logic Transport function.
MIDI Setup Guide: MIDI Control with 3rd Party Applications • Set Footswitch 1’s To MIDI Out to “MMC” and the MIDI CC/Action to “Record Punch (Pro Tools)”. • Set Footswitch 2’s To MIDI Out to “MMC” and the MIDI CC/Action to “Stop”. (Or, alternatively, you can choose whatever other two transport functions you prefer for these Footswitches). • At the top right of the MIDI Controller Settings dialog, type in “PT-Transport” and click the Save button to save these settings as a preset.
MIDI Setup Guide: MIDI Control with 3rd Party Applications Now, in the Pro Tools - Online submenu, select “MMC” so that it is checked. ...
MIDI Setup Guide: MIDI Control with 3rd Party Applications Steinberg Cubase® POD Studio/TonePort KB37 can be used as a keyboard controller in Steinberg Cubase® to record notes and play software instruments in MIDI & Instrument tracks.
MIDI Setup Guide: MIDI Control with 3rd Party Applications • Your settings should now look like the above for KB37. If you are using UX2 you’ll see only the Footswitch 1 &2 rows, and for UX8 the Footswitch 1 & 2 and Expression Pedal rows. If you are using KB37, you do not need to edit any of the settings in the MIDI Control Settings dialog.
MIDI Setup Guide: MIDI Control with 3rd Party Applications Uncheck the “All Inputs” box for your KB37/UX2/UX8 MIDI In Port Select MIDI Port Setup Note that you’ll still be able to choose your Line 6 device within your Cubase MIDI tracks’ MIDI Input selector (such as your KB37 to use it as your keyboard controller). The above setting just disallows MIDI track input if you select “All Inputs” as the track’s MIDI Input.
MIDI Setup Guide: MIDI Control with 3rd Party Applications • You should see the MIDI Channel and other settings in the Fader 1 row change, indicating it has “Learned” the MIDI CC message the KB37 knob 1 is transmitting. (Note that KB37/ UX2/UX8 always transmits these MIDI commands on MIDI Channel 1). • Now look at the Cubase Mixer window and watch the channel strip for track 1 - you should see its fader respond to the KB37 knob moves.
MIDI Setup Guide: MIDI Control with 3rd Party Applications With the 3rd party application examples covered in this chapter you should now be pretty well informed on how to get your POD Studio/TonePort device’s MIDI controllers up and running, and triggering all kinds of functions. Most other DAW applications that offer remote MIDI control can be configured similarly.
MIDI Setup Guide: Additional Online Resources Additional Online Resources Hungry for more info? We’ve got plenty of helpful resources just a click away...