PREFACE The LINDY IP Access KVM SWITCH CLASSIC features the latest and most technologically advanced SoC (System on Chip) IP KVM solution, based on Peppercon’s latest IP-KVM engine technology. IP Access KVM Switch Classic English User Manual Retaining the familiar management utilities, GUI and related software tools of its predecessor, the CPU IP Access Switch LITE, the IP Access KVM SWITCH CLASSIC delivers an advanced IP KVM solution whilst retaining compatibility with older models.
Contents 5. MENU OPTIONS ................................................................................................................... 19 1. INTRODUCTION ..................................................................................................................... 1 5.1 Remote Control .................................................................................................................. 19 5.1.1 KVM Console...........................................................................
1.3 System Requirements 1. Introduction Thank you for purchasing the LINDY IP ACCESS KVM SWITCH CLASSIC. This device allows operators to monitor and access their computers from remote locations. The IP ACCESS KVM SWITCH CLASSIC connects to the internet, intranet, LAN or WAN using standard CAT5 or higher cable, then uses a KVM cable to connect a local KVM switch or server. The IP ACCESS KVM SWITCH CLASSIC combines convenient digital remote KVM access and control with integrated system management.
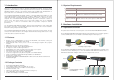
2.2 Connections 2.2.4 Dial up Line / Modem Connection The RS232 port of the IP ACCESS KVM SWITCH CLASSIC can either be used to connect to an external Modem i.e. to set up a dial up line connection or can be used to connect to an external RS232 managed power switch. Use the supplied cable to connect the appropriate unit. 2.2.5 Connecting an External Power Switch option At the time of writing (June 2008) the IP ACCESS KVM SWITCH CLASSIC supports the following external power switch options.
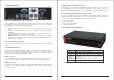
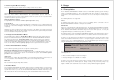
3.3 IP ACCESS KVM SWITCH CLASSIC Setup Tool 3. Configuration The IP ACCESS KVM SWITCH CLASSIC’s Parameter communication interfaces are all based on IP auto configuration TCP/IP. The switch comes pre-configured IP-Address with the IP configuration detailed here: Net-mask Default-Gateway Value none 192.168.0.70 255.255.255.0 none 3.3.1 MAC Address Detection Connect the IP ACCESS KVM SWITCH CLASSIC to your computer either via a local network, or via USB.
3.3.2 Authentication 3.4 Keyboard, Mouse and Video configuration To adjust the authentication settings, enter your login as a super user and change your password. Between the IP ACCESS KVM SWITCH CLASSIC and the host, there are two interfaces available for transmitting keyboard and mouse data: USB and PS/2. The correct operation of the remote mouse depends on several settings which will be discussed in the following subsections. Super user login Enter the login name of the super user.
4. Usage 3.4.3 Host System Mouse Settings The host' s operating system obtains various settings from the mouse driver. Note: The following limitations do not apply when using USB mice and Windows 2000 and higher! Special Mouse Driver There are mouse drivers which influence the synchronization process and lead to desynchronized mouse pointers. If this happens, make sure you do not use a special vendorspecific mouse driver on your host system.
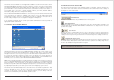
4.2 Logging In 4.3 Navigation 4.2.1 Login to the IP ACCESS KVM SWITCH CLASSIC Once logged into the IP ACCESS KVM SWITCH CLASSIC successfully, the main page appears. This page consists of three parts; each of them contains specific information. The buttons in the upper area allow you to navigate within the front end. The lower left area contains a navigation bar and allows you to switch between the different sections of the IP ACCESS KVM SWITCH CLASSIC.
The Remote Console window is a Java Applet that establishes its own TCP connection to the IP ACCESS KVM SWITCH CLASSIC. The protocol that runs over this connection is neither HTTP nor HTTPS, but RFB (Remote Frame Buffer Protocol). RFB needs to establish a connection to port number 443. Your local network environment has to allow this connection to be made, i.e. your firewall and, if you have a private internal network, your NAT (Network Address Translation) settings have to be configured accordingly.
Options Opens the Options menu. A short description of each of the options follows: Monitor Only Toggles the ‘Monitor Only’ filter on or off. If the filter is switched on, no remote console interaction is possible but monitoring is. faster video display, but small changes in some display regions may not be recognized immediately.
transferred, and on the number of changes between two single video pictures. We recommend that you use a higher compression level if the network bandwidth is low. The higher the compression level the more time is needed to pack and unpack the video data on either side of the connection. The compression quality depends on the video picture itself, e.g. the number of the colours or the diversity of pixels.
The IP ACCESS KVM SWITCH CLASSIC firmware features a Telnet server that enables a user to connect via a standard Telnet client. If the Telnet program is using a VT 100, VT 102 or VT 220 terminal or appropriate emulation, it is even possible to perform a console redirection, as long as the IP ACCESS KVM SWITCH CLASSIC host is using a text mode screen resolution. 5. Menu Options 5.
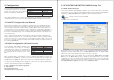
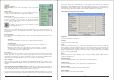
5.2 Virtual Media Windows Windows users should use the tool RawWrite for Windows which is included on the supplied CD. 5.2.1 Floppy Disk Launch RawWrite, you will see the window opposite: Insert your floppy disk into your floppy drive. Click the Read tab and then click on Select a name and destination for the floppy image file and click the Read button. As the image is written, you will see the progress as a percentage figure in the bottom left hand corner.
Windows To create the image file, use your favourite CD imaging tool. Copy the whole contents of the disc into one single image file on your hard disk. 5.2.2 Create a CD-ROM/ISO Image For example, with ‘Nero’ you choose ‘Copy and Backup’. Then, navigate to the ‘Copy Disc’ section. Select the CD ROM or DVD drive you would like to create an image from. Specify the filename of the image, and save the CD ROM content in that file. Example: 1. Create a CD image and name it image.iso 2.
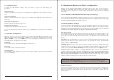
7. You will see the dialog below detailing the active image: 5.2.3 Drive Redirection The Drive Redirection feature allows the host system to access the CD-Rom drives, hard drives, floppy drives etc. on your client PC. 8. Click Reactivate. Access the console window and you will see that another CD drive has been installed on the host computer. This is the virtual drive you have just set up. You can access the uploaded CD image as though it were a regular CD. Click Unset to remove the image.
3. Click Connect Drive or Connect ISO The method of Drive Redirection: Built-in Java Drive Redirection function in Remote Console 1. Run Remote Control > KVM Console. 2. Click “Floppy” icon 4. Select a drive to redirect (if Connect Drive) 5. Select a ISO image to redirect (if Connect ISO) IMPORTANT 1. Drive Redirection is only possible with Windows 2000 and later versions. 2. Drive Redirection works on a low SCSI level.
5.3 User Management 5.3.1 Change Password To change your password, enter the new password in the upper entry field. Retype the password in the lower field. Click Apply to submit your changes. While the user account never sees the following options, the super account can change the name and password for both accounts. Existing users Select an existing user for modification. Once a user has been selected, click the lookup button to see the user information.
5.4 KVM Settings compression rates are very time consuming, they should not be used when several users are accessing the IP ACCESS KVM SWITCH CLASSIC simultaneously. 5.4.1 User Console The following settings are user specific. This means the super user can customize these settings for individual users separately. Changing the settings for one user does not affect the settings for the other users. The standard colour depth is 16 bit (65536 colours).
Miscellaneous Remote Console Settings 5.4.2 Keyboard/Mouse Start in Monitor Mode Sets the initial value for the monitor mode. By default the monitor mode is off. In case you switch it on, the Remote Console window will be started in a read only mode. Start in Exclusive Access Mode Enables the exclusive access mode immediately at Remote Console start-up. This forces the Remote Consoles of all other users to close.
5.5 Device Settings Mouse Speed Auto mouse speed Use this option if the mouse settings on the host use an additional acceleration setting. The IP ACCESS KVM SWITCH CLASSIC tries to detect the acceleration and speed of the mouse during the mouse sync process. Fixed mouse speed Use a direct translation of mouse movements between the local and the remote pointer. 5.5.1 Network The Network Settings panel allows network related parameters to be changed. Each parameter will be explained below.
Primary DNS Server IP Address IP address of the primary Domain Name Server in dot notation. This option may be left empty; however, the IP ACCESS KVM SWITCH CLASSIC will not be able to perform name resolution. Secondary DNS Server IP Address IP address of the secondary Domain Name Server in dot notation. It will be used in case the Primary DNS Server cannot be contacted. 5.5.2 Dynamic DNS A freely available Dynamic DNS service (dyndns.
5.5.3 Security Enable Dynamic DNS Enables the Dynamic DNS service. This requires a configured DNS server IP address. Dynamic DNS server This is the server name where the IP ACCESS KVM SWITCH CLASSIC registers itself in regular intervals. At the time of writing, this is a fixed setting since only dyndns.org is currently supported. Hostname This is the hostname of the IP ACCESS KVM SWITCH CLASSIC that is provided by the Dynamic DNS Server. (Use the whole name including the domain, e.g. testserver.dyndns.
Chain rule The Chain rule determines whether the access from the hosts is allowed or not. It can be one of these two values: ACCEPT : access allowed DROP : access not allowed 5.5.4 Certificate The rule can be configured to apply to a particular Group level (All, User, Super, Administrator). When the IP-KVM receives a TCP packet, it will process the packet with the chain rule depicted below.
3. Upload the certificate to the IP ACCESS KVM SWITCH CLASSIC switch using the Upload button. Confirm Challenge Password Confirmation of the Challenge Password Email The email address of a contact person that is responsible for the IP ACCESS KVM SWITCH CLASSIC and its security. Key length This is the length of the generated key in bits. 1024 bits are sufficient for most cases. Longer keys may result in slower response time by the IP ACCESS KVM SWITCH CLASSIC during connection establishment. 5.5.
make sure you configure your console computer accordingly. For instance, on Windows based operating systems you can configure a dial-up network connection, which defaults to the right settings like PPP. 5.5.6 Date And Time The Modem Settings panel allows you to configure remote access to the IP ACCESS KVM SWITCH CLASSIC using a modem. The meaning of each parameter will be described below. The modem settings are part of the serial settings panel.
SMTP Logging enabled With this option, the IP ACCESS KVM SWITCH CLASSIC is able to send Emails to an address given by the Email address text field in the Event Log Settings. These mails contain the same description strings as the internal log file and the mail subject is filled with the event group of the occurred log event.
5.6 Maintenance 5.6.2 Event Log 5.6.1 Device Information Displays the log list including the events that are logged by the IP ACCESS KVM SWITCH CLASSIC. This section contains a summary with various information about the IP ACCESS KVM SWITCH CLASSIC and its current firmware. It also allows you to reset the unit. 5.6.3 Update Firmware View the data file for support Allows you to download the IP ACCESS KVM SWITCH CLASSIC data file with specific support information.
A new firmware update is a binary file which can be sent to you by email from the Technical Support team of LINDY. Updating the firmware is a three-stage process: 1. The new firmware file is uploaded to the IP ACCESS KVM SWITCH CLASSIC. In order to do this you need to select the file on your local system using the Browse button on the Upload Firmware panel. Once the firmware file has been uploaded it is checked whether it is a valid firmware file and whether there were any transmission errors.
6. Troubleshooting Q 001: The remote mouse doesn’t work or is not synchronized A 001: Make sure the mouse settings in IP ACCESS KVM SWITCH CLASSIC match the mouse model. Use the Intelligent Sync option from the Mouse Handling sub menu of the Remote Console Options menu. Q 002: The video quality is bad or the picture is grainy A 002: Try to correct the brightness and contrast settings (see Page 19) until they are out of a range where the picture looks grainy.
7. Key Codes This table shows the key codes used to defines keystrokes or hotkeys for several functions. Please note that these key codes do not necessarily represent key characters that are used on international keyboards. They name a key on a standard 104 key PC keyboard with US English language mapping. Key (and aliases) 0-9 A-Z , TILDE -, MINUS =, EQUALS ; ’ <, LESS , .
8. Video Modes & User Permissions 9. Technical Specifications Model No. Target Device Connection Video Modes supported The table below lists the video modes that the IP ACCESS KVM SWITCH CLASSIC supports. Please do not use any other custom video settings; the IP ACCESS KVM SWITCH CLASSIC may not be able to detect them.
Well-Known TCP/UDP Port Numbers Port numbers are divided into three ranges: Well Known Ports, Registered Ports, and Dynamic and/or Private Ports. Well Known Ports are those from 0 through 1023. Registered Ports are those from 1024 through 49151. Dynamic and/or Private Ports are those from 49152 through 65535. Well Known Ports are assigned by IANA, and on most systems, can only be used by system processes or by programs executed by privileged users. Table below shows some of the wellknown port numbers.