IM10033 RETURN TO MAIN MENU PANTHER August 2009 TM Push Pull GUN Models: K2874-1, K2874-2, K2874-3, K2875-2 Safety depends on you. . . Lincoln arc welding and cutting equipment is designed and built with safety in mind. However, your overall safety can be increased by proper installation...and thoughtful operation on your part. DO NOT INSTALL, OPERATE OR REPAIR THIS EQUIPMENT WITHOUT READING THIS MANUAL AND THE SAFETY PRECAUTIONS CONTAINED THROUGHOUT.
i i SAFETY WARNING CALIFORNIA PROPOSITION 65 WARNINGS Diesel engine exhaust and some of its constituents are known to the State of California to cause cancer, birth defects, and other reproductive harm. The Above For Diesel Engines The engine exhaust from this product contains chemicals known to the State of California to cause cancer, birth defects, or other reproductive harm. The Above For Gasoline Engines ARC WELDING CAN BE HAZARDOUS.
ii ii SAFETY ELECTRIC SHOCK can kill. ARC RAYS can burn. 3.a. The electrode and work (or ground) circuits are electrically “hot” when the welder is on. Do not touch these “hot” parts with your bare skin or wet clothing. Wear dry, hole-free gloves to insulate hands. 4.a. Use a shield with the proper filter and cover plates to protect your eyes from sparks and the rays of the arc when welding or observing open arc welding. Headshield and filter lens should conform to ANSI Z87. I standards. 3.b.
iii iii SAFETY WELDING and CUTTING SPARKS can cause fire or explosion. 6.a. Remove fire hazards from the welding area. If this is not possible, cover them to prevent the welding sparks from starting a fire. Remember that welding sparks and hot materials from welding can easily go through small cracks and openings to adjacent areas. Avoid welding near hydraulic lines. Have a fire extinguisher readily available. 6.b.
iv iv SAFETY PRÉCAUTIONS DE SÛRETÉ Pour votre propre protection lire et observer toutes les instructions et les précautions de sûreté specifiques qui parraissent dans ce manuel aussi bien que les précautions de sûreté générales suivantes: Sûreté Pour Soudage A LʼArc 1. Protegez-vous contre la secousse électrique: a. Les circuits à lʼélectrode et à la piéce sont sous tension quand la machine à souder est en marche.
v v Thank You for selecting one of our QUALITY products. We want you to take pride in operating this product ••• as much pride as we have in bringing this product to you! CUSTOMER ASSISTANCE POLICY The business of our company is manufacturing and selling high quality welding equipment. Our challenge is to meet the needs of our customers and to exceed their expectations. On occasion, purchasers may ask us for advice or information about their use of our products.
vi vi TABLE OF CONTENTS SAFETY PRECAUTIONS.......................................................................................................................i-v TABLE OF CONTENTS...........................................................................................................................vi GENERAL INFORMATION ......................................................................................................................1 PRODUCT DESCRIPTION ..........................................
PANTHER™ Push Pull Gun - GENERAL PRODUCT DESCRIPTION RECOMMENDED PROCESSES AND EQUIPMENT The Panther™ push-pull gun is a lightweight, handheld combined semiautomatic wire feeder and welding gun, designed primarily for aluminum welding using argon shielding gas. The cable included with the push-pull gun allows welding up to 15 (4.57m) 25 (7.62m) or 50 feet (15.2m) air-cooled and 25 feet (7.62m) water-cooled from the power source.
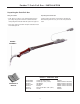
Panther™ Push Pull Gun - INSTALLATION Unpacking the Push-Pull Gun Safety Precautions Unpacking the Push-Pull Gun – Read "Safety Precautions" in the Operating Manual before proceeding. Only personnel that have read and understood the Operating Manual should install and operate this equipment. Carefully unpack your Panther™ Push-Pull Gun and attach the Barrel Assembly, and make sure you have all of the parts shown below.
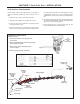
PANTHER™ Push Pull Gun - INSTALLATION Push-Pull Gun Familiarization wire. Wide groove feeds 3/64 inch (1.2mm) diameter wire. Gun is shipped with wide groove or 3/64 in operating position (toward handle). Reverse roller for .035 inch (0.9mm) diameter wire. Become familiar with your push-pull gun before connecting to welder. For features described below, refer to Figure on the next page. 1. Handle, gun can be used in either right or left hand. 5. Gas nozzle directs gas flow around arc.
PANTHER™ Push Pull Gun - INSTALLATION & OPERATING INSTRUCTIONS OPERATING INSTRUCTIONS: Handle Grip Position The handle is designed such that when held correctly, the trigger is operated with the rear finger. This ensures your hand is above speed control thus avoiding accidental contact with the speed control while welding.
PANTHER™ Push Pull Gun - OPERATING INSTRUCTIONS used. Consult your local dealer or appropriate AWS publication for help in selecting an appropriate alloy type and wire size. Also refer to, "Procedure Settings" later in this chapter, for wire sizes used with typical base metal thicknesses and procedure settings. Safety Precautions WARNING • Do not touch electrically live parts or electrode with skin or wet clothing Installing Conduit Liner: 1.
PANTHER™ Push Pull Gun - OPERATING INSTRUCTIONS Drive Roll Groove Selection The drive rolls have two grooves. A wider groove for feeding 3/64” (1.2mm) wire and a narrow groove for feeding .035” (0.9mm) wire to accommodate changes in the wire size used. Changing between the grooves simply requires reversing the drive roll. A. Drive Roll Orientation 1. Drive rolls are scribed with wire groove size. For appropriate groove orientation, ensure desired size callout is facing up and visible.
PANTHER™Push Pull Gun - OPERATING INSTRUCTIONS Making A Weld 1. Check that the push-pull gun power, control, and gas connections are correct for the power source being used. Check that the gas supply is turned on. Check wire push-pull for an adequate supply of wire. 2. See "Procedure Settings", below for wire feed speed and voltage settings. Set these controls depending on the welding wire and base metal thickness being used. 3. Connect work clamp to metal being welded.
PANTHER™ Push Pull Gun ACCESSORIES/MAINTENANCE ACCESSORIES (consult Lincoln Sales Bulletin E12.16) The following accessories are available for the Panther™ push-pull gun. .035-3/64" Aluminum Drive Roll Kit Features two grooves for feeding aluminum wire. The smaller groove feeds .035 wire. The larger groove feeds 3/64th wire. Order KP2876-1 Wire Conduits for Aluminum Wire 15 foot .035"-1/16" Wire Diameter 25 foot .035"-1/16" Wire Diameter 50 foot .
PANTHER™ Push Pull Gun Troubleshooting Guide PROBLEM SYMPTOMS No arc, wire feed, or gas flow. 1. 2. 3. 4. 5. Cable connections loose. Trigger switch loose or defective. Welder not turned on. Welder not plugged in. Cable or adapter cable damaged. No arc, weak arc. 1. Poor ground connection to work. 2. Power cable connection loose. 3. Voltage set too low. 4. Tip too large for wire size. 5. Wire feed speed too slow. No wire feed. 1. Feeding small diameter wire with large groove on drive roller. 2.
PANTHER™ Push Pull Gun Troubleshooting Guide TESTING THE TORCH Motor Check. Remove the torch connector from the cabinet. Using the torch Control Cable Connector, check the resistance across pins “A” and “B” (motor leads). The resistance across the motor should be between 5-10 ohms. If an open circuit or short exist, check the motor leads and motor independently. Testing the Potentiometer. Using the torch Control Cable Connector, check the resistance across pin “D” (wiper) and pin “C”.
PANTHER™ Push Pull Gun AIR-COOLED GUN BARREL AND EXTERNAL REPLACEMENT PARTS LIST AND DIAGRAM 24 21 22 23 26 25 16 17 19 19 18 19 19 16 19 27 28 20 ITEM NO. PART NO. ITEM NO. PART NO.
PANTHER™ Push Pull Gun WATER-COOLED GUN BARREL AND EXTERNAL REPLACEMENT PARTS LIST AND DIAGRAM 21 24 23 22 26 25 16 19 17 19 18 19 19 16 19 27 28 20 ITEM NO. PART NO. ITEM NO. DESCRIPTION PART NO.
PANTHER™ Push Pull Gun INTERNAL REPLACEMENT PARTS LIST AND DIAGRAM 2 1 12 7 13 14 8 (2x) 4 (2x) 10 11 3 9 15 5 6 ITEM NO. PART NO.
● Do not touch electrically live parts or WARNING Spanish AVISO DE PRECAUCION French ATTENTION German WARNUNG Portuguese ATENÇÃO ● Keep flammable materials away. ● Wear eye, ear and body protection. ● Mantenga el material combustible ● Protéjase los ojos, los oídos y el electrode with skin or wet clothing. ● Insulate yourself from work and ground. ● No toque las partes o los electrodos bajo carga con la piel o ropa mojada. ● Aislese del trabajo y de la tierra.
● Keep your head out of fumes. ● Use ventilation or exhaust to ● Turn power off before servicing. ● Do not operate with panel open or guards off. remove fumes from breathing zone. ● Los humos fuera de la zona de res- piración. ● Mantenga la cabeza fuera de los humos. Utilice ventilación o aspiración para gases. ● Gardez la tête à l’écart des fumées.
Cleveland, Ohio 44117-1199 U.S.A. TEL: 216.481.8100 FAX: 216.486.1751 WEB SITE: www.lincolnelectric.