
Manual


SF11 Laser altimeter
Product manual
I2C interface
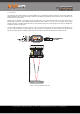
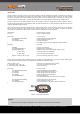
The I2C interface on the main connector can be used to output a value that represents the altitude in centimetres. This interface
operates in “slave” mode and uses 3.3 V logic levels. The I2C address can be set through the USB menu system. The host controller
acts as the I2C “master” and sends the address to the SF11 as an 8 bit value (7 address bits plus 1 read/write bit). The SF11 then
returns the altitude as a 16 bit integer. The maximum delay between receiving the address and returning the altitude is 25 ms.
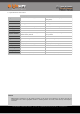
The I2C bus also has a binary coded command set that can be used to retrieve or change values. Distance values are always in
centimetres and signed values are permitted where used. The main I2C address can only be set through the USB menu and cannot be
change accidentally through the I2C port.
Values in the SF11 are held at specific locations and once a value has been read or written the location remains active until changed.
This is useful to simplify the code needed for the continuous monitoring of a value. For example, to update the distance
continuously, set the distance location once then read the value in a loop like the Arduino code below:
float distance; // Distance will be in meters
byte a, b; // Bytes read by the I2C port
void setup() // One time setup
{
Wire.beginTransmission(0x66); // Enable transmission to the I2C address
Wire.write(0); // Write the distance location -> 0
Wire.endTransmission(); // End the transmission
} // The output registers are now configured to send the distance
void loop() // Main loop
{
delay(50); // Delay or user code here
Wire.requestFrom(0x66, 2); // Request 2 bytes from the SF11
while(Wire.available()) // Make sure the SF11 sends the required number of bytes
{
a = Wire.read(); // Fetch the high byte of the distance
b = Wire.read(); // Fetch the low byte of the distance
}
distance = (float)(a * 256 + b)/100; // Convert to a floating point value in meters
}
Writing new values also makes the new location active so it needs to be changed back again if you want to monitor something else.
In this example the zero datum offset value is updated then the distance is read continuously:
float zero_offset = 0.34; // Start with a new zero datum value in meters
a = (byte)(zero_offset * 100 >> 8); // Convert to cm and fetch the high byte
b = (byte)(zero_offset * 100 && 0xff); // Fetch the low byte
void setup() // One time setup
{
Wire.beginTransmission(0x66); // Enable transmission to the I2C address
Wire.write(7); // Write the zero datum offset location -> 7
Wire.write(a); // Write the high byte of the zero datum
Wire.write(b); // Write the low byte of the zero datum
Wire.endTransmission(); // End the transmission
// The zero datum location is still active but is not needed
Wire.beginTransmission(0x66); // Enable transmission to the I2C address
Wire.write(0); // Write the distance location -> 0
Wire.endTransmission(); // End the transmission - the distance location is now active
}
Figure 8 :: I2C interface connections
!
Caution
Ensure that a unique I2C address is assigned to the SF11 and that no other devices share this address.
SF11 Laser altimeter - Product manual - Revision 9 | of | © LightWare Optoelectronics (Pty) Ltd, 2019 | www.lightware.co.za 8 20