
User's Manual


15
1. Overview
2. Set Up & Use /
Daily Operation
3. Optional Accessories
4. Maintenance &
Troubleshooting
5. Warranty, Safety
& Specifications
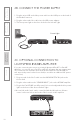
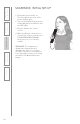
5. OPERATING THE FLEXMIKE
Once the Flexmike is charged, follow these steps to set it up for use.
1. Remove the Flexmike from the
charging cable and put it on by
connecting the magnetic clasps
behind your neck. The Flexmike
will automatically power on and
mute when it is removed from the
charger. This will automatically
power on the Access Link as well.
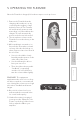
2. The microphone volume on the
Flexmike is set at the factory to the
mid point.
3. While speaking in a normal voice,
fine-tune the microphone volume
on front of the Access Link up or
down. Proper volume level should
be as follows:
• Your voice should be clearly
heard by another person on the
other side of the room.
• You should barely be able to
hear your own voice.
• There should not be any audio
“feedback” or squealing
outside of 2-3 feet (if there is,
turn the volume down slightly).
REMEMBER: This equipment
supplements the user’s voice so they
are able to speak in a conversational
tone. Having the volume set too high
will result in feedback and listener
fatigue.
4. Once initial volume level is set,
walk around the room and listen
for overall audio quality.
5. If further fine-tuning is required,
you may need to adjust the Tone
Control on the front of the Access
Link or adjust the EQ on your
amplifier.
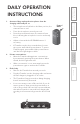
AUDIO INMICROPHONE TONE
POWER
MIN
1
MAX MIN MAX TREBLE BASS
2