
User Manual
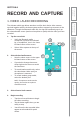

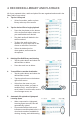
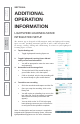
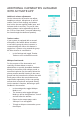
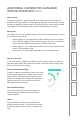
Table Of Contents
- U s e r M a n u a l
- SYSTEM COMPONENTS AND UNPACKING
- OPTIONAL COMPONENTS
- POD CONTROLS AND CONNECTIONS
- ACTIVATE STATION: CONTROLS, CONNECTIONS AND INDICATORS
- ACTIVATE STATION: CONTROLS, CONNECTIONS AND INDICATORS
- 2. PLUG IN THE ACTIVATE STATION
- 3. PLACE THE COMPONENTS IN THE ACTIVATE STATION
- 5. REGISTER ANY NEW ACTIVATE SYSTEM COMPONENTS
- 6. DOWNLOAD THE MOBILE APP
- 7. PAIR YOUR MOBILE DEVICE TO ACTIVATE STATION
- 8. SET UP THE FLEXMIKE + EARBUD
- 9. SET THE PODS OUT IN THE CLASSROOM
- 10. TEST GENERAL SYSTEM OPERATION
- 9. SETTING SYSTEM VOLUME LEVELS
- DAILY OPERATION INSTRUCTIONS
- ADDITIONAL OPERATION INFORMATION
- MAINTENANCE & TROUBLESHOOTING
- WARRANTY, SAFETY & SPECIFICATIONS

CHARGING PODS #9-12
If your system was equipped with more than 8 pods, those additional pods will
need to be charged using the provide USB cable from the back of the Activate
Station.
Charging:
•
Connect the included charging cable(s) to any of the USB CHARGING
OUTPUT por
ts on the back of Activate Station.
•
Connect the other end of the cable to the Micro USB port on the pod.
•
The red charge light on the Pod will light to indicate charging has begun.
•
When fully charged, the light will turn green.
TIPS AND TRICKS TO SUCCESSFUL USE
Determining optimum placement of the pods
•
Pods should be placed in the approximate center of the group
•
They can be placed on the center of a table or on the floor where the
students are sitting.
•
The microphone is designed to pick up students in a 360 degree radius, so
it a
lso operates best when in the middle of a group.
Managing equipment and charging
•
Leave all components in the on position.
- W
hen you place them on the charger, they will charge as normal.
-
When you remove them from the charger to start the day, they will be
fully charged and ready for operation.
•
Assign students to manage the charging of the group speakers.
- Have one assigned student remove it from the charger to start the day
and pl
ace it back on the charger at the end of the day.
•
If using the LS Remote App, always leave the remote control on the charger
to ensure it maintains its link with the Access amplifier and iOS device.
Determining proper volume levels
•
This system is not designed to make the teachers voice louder, but to
distribute it a
ppropriately so it is heard clearly by the selected group of
students or t
he whole class.
•
The pods are designed to be used independently, so turning the volume up
too loud can result in bleed-over to another group.
•
Typical volume levels at a group speaker are about half of the maximum
setting – approximately 12:00 on the dial.
•
It should be loud enough that students in the desired group hear you as
though you we
re speaking directly to them at a distance of 3 feet.
•
The classroom speaker should also be at a level that is not loud, but
clear t
hroughout the whole room. Typically 12:00 on the Access amplifier
‘Microphone Volume’ control is appropriate.
6.
Safety
&
Specifications
5.
Maintenance
&
T
r
oubleshooting
3.
DaiIy
Operation
2.
Initial
Set-up
1.
Overview
4.
Additional
Information