
User Manual
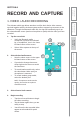

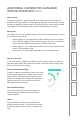
Table Of Contents
- U s e r M a n u a l
- SYSTEM COMPONENTS AND UNPACKING
- OPTIONAL COMPONENTS
- POD CONTROLS AND CONNECTIONS
- ACTIVATE STATION: CONTROLS, CONNECTIONS AND INDICATORS
- ACTIVATE STATION: CONTROLS, CONNECTIONS AND INDICATORS
- 2. PLUG IN THE ACTIVATE STATION
- 3. PLACE THE COMPONENTS IN THE ACTIVATE STATION
- 5. REGISTER ANY NEW ACTIVATE SYSTEM COMPONENTS
- 6. DOWNLOAD THE MOBILE APP
- 7. PAIR YOUR MOBILE DEVICE TO ACTIVATE STATION
- 8. SET UP THE FLEXMIKE + EARBUD
- 9. SET THE PODS OUT IN THE CLASSROOM
- 10. TEST GENERAL SYSTEM OPERATION
- 9. SETTING SYSTEM VOLUME LEVELS
- DAILY OPERATION INSTRUCTIONS
- ADDITIONAL OPERATION INFORMATION
- MAINTENANCE & TROUBLESHOOTING
- WARRANTY, SAFETY & SPECIFICATIONS

SEC
TION 4:
RECORD AND CAPTURE
1. VIDEO + AUDIO RECORDING
The Activate mobile app allows teachers to utilize their device video camera
synched together with the Activate system audio to capture key moments in the
classroom. Through the Bluetooth audio link, the App will seamlessly synch up
the selected audio source (teacher microphone or pods) with the video you have
recorded.
1.
Tap the record tab
•
Verify the Bluetooth audio
connection is present as indicated
by a “headphone” icon in the lower
left hand corner of the screen.
•
Select Video capture at the top of
the sc
reen.
2.
Select desired audio source
•
Note the select source in the upper
left hand c
orner of the screen.
•
If you wish to change the source,
swipe r
ight on the screen to reveal
the c
ontrol arc.
•
To record teacher audio only, select
the c
lass button. Make sure you
microphone is unmuted.
•
To record student group audio,
select the desired pod.
NOTE: for optimum student audio
quality, the teacher microphone
should be muted.
3.
Select front or back camera
4.
Begin recording
•
Tap the red record button to begin
the video recording.
•
Tap the button again when you are
ready to stop.
•
You will see the last recorded video
appear as a thumbnail for quick
review.
1
3
2
4
1
6.
Safety
&
Specifications
5.
Maintenance
&
T
r
oubleshooting
3.
DaiIy
Operation
2.
Initial
Set-up
1.
Overview
4.
Additional
Information