
User Manual
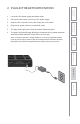
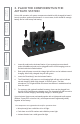
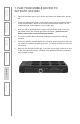
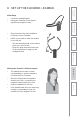
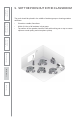

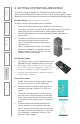
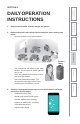
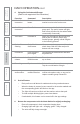
Table Of Contents
- U s e r M a n u a l
- SYSTEM COMPONENTS AND UNPACKING
- OPTIONAL COMPONENTS
- POD CONTROLS AND CONNECTIONS
- ACTIVATE STATION: CONTROLS, CONNECTIONS AND INDICATORS
- ACTIVATE STATION: CONTROLS, CONNECTIONS AND INDICATORS
- 2. PLUG IN THE ACTIVATE STATION
- 3. PLACE THE COMPONENTS IN THE ACTIVATE STATION
- 5. REGISTER ANY NEW ACTIVATE SYSTEM COMPONENTS
- 6. DOWNLOAD THE MOBILE APP
- 7. PAIR YOUR MOBILE DEVICE TO ACTIVATE STATION
- 8. SET UP THE FLEXMIKE + EARBUD
- 9. SET THE PODS OUT IN THE CLASSROOM
- 10. TEST GENERAL SYSTEM OPERATION
- 9. SETTING SYSTEM VOLUME LEVELS
- DAILY OPERATION INSTRUCTIONS
- ADDITIONAL OPERATION INFORMATION
- MAINTENANCE & TROUBLESHOOTING
- WARRANTY, SAFETY & SPECIFICATIONS

10.
TEST GENERAL SYSTEM OPERATION
1.
From your mobile device, open the Lightspeed Activate App.
2.
Select the classroom speaker and begin speaking into your microphone.
You should hear your voice and a comfortable, but not loud volume level.
Tap
the mute button to ensure that is working properly. The microphone
icon on the app and the power light on the Flexmike will both turn red.
3.
Select Pod #1. Note that it takes approximately 1.5-2 seconds to connect -
the button will blink and you will hear a tone in your earbud to confirm that
pod is liv
e. Begin speaking and confirm that your voice is coming through
that pod. You
should also be able to hear audio in your earbud. If possible,
have another person sit next to and speak into the pod. Try muting your
microphone to just monitor the conversation.
4.
Try selecting each of other pods to make sure they are all properly
connected to the system.
5.
Enable Pod to Class sharing by swiping one of the pods to the class speaker
icon. This allows a student to pick up the pod and speak into it like a
microphone to present to the class. The students voice will be amplified by
the class speaker, allowing all students to clearly understand. Note that the
teacher’s microphone can also be live or muted during student sharing.
6.
Try capturing a video. Press the Record tab. The camera on your device will
be activated. You should see a headphone icon on the lower left hand side
of t
he screen to indicate a bluetooth audio connection is active. Swipe to
the r
ight to pull out the remote arc and select an audio source to record.
To re
cord just your microphone, select the class icon. To record a student
conversation, select the specific pod to record that audio.
7.
Press the red recording button to start the recording. Make sure you or
another i
ndividual is speaking into the microphone and/or select pod. After
several s
econds, press the red stop button to end the recording
8.
Review the video. You can either click on the thumbnail for the video you
j
ust recorded, or click on the Library tab to pull up a list of your recordings.
Select the video and press play. By default, the audio will play back directly
to your earpiece. If you wish to play the audio back through the class
speaker or an idividual pod, un-mute the microphone and select the desired
audio s
ource from the control arc. Make sure you can hear the appropriate
audio y
ou were attempting to record.
9.
That covers the general functionality of the system. Please refer to the
tutorial in the mobile app and additional sections in this user manual for
more det
ailed operation.
6.
Safety
&
Specifications
5.
Maintenance
&
T
r
oubleshooting
4.
Additional
Information
3.
DaiIy
Operation
1.
Overview
2.
Initial
Set-up