
User Manual
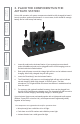
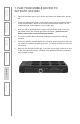
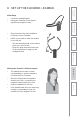
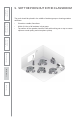

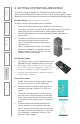
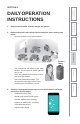
Table Of Contents
- U s e r M a n u a l
- SYSTEM COMPONENTS AND UNPACKING
- OPTIONAL COMPONENTS
- POD CONTROLS AND CONNECTIONS
- ACTIVATE STATION: CONTROLS, CONNECTIONS AND INDICATORS
- ACTIVATE STATION: CONTROLS, CONNECTIONS AND INDICATORS
- 2. PLUG IN THE ACTIVATE STATION
- 3. PLACE THE COMPONENTS IN THE ACTIVATE STATION
- 5. REGISTER ANY NEW ACTIVATE SYSTEM COMPONENTS
- 6. DOWNLOAD THE MOBILE APP
- 7. PAIR YOUR MOBILE DEVICE TO ACTIVATE STATION
- 8. SET UP THE FLEXMIKE + EARBUD
- 9. SET THE PODS OUT IN THE CLASSROOM
- 10. TEST GENERAL SYSTEM OPERATION
- 9. SETTING SYSTEM VOLUME LEVELS
- DAILY OPERATION INSTRUCTIONS
- ADDITIONAL OPERATION INFORMATION
- MAINTENANCE & TROUBLESHOOTING
- WARRANTY, SAFETY & SPECIFICATIONS

8.
SET UP THE FLEXMIKE + EARBUD
Initial Setup
•
Locate the earbud lanyard
•
Hang your Flexmike on the lanyard
opposite t
he magnetic clasp.
•
Plug the earbud into the headphone
connection on the Flexmike.
•
NOTE: if you prefer to wear the earbud
in your left ear:
- Turn the lanyard around so the earbud
goes up to your left ear.
- Route the plug around the back side
of the microphone to plug into the
headphone jack.
Wearing the Flexmike + Earbud Lanyard
•
The earbud can be worn in either
ear depending on how the lanyard is
connected to y
our Flexmike.
•
Place the lanyard and microphone
around your neck, connecting the
magnetic clasps behind your neck.
•
Insert the earbud into your ear
•
If the earbud cable does not seem long
enough to c
omfortably fit your ear,
unwind it from the lanyard 2-3 coils.
1
6.
Safety
&
Specifications
5.
Maintenance
&
T
r
oubleshooting
4.
Additional
Information
3.
DaiIy
Operation
1.
Overview
2.
Initial
Set-up