
User Manual
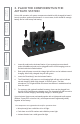
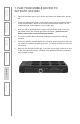
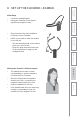
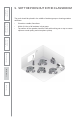

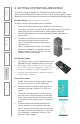
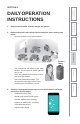
Table Of Contents
- U s e r M a n u a l
- SYSTEM COMPONENTS AND UNPACKING
- OPTIONAL COMPONENTS
- POD CONTROLS AND CONNECTIONS
- ACTIVATE STATION: CONTROLS, CONNECTIONS AND INDICATORS
- ACTIVATE STATION: CONTROLS, CONNECTIONS AND INDICATORS
- 2. PLUG IN THE ACTIVATE STATION
- 3. PLACE THE COMPONENTS IN THE ACTIVATE STATION
- 5. REGISTER ANY NEW ACTIVATE SYSTEM COMPONENTS
- 6. DOWNLOAD THE MOBILE APP
- 7. PAIR YOUR MOBILE DEVICE TO ACTIVATE STATION
- 8. SET UP THE FLEXMIKE + EARBUD
- 9. SET THE PODS OUT IN THE CLASSROOM
- 10. TEST GENERAL SYSTEM OPERATION
- 9. SETTING SYSTEM VOLUME LEVELS
- DAILY OPERATION INSTRUCTIONS
- ADDITIONAL OPERATION INFORMATION
- MAINTENANCE & TROUBLESHOOTING
- WARRANTY, SAFETY & SPECIFICATIONS

3. PLACE THE COMPONENTS IN THE
ACTIVATE STATION
Prior to full operation, all system components should be fully charged (at least 8
hours) to ensure optimum performance. In most cases, there should be enough
battery life for initial setup and testing.
1.
Insert all pods into the Activate Station. If your system has more than 8
pods, t
he additional pods can be plugged into the USB charging ports on
the bac
k with the included cables.
2.
Each pod will power on and the charge light will turn red to indicate normal
charging. When fully charged, they will turn green.
3.
Insert the Flexmike(s)* into the Activate Station.
4.
The Flexmike(s)* will power on and charging light will turn red to indicate
normal charging. When fully charged, it will turn green. The blue
microphone 1 or 2 light will blink for several seconds as it establishes a link,
then t
urn solid.
5.
For systems with optional handheld remotes, those can be plugged into
the rear US
B Pods/Remote charging ports.The charging light will turn red to
indicate nor
mal charging. When fully charged, it will turn green.
If y
our Activate System was purchased together with a Lightspeed audio system
(Redcat, Topcat, 955 or Access Link), all components were registered (paired)
together at the factory.
T
he components are registered and ready for operation when:
•
Microphone(s) has a solid blue #1 or #2 light
•
Pods have a red LED number and solid blue power light
•
Activate Station has a solid green link light
6.
Safety
&
Specifications
5.
Maintenance
&
T
r
oubleshooting
4.
Additional
Information
3.
DaiIy
Operation
1.
Overview
2.
Initial
Set-up