✚❈❋❇❄❁❄❀❍ Installation and Operation Installation et fonctionnement Instalación y operación Einbau und Betrieb Installazione e funzionamento ✤✤ ✎✡✟☛ ✤✤☛✎✡✟
Introduction INNOVATE OR DISINTEGRATE Thank you for purchasing the Lightning Audio Fast and the Furious Amplifier. Our customers have come to expect that Lightning Audio pushes the edge in audio. Now we will push the edge in the amplifier and woofer business with high value and high performance models. If, after reading your manual, you still have questions regarding this product, we recommend that you see your Lightning Audio dealer.
Safety Instructions This symbol with “WARNING” is intended to alert the user to the presence of important instructions. Failure to heed the instructions will result in severe injury or death. This symbol with “CAUTION” is intended to alert the user to the presence of important instructions. Failure to heed the instructions can result in injury or unit damage. ! CAUTION: To prevent injury and damage to the unit, please read and follow the instructions in this manual.
Installation INSTALLATION CONSIDERATIONS The following is a list of tools needed for installation: Volt/Ohm Meter Wire strippers Wire crimpers Wire cutters #2 Phillips screwdriver Battery post wrench Hand held drill w/assorted bits 1/8" diameter heatshrink tubing Assorted connectors Adequate Length—Red Power Wire Adequate Length—Remote Turn-on Wire Adequate Length—Black Grounding Wire This section focuses on some of the vehicle considerations for installing your new Amplifier.
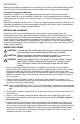
Installation Mounting the amplifier upside down to the rear deck of the trunk will not provide proper cooling and will severely affect the performance of the amplifier and is strongly not recommended. Passenger Compartment Mounting Mounting the amplifier in the passenger compartment will work as long as you provide a sufficient amount of air for the amplifier to cool itself. If you are going to mount the amplifier under the seat of the vehicle, you must have at least 1" (2.
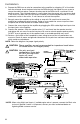
Installation 6. Prepare the REM turn-on wire for connection to the amplifier by stripping 1/2" of insulation from the wire end. Insert the bared wire into the REM terminal and tighten the set screw to secure the cable into place. Connect the other end of the REM wire to a switched 12 volt positive source. The switched voltage is usually taken from the source unit's accessory lead.
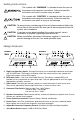
Installation USING PASSIVE CROSSOVERS A passive crossover is a circuit that uses capacitors and/or coils and is placed on speaker leads between the amplifier and speaker. The crossover delegates a specific range of frequencies to the speaker for optimum driver performance. A crossover network can perform one of three functions: High-Pass (capacitors), Low-Pass (inductors or coils) and Bandpass (combination of capacitor and coil). The most commonly used passive crossover networks are 6dB/octave systems.
Operation ADJUSTING GAIN To adjust the gain setting, turn the amplifier gains all the way down. Turn the source unit volume up until distortion is audible and then turn it down a bit until the distortion is inaudible. Next, turn the amplifier gain setting until once again distortion is audible and then back it down until the distortion is inaudible. NOTE: For a more in depth setting procedure, contact Lightning Audio Technical Support.
Limited Warranty Information Lightning Audio offers a limited warranty on products on the following terms: • Length of Warranty Speakers One year parts and labor warranty. Requires proof of purchase. Amplifiers One year parts and labor warranty. Requires proof of purchase. • What is Covered This warranty applies only to Lightning Audio products sold to consumers by Authorized Lightning Audio Dealers in the United States of America or its possessions.
Introduction Français L’innovation ou la mort ! Nous vous remercions d'avoir acheté cet ampli Lightning Audio Fast and the Furious. Notre clientèle s’attend à ce que Lightning Audio pousse toujours plus loin les limites du son. C’est ce à quoi nous nous consacrons à présent dans les domaines des amplis et des hautparleurs graves grâce à des modèles hautement performants de valeur supérieure.
Consignes de sécurité Le symbole accompagnant le mot « AVERTISSEMENT » signale à l'utilisateur la présence d’instructions importantes. Le non-respect de ces instructions causera des blessures graves ou la mort. Le symbole accompagnant l’expression « MISE EN GARDE » signale à l'utilisateur la présence d’instructions importantes. Le non-respect de ces instructions peut causer des blessures ou endommager l’appareil.
Installation Français CONSIDÉRATIONS CONCERNANT L’INSTALLATION Voici la liste d’outils requis pour l’installation : Voltmètre-ohmmètre Pince à dénuder Pince à sertir Coupe-fils Tournevis à embout cruciforme no 2 Clé de borne de batterie Perceuse à main avec mèches assorties Tube thermorétrécissable de 1/8" de diamètre Connecteurs assortis Longueur adéquate — Fil d’alimentation rouge Longueur adéquate — Fil d’allumage à distance Longueur adéquate — Fil de masse noir Cette section traite de points concerna
Installation Montage dans le coffre Un montage vertical de l’ampli assure un refroidissement optimal. Le montage de l’ampli sur le plancher du coffre est acceptable mais offre un refroidissement moindre que le montage vertical. Le montage de l’ampli à l’envers, sur la tablette arrière, n’assure pas un refroidissement satisfaisant, nuit à la performance de l’ampli et est, pas conséquent, fortement déconseillé.
Français Installation 6. Préparez le fil d’activation REM qui devra être relié à l’ampli en dénudant 1/2 po de son extrémité. Insérez la partie dénudée dans la borne REM, puis fixez le fil en vissant la vis sans tête. Connectez l’autre extrémité du fil REM à une source positive commutée de 12 volts. La tension commutée provient généralement de l’antenne ou du câble d’accessoires de la source audio.
Installation UTILISATION DE FILTRES PASSIFS Un filtre passif est un circuit utilisant des condensateurs ou bobines qui est placé sur les fils du haut-parleur, entre l’ampli et le haut-parleur. Le filtre délègue une gamme de fréquences spécifique au haut-parleur afin d’assurer une performance optimale de l’ampli. Un filtre passif peut accomplir une des trois fonctions suivantes : passe-haut (condensateurs), passe-bas (inducteurs ou bobines) et passe-bande (combinaison de condensateur et de bobine).
Fonctionnement Français RÉGLAGE DU GAIN Pour régler le gain, tournez le bouton de gain de l’ampli vers son niveau le plus bas. Augmentez le volume de la source audio jusqu’à produire une distorsion audible, puis baissez-le jusqu’à ce que la distorsion devienne inaudible. Augmentez ensuite le gain de l’ampli jusqu’à produire de nouveau une distorsion audible, puis baissez-le jusqu’à ce que la distorsion devienne inaudible.
Garantie limitée Lightning Audio offre une garantie limitée sur ses produits selon les termes suivants : • Durée de la garantie Haut-parleurs Un an, pièces et main-d’œuvre. Preuve d'achat exigée. Amplis Un an, pièces et main-d’œuvre. Preuve d'achat exigée. • Couverture Cette garantie s'applique uniquement aux produits Lightning Audio vendus aux consommateurs par des distributeurs Lightning Audio agréés, aux États-Unis d’Amérique et leurs territoires.
Introducción Innove o desintegrese! Español Gracias por comprar el Amplificador Lightning Audio Fast and the Furious. Nuestros clientes pueden contar con que Lightning Audio traspase los límites del audio. Ahora, traspasaremos lo límites en el negocio de amplificadores y woofers con modelos de gran valor y alto rendimiento.Si después de leer su manual tiene preguntas sobre este producto, le recomendamos que consulte a su distribuidor de Lightning Audio.
Instrucciones de seguridad Este símbolo de "ADVERTENCIA" tiene por objeto alertar al usuario sobre la presencia de instrucciones de importancia. No tener en cuenta las instrucciones podría resultar en lesiones graves o muerte. Este símbolo de "PRECAUCIÓN" tiene por objeto alertar al usuario sobre la presencia de instrucciones de importancia. No tener en cuenta las instrucciones podría resultar en lesiones o daños a la unidad.
Instalación CONSIDERACIONES SOBRE LA INSTALACIÓN La siguiente es una lista de las herramientas necesarias para la instalación: Español Voltímetro / Ohmetro Pelacables Tenaza engarzadora de cables Cortador de cables Destornillador Phillips No.
Instalación Instalación en el maletero Montar el amplificador verticalmente proporcionará el mejor enfriamiento al amplificador. Se puede montar el amplificador en el piso del maletero pero esta posición ofrece menor enfriamiento que el montaje vertical. Montar el amplificador boca abajo respecto a la plataforma posterior del maletero no proporcionará el enfriamiento adecuado, afectará severamente el rendimiento del amplificador y no se recomienda.
Instalación Español 5. Prepare el cable NEGRO (cable a tierra) para conectarlo al amplificador, pelando 1/2 pulgada (1,3 cm) de la aislación del extremo final del cable. Inserte el cable sin aislación en el terminal GND (tierra) y ajuste el tornillo de fijación para asegurar el cable en su lugar. Prepare la conexión a tierra en el chasis raspando la pintura de la superficie de metal y limpie minuciosamente el polvo y la grasa del área. Pele el otro extremo del cable y conecte un anillo conector.
Instalación USANDO X-OVERS PASIVOS Un X-over pasivo es un circuito que usa condensadores y/o bobinas, el cual se coloca en los conductores de los altavoces entre el amplificador y el altavoz. El X-over delega un rango específico de frecuencias al altavoz para un funcionamiento óptimo del transductor electroacústico. Una red de X-over puede realizar una de tres funciones: Paso alto (condensadores), paso bajo (inductores o bobinas) y paso de banda (combinación de condensador y bobina).
Operación AJUSTE DE LA GANANCIA Para ajustar el valor de la ganancia, baje la ganancia del amplificador completamente. Suba el volumen de la unidad fuente hasta que la distorsión sea audible y luego bájelo un poco hasta que la distorsión no pueda escucharse. A continuación, suba la ganancia del amplificador nuevamente hasta que la distorsión sea audible y luego bájela hasta que sea inaudible.
Información sobre la garantía limitada Lightning Audio ofrece una garantía limitada para los productos según los siguientes términos: • Duración de la garantía Altavoces Un año de garantía sobre partes y mano de obra. Se requiere prueba de compra. Amplificadores Un año de garantía sobre partes y mano de obra. Se requiere prueba de compra.
Einleitung Innovieren oder desintegrieren! Vielen Dank für Ihren Kauf des Lightning Audio Fast and the Furious Verstärkers. Unsere Kunden sind es gewöhnt, von Lightning Audio die modernste Technologie zu erwarten. Mit unseren modernen Verstärkern und Woofern bieten wir jetzt wertvolle Hochleistungsmodelle. Deutsch Falls Sie nach der Lektüre Ihrer Gebrauchsanleitung noch Fragen hinsichtlich dieses Produkts haben, empfehlen wir, dass Sie einen Lightning Audio Vertragshändler kontaktieren.
Sicherheitshinweise Dieses Symbol mit dem Wort „WARNUNG“ soll den Benutzer auf wichtige Hinweise aufmerksam machen. Nichtbeachtung der Hinweise führt zu schweren Verletzungen oder Tod. Dieses Symbol mit dem Wort „VORSICHT“ soll den Benutzer auf wichtige Hinweise aufmerksam machen. Nichtbeachtung der Hinweise kann zu Verletzungen oder Schäden am Gerät führen. ! VORSICHT: Bitte lesen Sie zur Vermeidung von Verletzungen und Schäden am Gerät die Hinweise in dieser Anleitung.
Einbau EINBAUÜBERLEGUNGEN Die nachfolgenden Werkzeuge werden für den Einbau benötigt: Deutsch Spannungs- und Widerstandsmesser Abisolierzange Drahtkripper Drahtschere Kreuzschraubenzieher Nr.
Einbau Befestigung des Verstärkers am Boden des Kofferraums ist möglich, bietet jedoch geringere Kühlung als vertikale Befestigung. Befestigung des Verstärkers mit der Oberseite nach unten am Kofferraumdeckel bietet keine ordnungsgemäße Kühlung und wirkt sich negativ auf die Leistung des Verstärkers aus. Von ihr wird dringend abgeraten. Einbau im Innenraum Befestigung des Verstärkers im Innenraum ist möglich, solange gewährleistet ist, dass der Verstärker genügend Luftzufuhr hat, um sich selbst zu kühlen.
Einbau 6. Das Fernbedienungsanschaltkabel zur Befestigung am Verstärker durch Abziehen von 13 mm der Isolation am Kabelende vorbereiten. Das freigelegte Kabel in den Fernbedienungspol einführen und die Befestigungsschraube anziehen. Das andere Ende des Fernbedienungskabels an eine geschaltete positive 12-Volt Quelle anschließen. Die geschaltete Spannung wird normalerweise vom Autoantennenoder Zubehörkabel des Source-Geräts geholt.
Einbau VERWENDUNG VON PASSIVEN CROSSOVERN Ein passives Crossover ist eine Schaltung, die Kondensatoren bzw. Spulen verwendet und auf den Lautsprecherkabeln zwischen Verstärker und Lautsprecher platziert ist. Das Crossover delegiert zur optimalen Verstärkerleistung einen spezifischen Frequenzbereich an den Lautsprecher. Ein Crossover-Netzwerk kann eine von drei Funktionen haben: Hochpass (Kondensatoren), Niedrigpass (Induktoren oder Spulen) und Bandpass (Kombination von Kondensator und Spule).
Betrieb LAUTSTÄRKE (GAIN) EINSTELLEN Zur Anpassung der Lautstärkereinstellung den Verstärker abdrehen. Die Lautstärke des SourceGeräts aufdrehen, bis eine Verzerrung hörbar wird, und sie dann etwas abdrehen, bis die Verzerrung nicht mehr hörbar ist. Als nächstes den Verstärker aufdrehen, bis eine Verzerrung erneut hörbar wird, und ihn dann abdrehen, bis die Verzerrung nicht mehr hörbar ist.
Informationen zur beschränkten Garantie Lightning Audio bietet eine beschränkte Produktgarantie zu folgenden Bedingungen: • Laufzeit der Garantie Lautsprecher Ein Jahr auf Teile und Fertigung. Kaufnachweis erforderlich. Verstärker Ein Jahr auf Teile und Fertigung. Kaufnachweis erforderlich.
Introduzione Introdurre novità o disintegrare! Vi ringraziamo per aver acquistato l’amplificatore della Lightning Audio Fast and the Furious. Ormai, i nostri clienti si aspettano che la Lightning Audio oltrepassi il traguardo nel campo audio. Adesso oltrepasseremo il traguardo anche nel campo degli amplificatori e dei woofer—con modelli ad alto valore e ad altre prestazioni.
Istruzioni di Sicurezza Questo simbolo con la dicitura “AVVERTIMENTO” intende avvertire l’utente alla presenza di istruzioni importanti. La mancata osservanza di queste istruzioni potrebbe causare gravi lesioni personali o persino la morte. Questo simbolo con la dicitura “ATTENZIONE” intende avvertire l’utente alla presenza di istruzioni importanti. La mancata osservanza di queste istruzioni potrebbe causare gravi lesioni personali o danni all’unità.
Installazione CONSIDERAZIONI SULL’INSTALLAZIONE Segue un elenco degli utensili necessari per eseguire l’installazione: Voltmetro/ohmetro Pinze spelafili Pinze raggrinzafili Pinze tagliafili Cacciavite a croce no.
Installazione Se montate l’amplificatore sul fondo del bagagliaio, esso funzionerà ma avrete una capacità di raffreddamento ridotta rispetto al montaggio in senso verticale. Se montate l’amplificatore al rovescio, contro il ponte posteriore del bagagliaio, non otterrete il raffreddamento necessario e ciò comprometterà notevolmente le prestazioni dell’amplificatore. Pertanto, non è assolutamente raccommandabile.
Installazione 6. Preparate il filo REM ad innesco per poterlo collegare all’amplificatore, spelando via 1/2 pollice di isolante dall’estremità del filo. Inserite il filo spelato dentro il terminale REM e stringete la vite di arresto per fissare il cavo. Collegate l’altra estremità del filo REM ad una fonte positiva commutata a 12 volt. La tensione commutata proviene generalmente dall’autoantenna o dal cavo accessorio dell’unità di fonte.
Installazione COME USARE LE FREQUENZE DI INCROCIO PASSIVE Una frequenza di incrocio passiva è un circuito che utilizza condensatori e/o bobine ed è piazzata sui cavi degli altoparlanti tra l’amplificatore e l’altoparlante. La frequenza di incrocio delega all’altoparlante una gamma specifica di frequenze per ottenere prestazioni ottimali dello stadio pilota.
Funzionamento REGOLAZIONE DI GUADAGNO Per regolare la sintonizzazione del guadagno, abbassate completamente i guadagni dell’amplificatore. Alzate il volume dell’unità di fonte finché la distorsione non diventi udibile, e poi abbassatelo finché la distorsione non sia più udibile. In seguito, girate dinuovo la sintonizzazione di guadagno dell’amplificatore finché non diventi udibile la distorsione e poi riabbassatelo fino a farla scomparire.
Informazioni Inerenti alla Garanzia Limitata La Lightning Audio offre una garanzia limitata sui prodotti alle seguenti condizioni: • Durata della garanzia Altoparlanti Garanzia di un anno sui pezzi di ricambio e sulla manodopera. È necessaria laricevuta. Amplificatori Garanzia di un anno sui pezzi di ricambio e sulla manodopera. Ènecessaria la ricevuta.
Italiano Nota 42
Nota 43
Lightning Audio 955 N. Fiesta Blvd, Suite 4 Gilbert, Arizona 85233 U.S.A. In U.S.A., (480) 966-8278 In Europe, Fax (49) 850-3934-014 In Japan, Fax (81) 559-79-1265 02/03 B.M.