
Installation Guide


5
DIY HARNESS INSTALLATION KIT INSTRUCTIONS
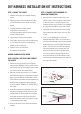
STEP 4. INSTALL THE DASH SWITCH
1. Find a suitable place on the dash to mount the dash
switch.
2. Afx dash switch by removing the adhesive from the
rear of the switch and attach to the desired location.
STEP 5. CONNECT THE DASHBOARD SWITCH
LOOM
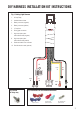
1. Route the dashboard switch loom connector (on the
driving light harness) carefully through the vehicle’s
rewall using pointy nose pliers to pull the cable
through. A torch will help you to see what you are
doing. Be careful to avoid crushing the connector.
Ensure the wires are kept away from any heat sources
2. Connect the dashboard switch loom connector on
the driving light harness (see item 1, gure 1) to the
dashboard switch loom pictured in Figure 7. Note: The
notch on the switch loom and wiring harness must
be aligned.
If you are using a different switch with dash illumination
(not included), connect the dash illumination cable (on
the switch loom) to your switch, as directed by the user
instructions for the switch.
STEP 6. CONNECT TO THE BATTERY
1. Connect the ring on the red wired battery connector to
the positive battery terminal using a spanner
2. Connect the ring on the black wired battery connector
to the negative battery terminal using a spanner.
STEP 7. SECURE CABLES
1. Use the supplied cable ties to secure all loose cables
and remove excess using wire cutters.
STEP 8. TEST
1. Turn on the ignition and test correct light operation by
switching on your high beam. Ensure the lights only
activate when switched to high beam.
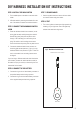
Fig 7. Dashboard switch loom
Dashboard switch loom connector
Dash switch
OFF
ON