
Instructions / Assembly


21
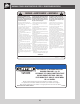
TOOLS AND HARDWARE REQUIRED / OUTILS ET QUINCAILLERIES REQUIS / INSTRUMENTAL Y HERRAJE REQUERIDOS
X SECTION 1 (CONTINUED) / SECTION 1 (SUITE) / SECCIÓN 1 (CONTINUACIÓN)
6
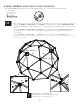
1.8
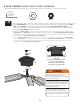
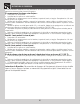
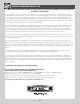
• Remove the Nut (ATL), the Washers (ARL) and the Bolt (ASI) at Joint D and add an additional Light Brown Tube (CPE).
Replace the Washer, Nut, and Bolt, however do not completely tighten to Joint D. Repeat the same process for
Joint E.
• Enlevez l’écrou (ATL), les rondelles (ARL) et le boulon (ASI) au joint D et ajoutez un autre tube marrón (CPE). Replacez
la rondelle, l’écrou et le boulon, mais ne serrez pas complètement au joint D. Répétez le même processus
pour le joint E.
• Retire la Tuerca (ATL) las Rondanas (ARL) y el Tornillo (ASI) en la Junta D y añada un Tubo café (CPE) adicional.
Reemplace la Rondana, la Tuerca y el Tornillo, pero no apriete completamente en la Junta D. Repita el mismo
proceso para la Junta E.
Joint D / Junta D
Joint / Junta E
Joint F / Junta F
CPE
CPE
ATL
ATL
ARL
ARL
ARL
ARL
ASI
ASI
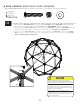
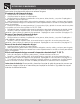
• Repeat the steps 1.7-1.8 to complete the circle.
• Répétez les étapes 1,7 et 1,8 afi n de former un cercle complet.
• Repita los pasos 1.7–1.8 para terminar el círculo.
!
3/16" (5 mm)
1/2" (13 mm)
(x1)
(x1)