
Instructions / Assembly

15
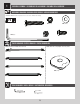
TOOLS AND HARDWARE REQUIRED / OUTILS ET QUINCAILLERIES REQUIS / INSTRUMENTAL Y HERRAJE REQUERIDOS
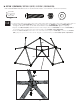
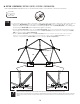
X SECTION 1 (CONTINUED) / SECTION 1 (SUITE) / SECCIÓN 1 (CONTINUACIÓN)
6
1.2
!
ARL (x20)
ARN (x10)
3/16" (5 mm)
1/2" (13 mm)
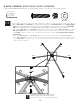
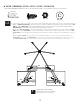
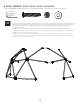
• Attach a Light Brown Tube (CPD) to the bottom of the assembly completed in the previous step (Joint A). Slide a Bolt
(ARN) through a Washer (ARL) and the two Light Brown Tubes. Place a Washer over the Bolt and fi nger tighten a
Nylock Nut (ASE) for removal later. Follow the same assembly for Joint B.
• Attachez un tube marrón (CPD) au bas de l’assemblage complété à l’étape précédente (Joint A). Glissez un boulon
(ARN) à travers une rondelle (ARL) et les deux tubes marrón. Installez une rondelle sur le boulon et serrez un écrou
en nylon (ASE) avec vos doigts qui sera enlevé plus tard. Suivez les mêmes instructions d’assemblage pour le joint
B.
• Sujete un Tubo café (CPD) a la parte inferior del ensamble terminado en el paso anterior (Junta A). Deslice un
Tornillo (ARN) a través de una Rondana (ARL) y los dos Tubos cafés. Coloque una Rondana por el Tornillo y apriete
una Tuerca de Nailon (ASE) con los dedos para retirarla después. Siga el mismo ensamble para la Junta B.
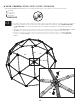
Joint A/ Junta A
Joint B / Junta B
CPD
ARN
ARN
ASE
ASE ARL
ARL
ARL
ARL
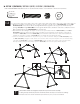
• Repeat this step on all fi ve assemblies.
• Répétez cette étape sur les cinq assemblages
• Repita este paso en los cinco ensambles.
ASE (x10)
(x1)
(x1)