
Installation Guide


Accessories
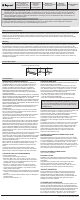
T-MOULDING
FLOORING
FLOORING
FLOORING CARPET
CARPET REDUCER
FLOORING
HARD SURFACE
REDUCER
RESILIENT
FLOOR
FLOORING STAIR NOSE
STAIR TREAD
RISER
FLOORING
WALL
WALL BASE
FLOORING
WALL
QUARTER ROUND
Finishing Touches
Care and Maintenance
6
5
Homedepot.com/lifeproof
Please contact 1-877-630-1800 for further assistance
LPWSPC002
□
Clean the floor.
□
Use matching putty where necessary.
□
Install or reinstall all wall trimpieces. Nail them through the wall, but not to the subfloor to avoid restricting the expansion gap.
□
Install transition trimpieces. Nail them to the subfloor, not the flooring.
□
At doorways, transitions should be used to protect the edges of the floor and to provide a decorative transition from one floor type to
another.
□
If the floor is to be covered, use a breathable material such as cardboard. Do not cover with plastic.
DAILY MAINTENANCE
□
Sweep, dust, mop, or vacuumyour floor regularly to remove any particles that could cause abrasion or scratch your floor.
□
Use a damp mop to remove spots and soil. Apply appropriate cleaning solution to the cleaning cloth / mop. Do NOT apply directly to the
floor.
□ For lightly soiled areas, clean with distilled water.
□ For moderately soiled areas, use a mild solution of isopropyl (rubbing) alcohol and distilled water. Dilute the mixture by mixing one part
alcohol and two parts distilled water. For tougher spots, use a higher concentration of isopropyl alcohol and distilled water.
□ HINT: For best results, clean the floor in the same direction of the planks. When the cleaning cloth/mop becomes soiled, rinse or replace
it with a clean one. Following up with a clean, dry cloth will remove residual streak marks and spots.
□ DO NOT leave any amount of liquids (water, juice, soft drinks, spills, etc.) on the floor. Clean any wet spots immediately.
□ DO NOT use a steam cleaner. Heat from steam may cause the floor plank edges to expand.
□ DO NOT douse the floor with water or liquid cleaners. Prolonged standing water or puddle may leave white marks.
□ DO NOT use any cleaning agents containing wax, oil or polish. Left over residue will form a dull film.
□ DO NOT use steel wool or scouring powder which will scratch the floor.
BRANDED OR OFF-THE-SHELF FLOOR CARE PRODUCTS
If none of the above are effective and you choose to use a store bought product, test the product in a non-conspicuous area (i.e., closet,
corner, or scrap pieces) for potential adverse side effects.
PREVENTATIVE MAINTENANCE
□ Avoid exposure of localized direct sunlight or heat source on the floor. Use UV screen on windows if necessary.
□ Protect your floor when using a dolly for moving furniture or appliances. Protective sheets and/or plywood may be needed. Never slide
or roll heavy furniture or appliances across the floor.
□ Place protective pads beneath furniture legs and other heavy objects.
□ Avoid excessive exposure to water from being tracked in during periods of inclement weather.
□ Minimize abrasive material and dirt by placing mats on both sides of exterior doors and by using area rugs in high-traffic areas.
□ Rearrange furniture and rugs periodically to avoid uneven color and shade changes from light exposure.
□ Use protective mats beneath rolling chairs and keep furniture casters clean.
□ Keep pets’ nails trimmed.
□ Remove shoes with cleats, spikes or exceptionally pointy heels before walking on the floor.
CLIMATE MAINTENANCE
□ Care should be taken to control humidity levels within the 35%-55% range. Flooring dimensions will be affected by varying levels of
humidity.
□ Maintain temperature levels within the 60°F-80°F. High temperature variations will affect the vinyl SPC core.
□ Dry Climates: A humidifier is recommended to maintain humidity levels. Wood stoves and electric heat tend to create very dry
conditions during the winter months. This also will cause expansion then shrinkage in flooring.
□ Humid, Wet Climates: By using an air conditioner, heater, or dehumidifier, proper humidity levels can be maintained to prevent mold or
mildew.
FLOOR REPAIR
□ Very light and small surface scratches can be repaired with a staining “touch up” pen of the appropriate color.
□ Slightly deeper scratches can be repaired by means of colored putty or stains. Fill the scratches with the putty. Level with putty knife.
Wipe off excess putty.
□ Very deep scratches may require the replacement of the planks.
CAUTION: Vacuums with a beater bar or unshielded power rotary brush head can damage a floor and should never be used.
Pictures are for general description and illustrative purposes only. Actual products may differ from diagrams.
T-Molding: Used to create a
Transition between floor coverings of
similar heights or to cover an
expansion gap.
Stair Nose: Used in conjunction with
flooring installed on stair steps or
finished edges of a higher level floor
like in a sunken living room.
Carpet Reducer (also called Baby
Threshold or End Cap):
Used to transition floor
coverings of
differing heights. This reducer strip is
also commonly used to border a
fireplace, sliding glass door and
other exterior door jambs.
Hard Surface Reducer: Used to
transition to another hard surface
flooring of different heights such as
tile, vinyl, or concrete.
Wall Base: Used to give a finished
look at the base of the walls. It can
be used with or without quarter
round.
Quarter Round: Used to cover the
expansion space between the wall
base and your flooring. It can also be
used to make smooth transitions
between the floor and cabinetry. It
can be used with or without wall
base molding.
4. EXPANSION GAP AND SPACERS
Continue with the installation process. Ensure the expansion gap
is maintained around the entire perimeter using spacers.
5.
INSTALLING THE LAST ROW
Use a pull bar to draw the last row to fit tightly to the previous
row.
6.
SEALING THE WET AREA PERIMETER
In wet areas, once installation is complete, use 100% silicone
sealant around the perimeter of the installed flooring. Fill the
expansion gap with compressable PE foam backer rod and
cover with 100% silicone sealant.
Grade Levels
Above Grade / On Grade
Below Grade
Installation Instructions
For Assistance,
Call: 1-877-630-1800
For latest revision, visit
Homedepot.com/lifeproof
Installation Method
Floating
Warranty
Limited Lifetime
Residential Warranty
Product Description
Vinyl Rigid Core
Plank and Tile Flooring
5Gi Locking System
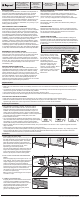
DIS-ASSEMBLING THE PLANKS
Separate the rows by slowly lifing up the outermost row until the lock is broken.
Place the row flat on the floor. Position hands near the shor end joint.
Pull the planks in opposite directions
.
4