
Installation Guide


Preparing for Installation
□
No acclimation is necessary. However, the flooring must be
installed in the temperature range of 50°F-100°F and relative
humidity (RH) of 40%-60%.
Boxes should remain unopened until the planks are ready to be
installed. Store unopened boxes flat and stacked on top of one
another and not be allowed to bend.
□
Ensure subfloors are clean.
□
Lay out several cartons. Randomly arrange planks to ensure good
color and shade mixture and end joint spacing. Inspect plank quality
and grading. Lay out trim moldngs in advance and find planks
whose shade closely coordinates. Set these aside for future use.
□
Remove existing base, shoe molding or threshold carefully. They can be used to cover the 1/4 in. expansion gap left around the edge of
the room.
□
Undercut doors and casings using a handsaw laid flat on a piece of flooring.
□
If an underlayment is used, install it parallel to the flooring according to underlayment manufacturer instruction. Any overlap (top) should
be on the same side as the groove of the flooring so that the floor planks will slide smoothly into place. Tape all seams. Secure the
underlayment material as necessary to prevent excessive movement.
Installation
Homedepot.com/lifeproof
Please contact 1-877-630-1800 for further assistance
THD-LP-VSPC-003 Print v4
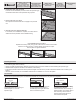
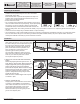
1.
INSTALLING THE FIRST ROW
When starting the first row; remove the tongue from
the width and length of the first plank and only from
the length of the subsequent planks. The starter
plank will guide the expansion gap between the
plank and the wall around the perimeter of the
area. Use spacers to ensure there is 1/4 in.
expansion gap around the perimeter.
The next plank is fastened by placing the short
edge of the second plank on top of the first plank.
Then use your hands to press down until the
second plank snaps into position.
2.
INSTALLING THE SECOND AND REMAINING
ROWS
Insert the long edge tongue into the groove at a 35° - 45°
angle. Slide left - right into position. Make sure the tongue
is tightly engaged in the groove by applying balanced
pressure in the direction of the groove. Repeat this
process with the next plank. Slide to the left so the tongue
and groove are on top of each other. Fold down. Lock the
short ends by pressing down with your hands. Use
spacers or scrap pieces of flooring along the wall to
maintain the expansion gap.
Make sure there is a random stagger at the end joints
of at least 6 in. apart.
3.
USING A TAPPING BLOCK
A tapping block is recommended to ensure there’s
no gapping in the installation process between
rows. Follow manufacturer’s instruction on how to
use the tapping block properly. Proper use of
tapping block protects the flooring from the
hammer and allows you to set it gently into the
groove of the adjacent plank.
1a
1b
1c
3
2d
2f
2c
2b
> 6 in
> 15 cm
2a
2e
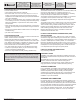
Grade Levels
Above Grade / On Grade
Below Grade
Installation Instructions
For Assistance,
Call: 1-877-630-1800
For latest revision, visit
Homedepot.com/lifeproof
Installation Method
Floating
Warranty
Limited Lifetime
Residential Warranty
10 Year Commercial
Product Description
Vinyl Rigid Core
Plank and Tile Flooring
Click Lock/Push Lock