
Installation Guide
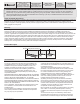


Accessories
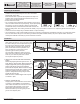
T-MOULDING
FLOORING
FLOORING
FLOORING CARPET
CARPET REDUCER
FLOORING STAIR NOSE
STAIR TREAD
RISER
Finishing Touches
□
Clean the floor.
□
Use matching putty where necessary.
□
Install or reinstall all wall trimpieces. Nail them through the wall, but not to the subfloor to avoid restricting the expansion gap.
□
Install transition trimpieces. Nail them to the subfloor, not the flooring.
□
At doorways, transitions should be used to protect the edges of the floor and to provide a decorative transition from one floor type to
another.
□
If the floor is to be covered, use a breathable material such as cardboard. Do not cover with plastic.
Pictures are for general description and illustrative purposes only. Actual products may differ from diagrams.
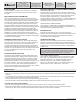
T-Molding: Used to create a
Transition between floor coverings of
similar heights or to cover an
expansion gap.
Stair Nose: Used in conjunction with
flooring installed on stair steps or
finished edges of a higher level floor
like in a sunken living room.
Carpet Reducer (also called Baby
Threshold or End Cap):
Used to transition floor coverings of
diff
ering heights. This reducer strip is
also commonly used to border a
fireplace, sliding glass door and
other exterior door jambs.
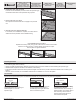
4. EXPANSION GAP AND SPACERS
Continue with the installation process. Ensure the expansion gap
is maintained around the entire perimeter using spacers.
5.
INSTALLING THE LAST ROW
Use a pull bar to draw the last row to fit tightly to the previous
row.
6.
SEALING THE WET AREA PERIMETER
In wet areas, once installation is complete, use 100% silicone
sealant around the perimeter of the installed flooring.
Grade Levels
Above Grade / On Grade
Below Grade
Installation Instructions
For Assistance,
Call: 1-877-630-1800
For latest revision, visit
Homedepot.com/lifeproof
Installation Method
Floating
Warranty
Limited Lifetime
Residential Warranty
10 Years Commercial
Product Description
Vinyl Rigid Core
Plank and Tile Flooring
Click Lock/Push Lock
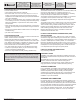
DIS-ASSEMBLING THE PLANKS
Separate the rows by slowly lifing up the outermost row until the lock is broken.
Place the row flat on the floor. Position hands near the shor end joint.
Pull the planks in opposite directions.
6
5
4
Homedepot.com/lifeproof
Please contact 1-877-630-1800 for further assistance
THD-LP-VSPC-003 Print v4