
Installation Guide


NOTE: Floor areas interrupted by wall openings greater than 5 ft.
wide, or interrupted by wall sections extending out of the wall, or
floor areas which are not rectangular may experience buckling or
gapping if there is excessive floor expansion or shrinkage.
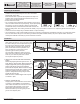
MOISTURE BARRIER and UNDERLAYMENT PADDING
CONCRETE SUBFLOOR
A vapor barrier is recommended, but not required. LifeProof™ is a
waterproof floating floor, but it should not be used to seal an existing
floor from moisture. It cannot inhibit the growth of mold or prevent
structural problems associated with, or caused by flooding,
excessive moisture, alkalis in the subfloor, or conditions arising from
hydrostatic pressure. A plastic film with a minimum thickness of 6
mil will help prevent some moisture issues.
SOUND CONTROL UNDERLAYMENT
Not necessary. The floor planks have attached foam padding for
sound mitigation. The only approved additional underlayment is the
Lifeproof Premium Universal Underlayment.
EXPANSION GAP
Required gap width range is 1/4 in.It is required around the
perimeter of the floor and between floor and all vertical obstructions.
Do not place permanently mounted structures such as kitchen
counter/cabinet on the installed floor.
TRANSITION MOLDING
Maximum continuous installation without transition molding is 65
lineal feet. The limit can be extended to 85 lineal feet providing the
expansion gap around the perimeter and other vertical obstruction is
increased to 1/2 in. wide. Required at doorways or passageways 5
ft. wide or less.
TOOLS AND MATERIALS BASICS
Tape measure • Moisture meter (wood, concrete or both) • Chalk
line & chalk • Non metal hammer • Electric power saw • Carbide
tipped saw blade for fine cut • NIOSH-designated dust mask
•
Hand saw or jamb saw • Eye protection • Straight edge or
Spacers • Pry Bar • Mallet • Broom • Color matched wood putty •
Tapping block • Pull bar • Painters tape • 100% silicon
EXISTING HOME
During installation, an existing home should have a consistent
room temperature of 50°F-100°F and relative humidity (RH) of
40%-60%.
NEW CONSTRUCTION OR REMODEL
All work involving water, such as pouring basement concrete
floors, drywall and plasterwork, plumbing, etc. must be completed
well in advance of the floor delivery. Ensure that the building is
enclosed. Where building codes allow, permanent heating and/or
air conditioning systems should be operating at least five days
preceding installation and should be maintained during and after
installation. If it is not possible for the permanent heating and/or air
conditioning system to be operating before, during and after
installation, a temporary heating and/or dehumidification system
that simulates normal living (occupied) conditions can enable the
installation to proceed until the permanent heating and/or air
conditioning system is fully operational. Your job site should have
a consistent temperature of 50°F-100°F and relative humidity (RH)
of 40%-60% during installation.
BASEMENTS AND CRAWL SPACES
Concrete slab or ground must be dry. Ensure that crawl spaces
have open vents year-round for proper air circulation and prevent
moisture build up. The ground in the crawl spaces must be
completely covered using 6 mil black polyethylene. Crawl space
clearance between the earth and underside of joists should be no
less than 18 in. and the perimeter of the vent area should be equal
to 1.5% of the total square footage of the crawl space or as
mandated by code.
RADIANT HEATED SUBFLOOR
This product can be installed over radiant heated subfloor with
embedded heating elements. Heating system elements must be
separated from the flooring by at least 1/2 in. distance. Heating
system should be set at 70°F and run for 48 hours prior to and
during the entire installation. The heating system should be run 48
hours after installation. Then it can be gradually increased over
the course of 24 hours, until normal operating temperature is
reached. Floor temperature should not exceed 85°F. Do not make
abrupt changes in radiant heating temperatures.
Helpful Pointers
GENERAL TIPS
□
Make sure your work area is well lit. Good visibility ensures that color is consistent and that visually defective planks are detected and
removed.
□
The remainder of the last plank can be used as a starter board on the following rows.The minimum length of the first and last plank
needs to be longer then the width of the material being installed.
□
Using a shorter piece at under cut door jams will help when fitting flooring in place.
□
Never hit the flooring directly with the tapping block and be careful not to fracture floor tongue and groove.
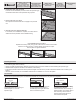
CUTTING THE LAST ROW TO WIDTH
□
Most often the entire length of the last row will need to be cut so that it is narrow enough to fit the remaining space.
□
Measure the distance between the floor face edge (exclude the tongue) to the wall. Subtract 1/4 in. from this measurement for
expansion gap. Draw a line. Cut through the line. Discard the excess piece. Proceed with the installation.
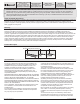
Grade Levels
Above Grade / On Grade
Below Grade
Installation Instructions
For Assistance,
Call: 1-877-630-1800
For latest revision, visit
Homedepot.com/lifeproof
Installation Method
Floating
Warranty
Limited Lifetime
Residential Warranty
10 Years Commercial
Product Description
Vinyl Rigid Core
Plank and Tile Flooring
Click Lock/Push Lock
Homedepot.com/lifeproof
Please contact 1-877-630-1800 for further assistance
THD-LP-VSPC-003 Print v4