S C R A T C H C O D I N G K I T Logic boost CODING CLASS CLASS forever imagine program share 2
CLASS 2 Before we start Whether you want to uncover the secrets of the universe, or you just want to pursue a career in the 21st century, basic computer programming is an essential skill to learn Stephen Hawking, theoretical physist, cosmologist, author
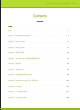
S C R A T C H C O D I N G Contents Start ………………………………………………………………………………………………………………………… 1 Lesson 1. Conditional statements …………………………………………………………………………………4 Lesson 2. Button sensor …………………………………………………………………………………………… 17 Lesson 3. Boxing robot ……………………………………………………………………………………… 27 Lesson 4. LED SENSOR ……………………………………………………………………………………… 43 Lesson 5. Sound sensor (SONGGENERATOR) Lesson 6. Pelicana …………………………………………………… 51 …………………………………………………………………………………………… 56 Lesson 7.
CLASS 2 Introduction Welcome to CLASS 2! How was Class1? In this class, we will be testing different sensors and what we can do by adding sensors to a DC motor. You will be making more complex robots.
S C R A T C H S C R A T C H C O D I N C O D I N G G K I K I T T Logic boost conditional sentences LESSON 1
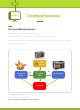
CLASS 2 Conditional sentences Intro to conditional sentences We are going to learn about conditional sentences. We will be starting with ‘If…’ block and ‘If…if not…’ block. Let’s find out what they do. Imagine you are a computer that can cook a pizza in the oven. You will have to check if it’s cooked completely or not.
S C R A T C H C O D I N G Conditional Sentences Conditional Sentences Whether we can eat the pizza or not depends on the condition of the pizza. The conditions for the pizza are either cooked or uncooked. 피자 굽기 Condition 시작 피자를 꺼내 어 드세요! 예 피자를 드세요! Eat pizza! 피자가 피자를 피자가 No 아니오 계속 피자를 다 아니오 Is it 다 cooked 예익었나요? 좀 더 구우세요! 익었나요? yes well? 구우세요! Keep going 프로그램 종료 Scratch ‘If’ and ‘Else’ block Click the control tab and drag the ‘If…Or else…’ block to use it.
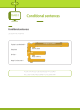
Conditional sentences CLASS 2 Conditional sentences Let’s apply what we learned. If pizza is cooked well… Eat pizza! the pizza is cooked If Eat the pizza Or else Or else… Keep cooking Keep it in the oven! To start from the top, it says eat the pizza “If” it’s cooked. But, it says “or else,” keep cooking if it’s not cooked well.
S C R A T C H Conditional sentences Make your own “If…Or else…” example Make your own ‘if or else’ example below. No Yes Program off Apply your example above to this ‘If..or else..’ Scratch block.
CLASS 2 Intro to conditional sentences Windmill using conditional sentences Let’s make the familiar windmill model from class1! It will be easy since you’ve already made one. Using this, we will be experiencing how to use ‘If..or else..’ phrase.
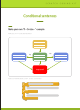
S C R A T C H C O D I N G Intro to conditional sentences Windmill using conditional sentences Our goal is to activate the motor with the spacebar. Let’s look at the picture! Program on Space Bar Turn on the motor Yes Was the spacebar pressed? No Turn off the motor STOP Program off To start the program, bring the ‘if or else’ block under the green flag block.
CLASS 2 Intro to conditional sentences Windmill using conditional sentences Click the ‘Observation’ tab and drag the ‘Click ___key’ block to the script. Now, drag the ‘Click___key’ block into the ‘if or else’ block. The conditions would be whether the spacebar is pressed or not Now, this code tells us that when the spacebar is pressed, it starts motor4 or else it gets turned off. But, it does not start when the spacebar is pressed. Let’s find out why.
S C R A T C H C O D I N G Intro to conditional sentences Windmill using conditional sentences Press the spacebar and see if the motor starts working! Space Bar Now, don’t press the spacebar and click the flag icon. You will see the motor is not starting! This is because the program checks if the spacebar was pressed or not pressed before it turned the motor on or off. You might be wondering why we didn’t use the block below when we made the script.
Practice Using Conditional Sentences and Loop CLASS 2 ‘If or else’ and infinite repetition Now, your program does not check if the spacebar is pressed or if it was pressed again. What we are trying to do now is make the program continueously check if the space bar is pressed.
S C R A T C H C O D I N G Practice Using Conditional Sentences and Loop ‘If or else’ and infinite repetition If we want the program to keep checking, it would look like this. We will make the program wait 1 second and check again. Then, we have to use an infinite number of blocks! This is the perfect time to use ‘infinite repetition’. Now, the program will automatically keep checking if the spacebar is being pressed or not. Let’s see what change this brought to the motor’s movement.
CLASS 2 Practice Using Conditional Sentences and Loop ‘If or else’ and infinite repetition Now, the motor will turn on when you press the spacebar. On the other hand, if you don’t, the motor will turn off. Space Bar STOP Space bar This is because the computer constantly checks if the spacebar is being pressed or not. For one more example, let’s see the next page where it explains the pizza program.
S C R A T C H C O D I N G Practice Using Conditional Sentences and Loop ‘If or else’ and infinite repetition The pizza program below checks the pizza only once! This means that we could’ve burn the pizza and have to throw it away! To avoid this, we need to keep checking the pizza.
S C R A T C H C O D I N G K I T Logic CLASS 2 boost BUTTON SENSOR LESSON 2
S C R A T C H C O D I N G Sensor Introduction What is BUTTON SENSOR ? The button sensor is used for the circuit’s connection/disconnection. It becomes ‘active’ when the button is pressed down at the part where it opens/closes in a circuit. It goes back automatically when the button is not pressed down. It clicks when the button is pressed, and LED will light up and connect the circuit. Side Front Above is how the button sensor looks like.
CLASS 2 Connecting to the main cell Connecting the button sensor Let’s learn how to connect the button sensor with the main cell. Plug in the 3-pin connection jack to the button sensor. Refer to the picture below “S” = White “+” = Red “-” = Black ※ If it’s not plugged in to the right place, the sensor won’t work. Check before you plug it into slot 7.
S C R A T C H C O D I N G Experiencing the button sensor Using the button sensor Let’s turn on the main cell and go to Scratch. See what kind of information the sensor is giving us. If everything is connected well, try pressing the button. If the button is not pressed, “digital2” will show “false”. When the button is pressed, “digital2” will show “true”. It basically means the button is pressed when ‘digital2’ shows ‘true’ and vise versa.
CLASS 2 Experiencing the button sensor Connecting the button sensor to the analog port. Connect the main cell’s analog port and the button sensor. 1 2 3 4 5 6 7 8 B R W 0 1 2 3 4 Analog input Check the values shown after connecting the button sensor. You can see that ‘Analog0’ stays at 255! When there is no input or nothing entered, the analog value of the button sensor will stay at 255. If you press the button, the value will decrease. If It isn’t, the value will increase.
S C R A T C H C O D I N G Experiencing the button sensor Using the button sensor Leave the button sensor and ‘analog0’ will be 255 When the button sensor is pressed, ‘analog0’ will 57 254 decrease. The button sensor’s analog value is 255 before pressing, and it decreases when it’s pressed. Keep this in mind so that we can set the basic value while coding. Just remember the analog value of the button sensor decreases when we press the button. More details of analog will be covered in the next level.
CLASS 2 How to Make a Robot Using the button seonsor Now we are going to find out how we can use the button sensor. You will first have to make our old friend, the windmill.
S C R A T C H C O D I N G Experiencing the button sensor Coding the windmill using the button sensor The flowchart will be the same with only some little differences ! ain g A ck e Ch Turn on the motor True Program start is the button sensor true or false? Ch ec kA ga in! False Turn off the motor STOP If you press the button, the motor will turn on.
CLASS 2 Experiencing the button sensor Using the windmill and the button sensor Now, we are going to activate the windmill with the button sensor. First, we need a way to bring “True” and “False” from the button sensor to Scratch. To do this, go to the ‘movement’ tab and drag in the ‘is sensor digital 2 pressed?’ block to the script. This ‘is sensor digital 2 pressed?’ block shows if the value is ‘true’ or ‘false’.
S C R A T C H C O D I N G Experiencing the button sensor Coding the windmill using the button sensor We just finished coding the windmill to operate when the spacebar is pressed. Now, we are going to code the windmill to operate when you press the button sensor. You might have realized already, but the ‘is the sensor ‘digital 2’ pressed?’ block and the ‘click the spacebar?’ block are the same shape. This is because these blocks are conditional. The program we made before is the same as this.
S C R A T C H C O D I N G K I T Logic CLASS 2 boost Boxing robot LESSON 3
S C R A T C H C O D I N G How to Make a Robot Boxing robot We are going to make a robot that can throw some punches using two button sensors. It’s a boxing robot! Do you remember activating a motor using just one button sensor? This time, we will be using two button sensors to control two motors separately.
How to Make a Robot CLASS 2 Boxing robot Make a boxing robot Materials needed for the boxing robot Diamond H8 Diamond V8 x3 x2 Rubi 7 x4 Sawtooth 36 Short Middle x5 connector x 7 connector x 6 Rubi 6 x4 hexagon x1 Rubi 4 x5 Rubi 2 x4 Rubi 0 x2 Mini 2 x4 A 14 A 23 A 45 A 64 BUTTON DC motor 메인보드128 x2 x6 x2 x1 SENSOR x 2 x2 Mini 1 x2 Curve x4 Triangle x3 connector x3 Battery case x1 Mainboard x1
S C R A T C H C O D I N G How to Make a Robot How to Make a Boxing robot 1 Make two of these. Figure 1 2 x2 x2 x2 x2 3 4 x2 Make two of these. x2 A23 x2 Figure 2 5 Figure 4 Make two of these.
CLASS 2 How to Make a Robot How to Make a Boxing robot 7 Make two of these. 8 Figure 7 x2 x2 A23 Figure 6 9 10 Make two of these. Make two of these.
S C R A T C H C O D I N G How to Make a Robot How to Make a Boxing robot 13 14 Make two of these.
CLASS 2 How to Make a Robot How to Make a Boxing robot 19 Figure 17 20 x1 Figure 18 x1 Figure 13 Figure 12 21 Figure 20 Make two of these.
S C R A T C H C O D I N G How to Make a Robot How to Make a Boxing robot 24 25 x1 x1 A64 x1 x1 x2 26 27 Figure 26 Figure 25 x1 Figure 24 28 Figure 27 Figure 23 x1 K I T
CLASS 2 How to Make a Robot How to Make a Boxing robot 29 30 x1 Make two of these.
S C R A T C H C O D I N G Connecting to the main cell How to Make a Boxing robot Complete 1 2 3 4 5 6 7 8 B R W 2 Left button sensor 3 Digital input Right button sensor K I T
CLASS 2 Expansion of the Button Sensor Using two button sensors Now, we are going to learn how to use two button sensors with the boxing robot. Connect the boxing robot tot Scratch and press the left and the right sensror. You will see the left sensor at Digital2 and the right sensor at Digital3. You can choose Digital2 or Digital3 by clicking the small black arrow on the block.
S C R A T C H C O D I N G Expansion of the Button Sensor Boxing Robot Connect the left motor and the right motor to the main board’s motor slot4 and motor slot7. We will now make a code that will control the boxing robot. When the left sensor is pressed, the robot’s left arm should throw a punch. If the right sensor is pressed, the right arm should throw a punch. Draw a flowchart of how you would make this possible.
CLASS 2 Expansion of the Button Sensor Boxing robot You must’ve drawn a similar picture with the one below! The code below shows how the left motor operates when the left sensor is pressed Program start Yes Turn on motor 4 Is the left button sensor pressed? No Turn off motor 4 The code below shows the right motor operating when the right button sensor is pressed Start the Program Yes Turn on motor7 Is the right button sensor pressed? No Turn off motor 7
S C R A T C H C O D I N G Expansion of the Button Sensor Boxing robot The code from the first program is almost the same as the windmill script! The second program’s script looks similar, but we are going to change from motor 4 to motor 7 and from digital 2 to digital 3. Start the program! The boxing robot will throw punches when you press the left or right button sensor.
CLASS 2 Expansion of the Button Sensor Combining the program We can combine two programs into one. The flowchart looks like below! Let’s say the program will repeat infinitely. Program srart Yes Turn on motor 4 is the left No turn off motor 4 button sensor pressed? Yes Turn on motor 7 is the right button sensor pressed? We can combine the programs like the picture on the right.
S C R A T C H C O D I N G exercise Boxing robot Start the program! The combined programs will work as they used to before. Now, choose a partner and play this game. Rules for the boxing robot game 1. The player holds the main cell trying to make robots slip 2. The players cannot pick up the robots 3. Let the robot throw punches at the front gear. 4.
S C R A T C H C O D I N G K I T Logic CLASS 2 boost LED SENSOR LESSON 4
S C R A T C H C O D I N G Introduction What is a LED SENSOR? Epoxy lens Wire bond Reflective cavity There is an electric current that flows in a lightbulb called a semiconductor. It lights up if there is an electric current flowing through it. Anode Cathode LEDs can shine different colors of light depending on which semiconductor was used. LEDs can shine for thousands of hours more than filament lightbulbs.
Connecting to the main cell CLASS 2 LED SENSOR? W R B “S” = White “+” = Red “-” = black Connect the LED sensor to port 11 (Digital output port 10).
S C R A T C H C O D I N G Experiencing the LED SENSOR Turning the LED sensor on and off The main cell controls whether the LED sensor turns on or off. Drag in the ‘Digital 13 output on’ block and the ‘Digital 13 output off’ block to the script and change 13 to 10 (digital output port 10 will be used as the output port).
CLASS 2 Experiencing the LED SENSOR Flashing led sensor Now, you are going to use what you know about sequence and make the LED repeat a flashing light. Make an outline about how you will make the script. Try it! Does it flash and go off? If not, look at the code below and find out what the problem was.
S C R A T C H C O D I N G Experiencing the LED SENSOR Using the button sensor to activate the led sensor Now, connect the button sensor and the main cell, and make a script that the led sensor will turn on when the button sensor is pressed. Make an outline of your script below. Try it! Does it work? If not, check the picture below and find out what the problem was.
CLASS 2 Experiencing the LED SENSOR ‘if’ phrase We have learned what the ‘if..or else..’ phrase is. There is a simpler phrase than this, too. It’s the ‘If’ phrase. The block you see above is the ‘If’ block. It activates blocks inside if ‘if…’ is satisfied. If it is not satisfied, it skips without doing anything. Now, let’s put in the condition we need. If we operate the led sensor using the ‘if’ phrase, the led sensor will never turn off since there is no ‘or else’ part.