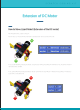
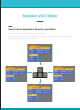
S C R A T C H C O D I N G Extension of DC Motor How to Move Lizard Robot (Extension of the DC motor) Flip the lizard robot to see it’s bottom. For the robot to move forward, we have to activate both motors at the same time. GO GO If you code following the picture above, the computer will activate Motor4 and Motor7 at the same time and move the robot forward. If you code following the picture below, we can combine the ‘Stop Motor 4’ block and ‘Stop Motor 7’ blocks to stop them at the same time.
52 CLASS 1 Extension of DC Motor How to Change the Robot’s Direction You have learned that if you set two motors to rotate clockwise, it will move forward. What if they rotate counter-clockwise? Would it be able to move left or right? Let’s do some testing! Let the lizard’s wheels stay on the back and start. We will try four different combinations of motor movements to move the robot. Write down if the motor is going clockwise or counter-clockwise depending on its movement direction.
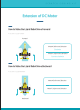
S C R A T C H C O D I N G Extension of DC Motor How to Make the Lizard Robot Move Forward If you want it to go forward… Forward Motor4 (left motor) direction Clockwise Motor7 (right motor) direction Counter-clockwise How to Make the Lizard Robot Move Backward If you want it to go backward… Motor4 (left motor) direction Motor7 (right motor) direction Backward K I T
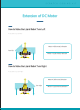
54 CLASS 1 Extension of DC Motor How to Stop the Lizard Robot If you want it to stop… Motor 4 (left motor) direction Off STOP STOP Motor7 (right motor) direction Off Tip: It will be easier to make the robot move if you make a code that stops Motor4 and Motor7 when the spacebar is pressed.
S C R A T C H C O D I N G Extension of DC Motor How to Make the Lizard Robot Turn Left If you want it to turn left… Motor 4 (left motor) direction Turn left Motor 7 (right motor) direction How to Make the Lizard Robot Turn Right If you want it to turn right… Motor 4 (left motor) direction Turn right Motor 7 (right motor) direction K I T
56 CLASS 1 Extension of DC Motor How to Make the Lizard Robot Slowly Turn Left By activating one motor, the lizard robot will be able to slowly turn left.
S C R A T C H C O D I N G Extension of DC Motor How to Use the Keyboard to Move the Lizard Robot You can combine the ‘Start’ block to activate the code you made. Put the ‘Start’ block on the top. After that, set each code to different arrow keys.
58 S C R A T C H C O D I N G K I T Logic CLASS 1 boost Random numbers and loop LESSON 3
S C R A T C H C O D I N G Random numbers and Coding Random Movements of the Lizard Robot Does the lizard robot move well? We just used keyboard arrow keys to control the robot. This time, we will code the robot to move for a random amount of time. Let’s review first. Click the ‘Motor’s rotating direction’ block to move the robot forward and click the ‘Stop Motor’ block to turn off the robot. How much did they move? The time you took between activating the motor and stopping the motor was random.
60 CLASS 1 Random numbers and Coding How to Use Random Numbers To move the robot for a random amount of time, there is a new block we will be using to produce a random number. Click the ‘Operators’ button in the palette. If you click ‘Operators’ you will see ‘Random number between 1 and 10.’ Drag the block to the script and click it. If you click it, a number will appear at the right side of the block.
S C R A T C H C O D I N G Random Numbers and Coding How to Code the Lizard Robot Just like we learned before, we can use the keyboard to edit the numbers on the blocks. Drag the green random number block into the ‘Wait’ block to make the script below. If you activate the script, the lizard robot will move for a random amount of time between 1 and 5 seconds. This is how you use the random number to activate a robot for a random amount of time.
62 CLASS 1 Intro to ‘Loop’ What is ‘Loop’? ‘Loop’ can repeat a robot’s movement and lets us constantly check many different settings. It is useful when you make a code that includes more than one movement. In this lesson, we will learn two loops. The simplest loop is when a computer repeating the same order again and again. Also, loop can make your code simple and help you easily make repeating code.
S C R A T C H C O D I N G Intro to ‘Loop’ Infinite repetition To understand how loops work, we will use the lizard robot. We will use the loop to infinitely rotate the motor instead of using an infinite number of blocks. Refer to the picture below. If you activate this, the left wheel of the lizard robot will turn on for 1 second and turn off. Now, we will use the ‘infinitely repeat’ block to keep turning on and off the left wheel. You can find this block under the ‘Control’ tab in the palette.
64 CLASS 1 Intro to ‘Loop’ ‘Repeat’ Block Now, we will learn about a loop that will repeat a certain number of times. If you want the motor to rotate 10 times, you just need to drag ‘Repeat 10 times’ block to the script. Take the ‘Infinite repetition’ block and change it to the ‘Repeat 10 times’ block You should’ve seen the motor turning on and off 10 times! These are two types of loop we will be using in this lesson.
S C R A T C H C O D I N G Loop and Random Numbers Wiggly Lizad Robot Now, you understand what loops are. Let’s make a simple game program. This game is called ‘Wiggly Lizard Robot!’ We will code for the left motor and the right motor to move for a random amount of time to make the lizard robot move forward. Instead of moving once and stopping, we will use a loop to keep the robot moving for a certain amount of time.
66 CLASS 1 Loop and Random Numbers How to Code a Wiggly Lizard Robot This code will make the left motor turn on and off for a random amount of time This code will make the right motor turn on and off for a random amount of time. This is using what we learned about random numbers before. Connect the codes and look below. If you activate this code, the left motor will turn on and off for 1-3 seconds and then the right motor will turn on and off for 1-3 seconds.
S C R A T C H C O D I N G Loop and Random Numbers How to Code a Wiggly Lizard Robot If you activate the script we have been making, the lizard robot will stop after moving once, so it cannot move forward! Therfore, we need something that will repeat the program. It’s loop! Look at the picture on your right. You have to add a block, so the left and right motors are keep activated. Left motor But, the right picture is not right.
68 CLASS 1 Loop and Random Numbers How to Code a Wiggly Lizard Robot For the lizard robot to activate well, it needs some time to wait before moving left motor after the right motor. This sequence is different from the one before. We will set the lizard robot’s motor to activate, wait 1 second, and activate again. First, drag ‘Reapeat 10 times’ block to your code.
S C R A T C H C O D I N G Loop and Random Numbers How to Code a Wiggly Lizard Robot We will make the lizard robot wait for each motor to move. To do this, add the ‘Wait 1 second’ block like the picture below.
70 CLASS 1 Practice Play ‘Wiggly Lizard Robot’ If you want to repeat more than 10 times, try using the ‘Infinitely repeat’ block. It will look like below! Choose left forever Choose right Need time for the player to move For now, the sequence looks like this! See how there is no ‘Program off’ anymore! The computer will infinitely repeat this script, so it never ends. If you want it to end, you will have to turn it off.
S C R A T C H S C R A T C H C O D I N G C O D I N G K I K I T T Logic boost Gunman robot LESSON 4
72 CLASS 1 How to Make a Robot Gunman Robot Let’s make a moving gunman robot. Using Scratch, it can move forward/backward and shoot rubber bands. Just like you learned before, we are going to use the arrow keys on the keyboard to activate the motors. There are two motors used in Gunman robot. One helps it to go forward/backward and the other one shoots rubber bands. We are going to use the left and the right arrow keys to move the robot. The space bar will shoot the rubber bands.
S C R A T C H C O D I N G How to Make a Robot How to Make a Moving Gunman Robot We will be learning what each motor does for the gunman robot. As you know, one DC motor will help the robot to go forward/backward, and the other DC motor will be shooting rubber bands. Let’s make the model first.
74 How to Make a Robot CLASS 1 How to Make the Gunman Robot 1 2 x2 x2 x2 x2 x2 x1 A64 x1 A96 x2 x1 2 3 4 1 5 6 4 x2 x2 7 8 x2 7 x1 x1 x1 x1 A23 6
S C R A T C H C O D I N G How to Make a Robot How to Make a Gunman Robot 9 10 x2 x1 A64 x2 x1 x1 x2 11 12 x1 x1 x1 x1 x2 A96 x1 x2 12 11 13 x2 x1 14 x2 x1 9 15 14 16 K I T
76 CLASS 1 How to Make a Robot How to Make the Gunman Robot 17 18 x4 x2 x2 x4 19 x2 x2 A45 20 21 x1 x1 x1
S C R A T C H C O D I N G Connecting to the Main Cell How should we connect the robot and the main cell? Look at the picture below! When connecting the motor that will help the robot to move forward/backward, plug in the black cable on the top pin and the red one to the bottom pin. When connecting the motor that will be shooting rubber bands, plug in the red one on the top, and the black one to the bottom.
78 CLASS 1 Exercise Coding the Gunman Robot Try coding by yourself. When you press the left arrow key, the robot has to go left and when you press the right arrow key, the robot has to go right. When you press the space bar, it has to shoot rubber bands using the motor. Motor 4 moves the robot, and Motor 7 shoots rubberbands.
S C R A T C H C O D I N G Explanation Controlling the Gunman Robot Were you able to code it? Did it work correctly? If it did, then great job! But, if it didn’t go well, refer to the script below. If you press the left key, Motor4 rotates counter clockwise for 1 second. If you press the right arrow key, Motor4 rotates clockwise for 1 second. By doing this, you can move the robot right then left. When you press the spacebar, Motor 7 rotates counter clockwise for 1 second to shoot rubberbands.
80 CLASS 1 Exercise How to code the gunman robot Does the robot work well? Now, we are going to use ‘Loop’ and random numbers to slightly change the movement of Gunman. Before, spacebar caused the robot to shoot rubber bands. Add a script so that when the flag icon is clicked, Motor 7 shoots the rubber band and waits 1-2 seconds. Then, make it repeat 5 times and stop the motor. Make sure the robot has five rubber bands since it will be shooting five times.
S C R A T C H C O D I N G Explanation Controlling the Gunman Robot Were you able to make the script? If it doesn’t work well, refer to the script below. First, it has to start when the flag icon is clicked. Then, Motor 7 has to rotate counter clock wise five times. Also, Motor 7 has to wait 1-2 sec after its action. Then, Motor 7 will stop. Now, code so that it moves in any way you want.
82 S C R A T C H C O D I N G K I T Logic CLASS 1 boost Transport Robot LESSON 5
S C R A T C H C O D I N G How to Make a Robot Transport Robot Let’s make a transport robot that can move stuff around. Using scratch, it can move forward/backward and carry stuff. Two motors are used for the transport robot. It’s similar with the gunman robot. One motor will be helping the robot to move forward/backward, and the other motor will help the robot to carry an object. By coding the transport robot, you will be thinking about the sequence of its actions and code.
84 How to Make a Robot CLASS 1 Transport Robot Let’s make a transport robot! Materials Needed Diamond V8 x1 Diamond V6 x1 Rubi 8 x3 Rubi 4 x 10 Rubi 2 x5 Rubi 0 x3 Triangle x2 Sawtooth 8 x2 Sawtooth 24 x1 Sawtooth 12 x2 Sawtooth 36 x4 Worm x5 A23 x3 A45 x2 A64 x3 A96 x4 Vertical connector x 2 Off-road wheel x 2 Rubi 7 x2 Rubi 6 x2 Mini 2 x6 Short Middle Long connector x 4 connector x 3 connector x 1 DC motor x2 connector x1
S C R A T C H C O D I N G How to Make a Robot How to Make a Transport Robot 1 3 x1 x1 A23 x1 x1 2 x2 x1 A96 x1 A45 x1 x1 A64 x1 x2 4 back x1 x1 x1 x1 x1 A64 5 4 x1 x1 x1 x1 6 x1 x2 A23 x2 x2 A96 x2 x2 7 8 x1 x1 A96 x3 x1 7 6 K I T
86 CLASS 1 How to Make a Robot How to Make a Transport Robot 9 10 x1 x2 back 11 12 x2 x1 x1 13 14 x1 A45 x1 bottom 15 16 x1 A64 x1 15 x1 14
S C R A T C H C O D I N G How to Make a Robot How to Make a Transport Robot 17 18 x4 x1 17 16 x1 19 20 x4 x1 x1 21 22 16 x1 x2 x2 x2 21 5 20 23 24 x2 x2 K I T
88 CLASS 1 Connecting to the Main Cell Connecting the Transport Robot How should we connect the main cell and the robot? Study the picture below! When plugging in the motor that will be moving the robot forward/backward, plug in the black cable on the top pin and the red one to the bottom pin. When connecting the motor that carries an object, connect the red cable to the top pin and the black cable to the bottom pin.
S C R A T C H C O D I N G Exercise Coding the Transport Robot Try coding this next part by yourself. When you press the flag icon, the robot has to go forward for 3 seconds, and lift up its part that carries an object for 1 second. Then, go back down for 1 second, and move backward for 3 3seconds. Make it repeat infinitely. Carefully make a sequence that can do the actions in order.
90 CLASS 1 Explanation Activating Transport Robot Were you able to make the script? If it did not work well, check the script on the next page. When you press the flag icon, the script has to start and go forward by rotating Motor4 clockwise for 3 seconds. Then, rotate Motor7 clockwise for 1 second to lift up an object and rotate it back counter clockwise for 1 second to completely carry it. Then, rotate Motor 4 again counter clockwise for 3 seconds to move the robot backward.
S C R A T C H Explanation Activating Transport Robot Do you understand this script? If you carefully think about the order of its movements, it’s easy to code. Organizing each action in the right order is also called sequencing.
92 CLASS 1 Exercise Coding Transport Robot Try coding the robot so it moves. When you press the left arrow key, the robot moves forward and the right arrow key moves the robot backward. The up key lifts up the object and the down key puts it down. Each movement goes for 1 second. Refer to the code of Gunman robot.
S C R A T C H C O D I N G Explanation Activating Transport robot Did you finish coding? Did it work well? If it did, then good job! But if it didn’t work correctly, check the script on the next page. Left key rotates Motor 4 clockwise for 1 second, and the right ke rotates Motor4 counter clockwise for 1 second. You can move the robot forward/backward using only one motor. Up key rotates motor7 clockwise for 1 second, and the down key rotates motor7 counter clockwise for 1 second.
94 CLASS 1 Explanation Explanation You can easily make this script, right? Now, practice using the robot to move stuff around! Feel free to change time or control keys!
S C R A T C H S C R A T C H C O D I N G C O D I N G K I K I T T Logic boost Chicken Dart LESSON 6
96 Exercise CLASS 1 robotori Chicken Dart 말 추가하기 네 칸 점프하기 시작점으로 돌아가기 뒤로 세칸 이동하기 뒤로 세칸 이동하기 시작점으로 돌아가기 말 추가하기 다트 한번더돌리기 뒤로 세칸이동하기 다트 한번더돌리기 두 칸 점프하기 Let’s play a game with friends or family using the robotori chicken dart! The robot will tell you what to do, and the winner is who gets to ‘End’ first. We are going to code so that the arrow of the robot stops turning after a random amount of time. It points to a number, and that’s how many spaces a player will be moving on the board.
S C R A T C H C O D I N G Exercise Making the Chicken Dart Chicken Dart Materials Diamond V6 x4 Rubi 7 x3 Rubi 4 x 11 Rubi 6 x2 Rubi 0 x2 Mini 2 x3 Mini 1 x2 Curve x3 Triangle x2 Sawtooth 24 x2 Short connector x2 Motorconnector x 11 A23 x2 A45 x1 Battery case x1 DC motor x1 K I T
98 Exercise CLASS 1 1 1-1 1-2 1-3 x1 1 x1 1 x4 2 x2 1 2 x6 x2 2 1-4 1-5 2 1-3 x 10 1 4 1-1 3 2 2-1 2-2 2-3 x2 x1 x1 A 45 2-4 2-5 x1 x1 x1
R O B O T O R I C O D I N G Exercise 3 3-1 3-2 back 3-3 x1 x2 x2 x1 x2 x2 3-4 3-5 Front Back x1 x2 x1 x2 4 Complete! Plug in the motor to slot4 Refer to the picture below R B x2 A 23 C L A S S
100 Exercise CLASS 1 Intro to the Chicken Dart The chicken dart robot will tell you how many spaces to move on the game board. As you can see below, the chicken dart is divided in four parts: 1 2 3 4 Start the chicken dart when it’s your turn. The arrow will point at a number after turning for a certain amount of time. The number of circles you see on it is the number of spaces you will be moving.
S C R A T C H C O D I N G Exercise Coding the Chicken Dart Try coding the chicken dart by yourself. The DC motor has to rotate for a random amount of time and point a number.
102 Exercise CLASS 1 Coding the Chicken Dart First, make a basic script that will activate the motor. When the script starts, the DC motor has to activate for 1 second and stop. Now drag a green random number block into the script Your program will start a motor and stop for a random amount of time! You just completed coding the chicken dart robot! Start the program 3 times and draw the part it pointed to.
S C R A T C H C O D I N G Exercise Rules of the Chicken Dart Game Use the game board on the next page. Every player needs their own game piece. Use different colored cells of a robotori kit. Robotori Chicken Dart Game Rules 1. Click the green flag icon to start the chicken dart program. 2. The number it points to is how many spaces the player can move. 3. If a player reaches the special space, he or she should read what it says and do what it says. 4.
104 CLASS 1 Go back to ‘Start’ ate gain Rot dart a the Add a game piece Add a game piece END Go back 3 spaces Go back 3 spaces Move 2 spaces forward Rotate the dart again START e4 Mov ard forw es spac Go back 3 spaces
FCC Information to User This equipment has been tested and found to comply with the limits for a Class B digital device, pursuant to Part 15 of the FCC Rules. These limits are designed to provide reasonable protection against harmful interference in a residential installation. This equipment generates, uses and can radiate radio frequency energy and, if not installed and used in accordance with the instructions, may cause harmful interference to radio communications.