S C R A T C H C O D I N G K I T Logic boost CODING CLASS CLASS forever imagine program share 4
CLASS 4 Before getting started “ The best programmers are not marginally better than merely good ones. They are an order-of-magnitude better, measured by whatever standard: conceptual creativity, speed, ingenuity of design, or problem-solving ability.” Randall E.
S C R A T C H C O D I N G Table of contents To begin ………………………………………………………………………………………………………………… 3 Lesson 1. waiting up to ~ ……………………………………………………………………………………… 4 Lesson 2. he basic s of the variables …………………………………………………………………… 12 Lesson 3. utilizing the variables ………………………………………………………………………… 27 Lesson 4. Mole game ………………………………………………………………………………………… 40 Lesson 5. List …………………………………………………………………………………………………… 60 Lesson 6. Tory Piano …………………………………………………………………………………………… 67 Lesson 7.
CLASS 4 To begin Welcome to Class 4! Now you have leared all contents of coding robotics from classes 1 through 4! Great job! Now you will begin the intensive course on Scratch. If the previous courses were easy for you, now you will begin the relatively harder courses.
S C R A T C H S C R A T C H C O D I N G C O D I N G K I K I T T Logic Boost Wait until 1 LESSON
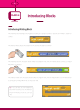
CLASS 4 Introducing Blocks introducing Waiting Block The “waiting” block changes the progam by waiting by a certain number of seconds and makes it easier for coding. The “waiting” block pauses the program until it satisfies the specific condition 위에 보이는 기다리기 블록은 디지털 INPUT 포트 2에 연결된 적외선 센서가 눌려 지 The “waiting” block in the figure above makes the program wait until an infrared sensor connects to Digital 기 전까지 INPUT Port 2 is기다리게 pressed. 해줘요.
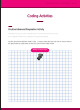
S C R A T C H C O D I N G Coding Activities Creative Advanced Preparation Activity Think about how you can use the “waiting” block to move the robot that has a DC motor. On this page we will learn how to develop some creative thinking skills. Just like the mini-windmill we made in Class 1, create a robot that uses only one DC motor and use the space below to simply draw out how you can move the robot around.
CLASS 4 Coding Activities How to Make a Mini-Windmill First, we need to make our old friend, Mini-Windmill.
S C R A T C H C O D I N G Coding Activities Using the “Waiting” block Now you need two infrared sensors. Plug the infrared sensors into the digital INPUT port of your main cell. Then, plug in your model, or your mini-windmill, into the left port of the DC motor of the main cell. Infrared sensors must be plugged into the 7th and 8th port of the main cell’s digital INPUT...
CLASS 4 Coding Activities Using “Waiting” Block Now let’s brainstorm several ideas. Then, show how your program appears in Scratch on the flowchart. The most important thing to remember is that the goal of this program is to have a DC motor that only works when both infrared sensors are pressed. Hint: Use the “waiting” block and the “if~ or” block.
S C R A T C H C O D I N G Coding Activities Using “Waiting” Block Are you still having problems? Don’t worry! Check out how the code you have to make appears. Let’s make it so that the system below repeats. Strat the program Wait until the left infrared sensor is properly pressed. DC motor True operation Is the right infrared sensor properly pressed? False Turn off the DC motor Within the program, the “waiting” block will not activate the program until the left infrared sensor is pressed.
CLASS 4 Coding Activities Using “Waiting” Block Take a look at the scratch code below. The “waiting” block pauses the program until the left sensor is pressed. Once the sensor is pressed, the program will continuously run and move over to the “if~ or” block.. Topic The “Waiting” block is a hard concept to understand. Think of it as a door that blocks the activation of the program.
S C R A T C H S C R A T C H C O D I N C O D I N G G K I K I T T Logic Boost Basics of Variables LESSON 2
CLASS 4 Introduction What are variables? Variables are used to save the information of certain numbers or values. 1. The value of analog & digital sensor 2.
S C R A T C H C O D I N G Variables based coding activity Why are variables important? Without variables, there is no way for computers to ‘remember’ something. If, you are not able to remember the simple things, then your life will be very limited. Giving your robot the ability to remember is more complicated, but also interactive. Most importantly, it opens up the opportunity for more interesting designs. Now let’s use variables in the scratch.
CLASS 4 Variables based coding activity Making Variables After you have finished making variables, you will see some changes in your scratch screen. First, you will be able to see the new orange blocks related to the “counter” variables in your palette menu. On the right side of your screen, the “counter” variable is shown on the stage window.
S C R A T C H C O D I N G Variables based coding activity Variable Blocks Now we will learn about the new variable block we saw previously. First, look at the three blocks below. The first block shows the actual value that is held in our variable, “counter.” The variable is displaying a certain number and that number can be found in the stage window. Currently, the variable “counter” is displaying “0.
CLASS 4 Variables based coding activity Variable blocks The “Save 0 at counter” block changes the saved value to the value or character that the user desires. Click on the “0” and change it to “1” =1 You will see that the variable value of “counter” has changed from “0” to “1”! Also, you can change the values to letters. Double click the white area and input a word like “true” or “false.
S C R A T C H C O D I N G Variables based coding activity Variable blocks “Accumulate 1 at counter” block causes the value of variabes to change. Double click the block show below! In the white blank in the block above, input “1” and double click the block. =2 This block adds “1” to the variable value that was originally saved, and changed “1” to “2”! If you continue to press on this block , you will be increasing the value by 1 continuously.
CLASS 4 Variables based coding activity Variable blocks What should we do to increase the value of the“counter” variable by 2? Double click the white area and input “2.
S C R A T C H C O D I N G Variables based coding activity How to make an analog meter 1 1 2 11 x2 1 x2 x2 x1x2 x2 x2 x1 x1 x1 x1 이 각도로 붙이세요! 서보 Servo motor 이 각도로 붙이세요! Step 1이 각도로 붙이세요! Step 서보 1 모터 모터 1 Step Step 1 Step 1 A64 x1 x1 A64A64 3 3 3 모터 2 x1 x1 x1 x4 서보 모터 x1x1 A64 A64 x1 x1 x4 2 2서보 connect이them at this 붙이세요! angle! 붙이세요! 2 이 각도로각도로 서보 모터 x1 x1 3 1 2 x1 x1 3 3 x4 4 4 4 4 4 4 x4 x4 x4 Step 3 Step Step Step 33 3 Step 3 Step33 Step 3 Step 3 Step Step 3
CLASS 4 Time Watch Coding Activities Time Watch Let’s make a time watch using the meter we made before. A time watch is a device that records time in seconds. Time watches were used in sports-related events before the digital time watch was invented. Time watches were also used for the aircraft speed measurement test. The picture on the right: Pocket time watch made in the Sweden Mountain town La Chaux-de-Fonds Now you will make a simple program that uses variables.
S C R A T C H C O D I N G Time Watch Coding Activities Time Watch You have enough knowledge to make your own program! Once again, You need to make a program that records time. Think about what variables and variable blocks you will have to use to make this program.
CLASS 4 Time Watch Coding Activities Time Watch Was it hard to make the last program? Now, we will divide it into a parts and work through it. First, you need to make the variable increase by 1 for every second. Refer to the code below! The code on the left adds “1” to the variable every second. Now, the variable you have made works as a timer! If you remember what we’ve learned previously, you know that you can replace the value of servo motor angle with the value that can be expressed as a number.
S C R A T C H C O D I N G Time Watch Coding Activities Time Watch Using the space shown below, line up the bottom line of the time watch you have made. Activate the program! time Line up the bottom line of the servo motor into the blank The second hand of the time watch you have made should move towards the right very slowly. If not, you need to adjust the direction of the servo motor. We learned how to adjust the servo motor in Class 3.
CLASS 4 Time Watch Coding Activities Time Watch If you activate the program you’ve learned previously, you will be able to see the servo motor moving slowly. Now let’s think about it. How can you increase the range for the motion of the servo motor? Change the accumulating value from “1” to “5.” Now, you will be able to see the “counter” variable moving by “5” per 0.1 second. 1 second 2 second If you activate the program again, you can see the second hand moving with a wider width.
S C R A T C H C O D I N G Time Watch Coding Activities Challenge How can you make the time watch to start at the beginning, hit the end and then go back to the beginning? Change the accumulating by “1” to accumulating by “-1” at “counter” variable.
S C R A T C H C O D I N G K I T Logic CLASS 4Boost Using variables LESSON 3
S C R A T C H C O D I N G Status indication and variables Status indicating variables Previously you learned how the variables can express something numerical such as the sensor value and time. The variables, however, can also be used to save characters or word. With this, variables can mark the “status.” “Status,” in this case, means the expression of condition or feature of certain object. For example, opening or closing a door or red, green, and yellow traffic lights are specific condition or feature.
CLASS 4 Status indication and variables Status indicating variables Now let’s learn how to use the variables to display the status. Please refer to the example below! Imagine having an electric fan. The electric fan is turned on only if you press the button. If you let go of the button, it will still be on. It only turns on if you press the button again. switch 1. Press the switch button to turn on the fan switch 2. The fan continues to work switch 3.
S C R A T C H C O D I N G Making a Robot Status indicating variables Imagine yourself being a computer. What should you do to program the function of the fan on the previous page using the variable? On Scratch, use variables to make a coding program that turns on and off the fan as you press.
CLASS 4 Making a Robot 1 2 Make two identical model x3 x6 x1 x2 x2 x4 3 4 x2 x4 x4 Make two identical model 5 Assemble models you made in step 2 and 3 6 Make two identical model x4 x2 x4 x2 A 45 x2 Assemble models you made in step 1 and 4
S C R A T C H C O D I N G Making a Robot 7 8 assemble models you made in step 6 and 7 x2 x2 x2 9 10 x 12 Make two identical model Complete assemble models you made in step 8 and 9 K I T
CLASS 4 Drone Coding Activity Coding a Drone Get out one infrared sensor and connect it with Digital INPUT Port 7 of the main cell. Plug in the left and right DC motor properly to the port. 1 2 3 4 5 6 7 8 B R W 2 3 Digital in Think about how to make a program. On the space provided below, write down several things you need to activate the program.
S C R A T C H C O D I N G Drone Coding Activity Coding a Drone Compare the items below and your own! - Make a variable that displays if the drone is on or off. - Whenever an infrared sensor is recognized, a program must be programmed that changes the value of the variable representing the state of the drone to on and off. - If the value of the variable indicating the state of the drone is on, the DC motor is activated.
CLASS 4 Drone Coding Activity Coding a Drone Since we made the needed variables, we now need to learn about the item that has to be programed. - Whenever an infrared sensor is recognized, a program must be programmed to change the value of the variable representing the state of the drone to on and off. This might look simple but needs a complicated coding. Don’t be disappointed even if you can not figure it out. But, please try to brainstorm using the space below on how you could make this program.
S C R A T C H C O D I N G Drone Coding Activity Coding a Drone Now think of this code as two separate parts. Your program must be activated when the infrared sensor is pressed and released. The “waiting” block is used in this situation. start program wait until the left infrared is pressed. wait until the left infrared sensor is released. activate the other programs The first waiting block pauses the program until the infrared sensor is pressed.
CLASS 4 Drone Coding Activity Coding a Drone Now, you need to change the value of “fanState” to “on” and “off” whenever the infrared sensor is pressed. set the tester condition to “off’ True Is the tester turned off? False Set the tester condition to “on” As a review, the variable you made needs to have a value of either “on” or “off”. To display the flow chart above, conditional statement such as “if~ or” is necessary.
S C R A T C H C O D I N G Drone Coding Activity Coding a Drone Now we are almost done. The last item of program you have to make is: - If the value of the variable indicating the state of the drone is on, the DC motor is activated. If it is off, the motor is not operated. This coding is relatively easy! Please go ahead and code the program by yourself. Hint: Use the conditional statement “If ~ or”.
CLASS 4 Drone Coding Activity Challenge Think of what you would do if you got two motors. What should you do to activate the left motor when the infrared sensor is first pressed? When you press the infrared sensor again, both left and right sensor must be turned on. When you press the sensor for the third time, both motors should pause their work. Hint: You need to make the condition of the variables from “on” and “off” to “left”, “both” and “off.” Also don’t forget to use the “if~ or” statement.
S C R A T C H S C R A T C H C O D I N C O D I N G G K I K I T T Logic Boost Mole Game LESSON 4
CLASS 4 Introduction Mole Game The mole game is a game that allows the user to score by pressing the IR sensor (Infrared sensor) according to the number from the scratch program in the range of 1~6. In the mole game, you need to use the 7 IR sensors we learned in previous lessons. One IR sensor has the job of activating the game, and the rest have numbers 1~6 assigned. Remember this as you start the coding.
S C R A T C H C O D I N G Making a robot IR SENSOR 1 2 3 4 5 6 7 8 B R W Material list 부품리스트 Diamond H8 x 18 A 64 x 12 Diamond H6 x6 Diamond V8 x 12 4 Mainboard128 3 Battery Case x1 x1 Diamond V6 x 22 9 Rubi 8 x6 축 64 Link x8 IR Sensor x7 Rubi 2 Link x 12 12 x 12 8 3핀 연결잭 Motor connector x 24 3 4핀 연결잭 1 K I T
CLASS 4 Making a Robot 1 2 Make two identical model x 12 x7 x 16 x1 x1 x8 3 4 x6 x 12 x 18 x 12 x6 부품리스트 x 24 x6 x6 Make 6 identical models Make 6 identical9models and insert 12 the rubber 8 bands Assemble model 3 and 4.
S C R A T C H C O D I N G Mole game coding activity Mole game activation First, let’s make a code that activates the game when the IR sensor connected to digital port 3 is pressed. The initial sensor value of digital port is “false”. The sensor value changes to “true” when the user presses the IR sensor. Using this do the coding saying “when digital 3 sensor value = true, activate the game”. Mole game activation coding Make a script by dragging the blocks as shown above.
CLASS 4 Mole game coding activity Mole game activation coding Once the IR sensor connected to digital port 3 is pressed, the signal announcing the start of the game must be sent. At this moment, we use the “Broadcast” block. “Broadcast” in Scratch means it’s sending a signal. If you send a signal, you must receive it, right? Broadcast the mole game The figure above is the script with ‘broadcast’ block added.
S C R A T C H C O D I N G Mole game coding activity Make a sound for a mole game Now let’s make a script after receiving the ‘start’ broadcast. We need a sound for announcing the start of the game, signaling number 1~6 and sound that announces the end of the game. You can record this sounds in Scratch! If you cannot record the sounds, you can simply open the soundtrack.
CLASS 4 Mole game coding activity Mole game variable coding Did you make all the sound file necessary? Then let’s make a script for the activation of the game. In the mole game, every time you press the infrared sensor, the 'score' will increase by one point. And each infrared sensor has to be pressed within a certain 'time.' Here we have to use variables, such as ‘Run’, “Score’, ‘Time’. You can simply think of variables as storage space.
S C R A T C H C O D I N G Mole game coding activity Mole game activation coding Drag the coding blocks and make a script like the one above. Does the work make sense? First, receive a ‘start’ broadcast from the top. Then, the blocks below will be activated in order. Save 0 at ‘Score’ variable, and 1 at ‘Timeout’ variable. Right now, there is nothing in the storage space in variables. Therefore, we need to set the first value. After saving, play the sound file announcing the start.
CLASS 4 Mole game coding activity Mole game ‘If~’ block repetition Do you remember the ‘If~’ block used in the previous page? It was a block that activates the script when certain condition is satisfied. Then the ‘If~’ block for number 1 to 6 will be made. Which means that there will be six ‘If~’ block connected. Then what should happen to the script inside the each ‘If~’ block? They must be similar to each other.
S C R A T C H C O D I N G Mole game coding activity How to use “If not ~’ block in the mole game. With the script we used in the previous page make a script like the one above. Previously, you expressed pressing the sensor or timer exceeding the time set in the ‘Timeout’ variable. Let’s think about what should happen next. If the timer exceeds ‘1 second’ the game is over. At this moment, computer must announce the end of the game and stop the script.
CLASS 4 Mole game coding activity Mole game coding Now you've completed the script for the condition "'Action=1". So let's combine the scripts we have created so far. If you combine them it will look like the script above. There is one thing added here, the 'infinite repeat' block. This block means that it will check the internal script of the block repetively. By using this block, the game will go through not just once but will continue until the script stops (until we have GAME OVER).
S C R A T C H C O D I N G Mole game coding activity Mole game 2~5 script coding Utilize the script on the right and code script from 2 to 5. Be aware of change in value of ‘Action’ variable, each corresponding number of sounds and which port is the sensor plugged into.
CLASS 4 Mole game coding activity Mole game coding The final script of the mole game will be shown as below! The whole script can be found at http://www.robotori.
S C R A T C H C O D I N G Mole game coding activity Mole game efficient coding method Above is the portion of the entire mole game script. There is a way to make this script with ‘If not~’ to be much simpler. Take a look at a content inside the “’not’. It is a process where you accumulate 1 point every time into the ‘Score’ variable. Do you think you can make this process easier by replacing the ’If not~’ block with ‘If~’ block? You can express the script as show above if you use the ‘If~’ block.
CLASS 4 Mole game coding activity Mole Game Play Now please activate the mole game program you coded and if it does not function like it’s supposed to, look through your book to check if you have made any mistakes.
S C R A T C H C O D I N G Mole game coding activity Mole game Question 1 How was the game? Was it too easy for you? Then code the program so your time decreases by 0.1 second every time 10 points are accumulated in your score.
CLASS 4 Commentary Mole game question 1 commentary Did you get it to decrease your time by 0.1 when you accumulate 10 points to ‘Score’? was it activated correctly? If it did, just take this commentary as consultation and move on to the next page. If it didn’t work out as you wanted, use the script below. Combine the script above into the beginning of the 'infinite repeat’ block and run the program. If the ‘Score’ becomes the multiple of 10, everything else becomes 0 when it is divided by ten.
S C R A T C H C O D I N G Activity Mole game question 2 How do you feel after doing the mole game with shortened time? Wasn’t it bored to increase the number by 1? Now let’s make a program where the computer continuously calls the numbers 1 or 2, and the user must input the number that is called at the very end.
CLASS 4 Commentary Mole game question 2 commentary Did you make the program where computer calls 1 or 2 continuously and the user have to input the last number that computer calls? Was it working well? If it did, just take this commentary as helpful advice and move on to the next page. If it didn’t work out as you wanted, use the script below. Since you have to select one or two numbers, use the random number block to find a random number between 1 and 2.
S C R A T C H S C R A T C H C O D I N C O D I N G G K I K I T T Logic Boost List LESSON 5
CLASS 4 Introduction What is a list? A list can be used to save several number or information of values. It is very similar to the variables; the only difference is that a list can save more than one value while the variables can save only one value. Think of the list as a book shelf that can contain many books.
S C R A T C H C O D I N G List coding activities Why do you need a list? The variables we learned in the previous lesson can save only one information. But, list can save more than one information. With list, you don’t have to make several different variables, you can save several information at once. Furthermore, you can get the saved information anytime and use it.
CLASS 4 List coding activities Making a List After making a list, you will see some differences in the scratch screen. First, you will see new brown blocks related to “list” list in the palette menu. On the right side of the screen, you will see the “list” list in the stage window.
S C R A T C H C O D I N G List coding activities List Blocks Now we will learn about the new blocks you need to know to use the list The first block is a block that adds values to your “list” list in order. Just like adding a book on the shelf, you are adding values to the “list” list. Currently on the stage screen you “list” shows up as empty but you’ll be able to see the change in number and value as you add the value to the list.
CLASS 4 List coding activities List blocks The “Deleting an item at position 1 in the list” block deletes certain value or character that user chooses at specific place. If you double click part (1) and change it to different value, delete all values using the black arrow, or delete the last item. The “put ( ) in position (1) in the (list)” block puts a value or letter in the specific portion of the list.
S C R A T C H C O D I N G List coding activities List blocks The block “Replace item 1 in list with ~” changes the value of the item in the list. As you can see above, the first list has C saved in the position 3. If you use the “ replace item 3 in the list with CC” block, you can see that the ‘CC’ has replace C in the list. The “item at position (1) in list” block on the very left is the block that shows the value that I saved in the specific position.
S C R A T C H C O D I N G K I T Logic CLASS 4 Boost TORI piano LESSON 6
S C R A T C H C O D I N G introduction TORI piano The TORI Piano is a model for recording and playback in Scratch, and we will code the program using the button sensor, the infrared sensor and the LED sensor. The key of this coding is that if you press and hold the infrared sensor connected to the input digital port 3 for more than 2 seconds to record, and if you press and release it for less than 2 seconds, the existing recorded sound will be played back.
CLASS 4 Making a robot BUTTON SENSOR 1 2 3 4 5 LED SENSOR 6 7 11 12 13 14 15 16 17 18 8 B B R R W W IR SENSOR Material list Diamond V8 x 12 Diamond V6 x9 Rubi 8 x3 Rubi 4 x9 Rubi 2 x6 Rubi 0 x4 Mini 2 x2 Triangle x2 Mainboard 128 x1 Battery Case x1 IR SENSOR x1 LED sensor x1 button sensor x7 Link x 10 Mini 1 x4