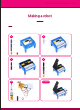
S C R A T C H Making a robot 1 2 x 12 x7 x9 x1 x2 x4 3 4 x2 x3 x4 x7 x3 x2 5 Complete x1 x1 x1 x1 x2 x 10 C O D I N G K I T
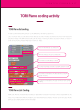
72 CLASS 4 TORI Piano coding activity TORI piano sound play Before making TORI Piano mentioned above, we need to make a program without the recording function that sounds out Do Re Mi Fa So La Ti when the button sensor between 1~7 on the piano is pressed. TORI Piano playback coding Let’s make a script by dragging in the blocks like the one shown above.
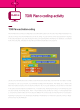
S C R A T C H C O D I N G TORI Piano coding activity TORI Piano Playback coding Does the script you created work well? You will find a strange thing as you are running the preceding script. If you press and hold the button sensor connected to the analog 0 port, you will notice that you are continuing to press and hold the button while you are pressing the button. Use the script from the previous page to make a script above. Unlike the previous script, now we have added a "Waiting" block.
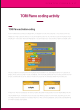
74 CLASS 4 TORI Piano coding activity TORI Piano Playback coding Does the script you made above function correctly? If so, we will add another note. It is very similar to the script we made above, so it should be very easy to make. Create the script above using the script you created on the previous page. You have to add another script that plays the note. The script to add at this time is a button sensor that outputs 71 notes.
S C R A T C H C O D I N G TORI Piano coding activity TORI Piano Playback coding Now, let's create a script that connects all the notes between the Do and Si. It will look like the one below.
76 CLASS 4 TORI Piano coding activity Activating TORI Piano First, let’s make a code that is activated when the IR sensor connected to Digital Port 3 is pressed. The early sensor value of Digital Port is “false”. When the user presses the infrared sensor, the sensor value changes to "true." Using this, code “if Digital sensor 3 value = true , then activate the game” . TORI Piano Activation Coding Drag the blocks in the picture above and make the script.
S C R A T C H C O D I N G TORI Piano coding activity TORI Piano list coding In order to add the recording function to the TORI piano, we need to use the ‘list.’ List is a function that you can save as much value as you want. The lists you need is the one for the ‘notes’ and another for ‘beats.’ The TORI piano should store the notes of the button sensor you press in the list of 'notes' in order, and store the corresponding notes in the list of 'beats.' Click the Variables tab to create a list.
78 CLASS 4 TORI Piano coding activity TORI Piano activation coding The infrared sensor connected to digital port 3 should be able to play both the role of recording and playback. You can use a timer so that one infrared sensor can do two things. You can think of a timer as a stopwatch in progress in the scratch program. Let’s code the program that start recording when the IR sensor of digital port 3 is pressed more than 2 seconds, and plays the recorded sound when pressed less than 2 seconds.
S C R A T C H C O D I N G TORI Piano coding activity TORI Piano activation coding If the infrared sensor connected to Digital Port 3 is pressed for more than 2 seconds, it must record, and if you release your finger 2 seconds before, it must send a signal to play. For this, we need to use the ‘broadcast’ block. ‘Broadcast’ in the scratch means sending signals. If you send signal, you must be able to receive the signal, right? The picture above is the script after the ‘broadcast’ block is added.
80 CLASS 4 TORI Piano coding activity TORI piano recording Coding Drag the coding locks and make a script like the one above. Did you get it? First, receive the ‘Record’ broadcast from the top. Then the bottom blocks are executed in order. The reason I chose 'Record' here is to let you know that it is a script related to recording. When broadcasting, it is helpful to specify the word related to the script to do complicated coding.
S C R A T C H C O D I N G TORI Piano coding activity TORI Piano, repetition of ‘If~’ block Do you remember the ‘IF~’ block we used previously? It was the block that activates its internal script when certain condition was fulfilled. If so, a block of 'if ~ if' will be created for the notes between Do and Si. That is, seven ‘IF~” block should be connected. So, what happens to the script inside each 'if~' block? They will be similar to each other.
82 CLASS 4 TORI Piano coding activity End Tori Piano recording Using the script from previous page, make a script just like the one above. You can record until the Digital Port 3 IR sensor is pressed again. To express this behavior, use the ‘Repeat until~” block. This block repeats the internal script until certain condition is met. The condition in this case is ‘Is Digital 3 Sensor pressed?” Which means, it will continue the internal script (recording) until the Digital 3 IR sensor is pressed.
S C R A T C H C O D I N G TORI Piano coding activity Recording ‘60th’ note Now you have made an “’analog 0 senor value <100” script. Then now let’s assemble the scripts we made so far. The script above is what you should get if you assemble everything. If you start the recording, LED is turned on, and it waits until the use release hand from the digital 3 IR sensor. After that, the timer resets. The reason for initialization of the timer was explained previously.
84 CLASS 4 TORI Piano coding activity Recording ‘71st’ note Using a script from previous page, make a script shown above. The contents of the input of the digital 2-button sensor were covered in the previous simple playback piano. The principle is the same as the button sensor connected to the analog port.
S C R A T C H C O D I N G TORI Piano coding activity Learn sonic name Do you remember that we set ‘Do’ as “C’ and ‘Si’ as ‘B’? On this page we will briefly learn the sonic names of each note. Korea Da La Ma Ba Sa Ka Na Da Germany France Italy USA Source: Classical Music Term Dictionary The sonic name is about the pitch of the sound. It’s a fixed name for each note. It’s a different concept than the notes that depends on the first note.
86 CLASS 4 TORI Piano coding activity Code a script for recording C~B Using the script on the right, code a script that will record from C to B. Make sure that the port of the analog sensor and the port of the digital sensor are changed, and check that the note names stored in the 'note' list are set considering the sound.
S C R A T C H TORI Piano coding activity TORI Piano active activation and recording coding.
88 CLASS 4 TORI Piano coding activity TORI Piano variable coding Now, let's create a script for the part that plays Tori Piano. Pre-recorded beats and notes are stored in the 'Beats' and 'note' lists. You need a role to 'point and play' the notes and notes stored in each list in order to create a TORI piano play script. Here we have to use the variable we learned earlier, the 'pointer' variable. Variables can easily be thought of as storage space.
S C R A T C H C O D I N G TORI Piano coding activity TORI Piano Playback coding Go ahead and make a script like the one above. Did you get it? First, on the top you receive a ‘Play’ signal. Then the blocks below that will be activated in order. The reason why we saved it as ‘Play’ in this case is also to show that it is related to recording. Save 1 at ‘pointer’ variable. This is to show that it is the first item in the ‘note’ and ‘Beats’ list.
90 CLASS 4 TORI Piano coding activity TORI Piano playback coding Let’s continue with the explanation for the script on the previous page. Should we take a look into the script inside the ‘repeat to~’ block? The timer is initialized and continues to flow when it is played. And wait until the timer is larger than the item value of 'Beats' pointed to by the value stored in 'Pointer' (initially 1). The moment it gets bigger, it gets out of the ‘waiting’ block.
S C R A T C H TORI Piano coding activity Coding playback scripts for C~B Use the script on the right to code the playback script until C~B. There is nothing to change except to add a loop of 'if ~' blocks. You can create a total of 7 blocks from C to B by connecting the condition of 'if' to 'block'.
92 CLASS 4 TORI Piano coding activity TORI Piano play coding The playback script for TORI Piano will look like the figure below! The whole script can be found at http://www.robotori.
S C R A T C H C O D I N G TORI Piano coding activity TORI Piano Play Now run the coded TORI Piano program to see if it works. If it does not work, please check the beginning of the book to see if there are any errors. Let's play your own with recording and playback functions. Let’s play your own piece with recording and playback functions.
94 CLASS 4 TORI Piano Problem 1 TORI Piano Problem 1 Have you tried playing TORI Piano using the recording and playback functions? Now, let's try recording the same score while watching the score below. The music below is ‘Airplane.’ You can play this with TORI Piano. Go ahead and try to play it.
S C R A T C H C O D I N G TORI Piano Problem 3 TORI Piano Problem 3 Were you able to play the songs in the previous page? This time, try to use the TORI piano to hear not only the piano but also the sounds of other instruments. On the Sound tab, find the desired block of instruments and combine it with the original script. Let's try it.
96 CLASS 4 Commentary TORI Piano problem 3 commentary Locate the block that sets up the instrument in the sound tab and try to connect it to the bottom of the "Record '" block. Find and drag the block shown below. The block above is currently set to use the 28th instrument. You can select various instruments by pressing the black arrow next to the number. You should set up another instrument only when recording. Because, when you play it, it reproduces the recorded material as it is.
S C R A T C H C O D I N G Introduction Artificial intelligence and autonomous vehicles. You have often heard the term 'artificial intelligence' in society today. Artificial intelligence is entering our lives at a very fast pace, telling what a computer can think and judge like a person. Artificial intelligence can not only do most of the things that people do, but it also gives people ideas that they cannot think of and can do things they cannot do.
98 S C R A T C H C O D I N G K I T Logic CLASS 4 Boost TORI Autonomous Vehicle LESSON 7
S C R A T C H C O D I N G introduction Tori Autonomous Vehicle Let's create a self-driving car using various sensors! Let’s create a robot that recognizes obstacles using an infrared sensor and an ultrasonic sensor and judges itself to go in the direction without obstacles. There is a 'differential gear unit' and a 'steering wheel' that allow the Tori autonomous vehicle to move like a real car. First, let's look at these two things and let them learn what role they play by creating a robot yourself.
100 CLASS 4 Concept Differential gear unit A differential gear unit is a device that is used to transmit moving forces in real cars. So far you've created robots that use two wheels to move around. All the robots that use two wheels use two DC motors. I put the wheels on each DC motor one by one, and I made the robot to operate two wheels.
S C R A T C H C O D I N G Concept Steering Wheel Do you understand the differential gear you learned earlier? Now let's see what is called a steering wheel that is necessary for an autonomous vehicle to operate. The driver must turn the handle to change the direction of the car to the left or right. The handle of this car is called the steering wheel. This steering wheel can be used to control direction. In the TORI autonomous vehicle, I will use the servo motor to express the steering wheel behavior.
102 CLASS 4 Concept Autonomous Vehicle So far, we have learned about the 'differential gearing' and the 'steering wheel' necessary for the car to work. Both of these factors were driving the car. Now let's see what it takes to have a car named autonomous. An autonomous vehicle is a car that automatically detects the condition of the road without the driver controlling the brakes, handles, and accelerator pedals.
S C R A T C H C O D I N G K I T Activities Tori Autonomous Vehicle Create your self-judging and moving tori autonomous vehicle 부품리스트 Autonomous Vehicle Material list 부품리스트 부품리스트 1단셀 굵은수평셀 Diamond H6 Diamond V8 Diamond V6 x4 x2 x1 Rubi 8 x5 Rubi 7 x8 Rubi 4 x8 Rubi 6 x 13 9 9 Rubi 2 x3 Rubi 0 x 15 12 Mini 2 x 22 Link 12x84 Mini 1 x8 24톱니기어 36톱니기어 12톱니기어 3 Bevel4 Sawtooth Sawtooth Sawtooth x4 4 24 x 2 12 x 2 36 x 7 축 64 3 축 64 4 Vertical Short Middle Motor connector x 6 con
104 CLASS 4 Activities Making Tori Autonomous Vehicle 1 2 x4 x2 x6 x1 A 45 x1 x4 24톱니기어 x1 x4 M1 (DC모터) Make two of the same model 3 x1 4 Assemble model 1 and 2 like the one x1 36톱니기어 x2 in the picture x1 A 45 caution 5 5-1 5-2 x2 x2 x2 x4 x2 A 23 x2 A 23 굵은수평셀 베벨기어 x2 베벨기어 Assemble with model 1
S C R A T C H C O D I N G Activities Tori Autonomous Vehicle 5 5-3 5-4 5-3 Top 5-6 differential gear 36 Assemble 5-1 model and 5-2 model like it is shown in the picture 5-5 x1 x1 36톱니기어 24톱니기어 x2 x1 x2 A 14 5-7 Fix it to the position so it cannot move.
106 CLASS 4 Activities Making Tori Autonomous Vehicle 6 7 x2 Assemble model 4 and 5-8 like it 12톱니기어 is shown In the figure. Assembly location 8 8-1 x2 8-2 Sawtooth 36 36톱니기어 x2 Assembly x2 location A 64 A64 9 10 Assemble model 8and 9 like it is shown in the picture.
S C R A T C H C O D I N G K I T Activities Tori Autonomous Vehicle 11 12 x2 x2 Assemble model 10 and 11 like it is shown in the picture 13 14 x2 x1 x2 x2 36톱니기어 x1 오프로드 바퀴 15 16 부품리스트 x4 12 3핀 연결잭 3 8 Assemble model134 and 13 like it is shown in the figure. Do the same thing for the back using the 4핀 연결잭 connection jack.
108 CLASS 4 Activities Making Tori autonomous vehicle 17 18 x2 x1 x1 x5 x1 x1 19 Figure 18 Assemble model 16, 17 and 18 like it is shown In the figure. 20 Figure 17 x2 x1 A 14 x1 x1 A 23 x1 A 45 Figure 16 21 x1 22 Assemble model 19 and 20 like it is shown In the figure.
S C R A T C H C O D I N G Activities Making Tori autonomous vehicle 23 24 x1 x2 A 64 x2 A 45 A64 굵은수평셀 x2 x2 x2 x2 Assemble model 21 and 22 like it is shown In the figure. 25 x4 Assemble model 10 and 11 like it is shown In the figure. 26 Assemble model 22 and 24 like it is shown In the figure.
110 CLASS 4 Activities Making Tori Autonomous Vehicle Complete
S C R A T C H C O D I N G Connecting Main cell Connecting Main cell BUTTON SONSER 1 0 2 1 3 2 IR SENSOR 4 3 5 4 6 5 7 2 8 3 ULTRASONIC SENSOR 11 12 13 14 15 16 17 1 8 B B R R W W 10 11 12 13 SONG GENERATOR 5 6 9 Servo motor Connector to DC motor K I T
112 CLASS 4 Activities Coding Tori Autonomous Vehicle Now, let's try to code a real self-driving car. Your Tori autonomous vehicle is a car robot that uses four infrared sensors and one ultrasonic sensor. Once you are aware of the situation with each input sensor, you can then use the differential gear to move the vehicle to an unobstructed location. Location with IR sensor Location with ULTRASONIC sensor The Tori autonomous vehicle uses two infrared sensors to detect the floor.
S C R A T C H C O D I N G Activities Setting Tori Autonomous Vehicle Variables. Now let's set up the variables we need to do the coding once. You need a fairly large number of variables to code autonomous vehicles. Find out what variables you need and learn what each one does. First, go to the Variables tab and make the following variables! Standard values of the two front infrared sensors Standard values of the two infrared sensors below.
114 CLASS 4 Activities Setting the first value of the variable Now you have to set the initial values of each variable. When you press the Run (activation) button, you need to set the angle of the servo motor and the reference value of the sensor first.
S C R A T C H C O D I N G Activities Use the IR sensor to judge after recognizing the situation Now you are going to code how to operate using the values entered by the infrared and ultrasonic sensors of the Tori autonomous vehicle. First, create a script about how the infrared sensor recognizes the situation.
116 CLASS 4 Commentary Use the IR sensor to judge after recognizing the situation If the infrared sensor connected to the right front is smaller than the reference value or if the infrared sensor connected at the lower right is larger than the reference value, the car should operate in the backward direction and the steering wheel in the left direction.
S C R A T C H C O D I N G Activities Operation after judging using right infrared sensor In the 'Monitor_process' script created on the previous page, if the infrared sensor connected to the right recognizes an obstacle, it broadcasts 'Detect_IR_R' and stores '1' in the variable 'is_Detect_obstacle'. Now, let's code what the script 'Detect_IR_R' should do. This script shows the situation when the right infrared sensor is recognized, so the car must go to the left.
118 CLASS 4 Activities Use the left infrared sensor to operate after judgment Now, let's code a script for 'Detect_IR_L' broadcast from the 'Monitor_process' script. Please refer to the 'Detect_ IR_R' script created on the previous page. This time, it indicates the situation when the left infrared sensor is recognized, so the car must go to the right. At this time, it does not go right instantly, but it has to go back to the right after a little bit.
S C R A T C H C O D I N G Commentary Operation after judging using the left IR sensor In your 'Monitor_process' script, if the infrared sensor connected to the left detects an obstacle, it broadcasts 'Detect_IR_L' and it stores '1' in variable 'is_Detect_obstacle'. The 'Detect_IR_L' script shows the situation when the left infrared sensor is recognized, so the car must go to the right. At this time, it does not go right to the right but has to go back to the right a little back.
120 CLASS 4 Activities Stop operation using button sensor When you run the script and press the button sensor, the Tori Autonomous Vehicle will be able to recognize and determine the situation by itself. There are many unexpected situations when you travel like this. At this time, add the code to the existing script to stop te operation by pressing the button sensor. Code all motions to stop when the button sensor is pressed while Tori autonomous vehicle is moving.
S C R A T C H C O D I N G Commentary Stop operation using button sensor If you press the button sensor while the car is running, all operations must be stopped. If so, you can add a conditional statement to the 'Monitor_process' script that provides context awareness. The conditional statement that stops all operation when button sensor is pressed is as below. I think you could easily make the above conditional statements easy enough.
122 CLASS 4 Activities Use ultrasonic sensor to judge after recognizing the situation Now, try to use the ultrasonic sensor to recognize the situation. The closer the distance of the ultrasonic sensor, the smaller the analog value. It can detect obstacles by using the ultrasonic sensor connected to the servo motor.
S C R A T C H C O D I N G Commentary Use ultrasonic sensor to judge after recognizing the situation If the ultrasonic sensor is smaller than the 'Detect_value_Ultrasonic' parameter, the ultrasonic sensor should sample. However, if the ultrasonic sensor is not recognized and the infrared sensor is not recognized, there is no obstacle, so the robot must keep moving forward. Let's create a script that satisfies these conditions first.
124 CLASS 4 Commentary Sampling with an ultrasonic sensor Now let’s create a script called ‘check_Ultrasonic’ that we broadcasted earlier. Compare it to the script you’ve created and see what’s different! The scripts needed for sampling the ultrasonic sensors are shown below. Go ahead and make it! When it gets 'check_Ultrasonic', it runs backwards for half a second, and broadcast 'move_stop' and wait. After that, it starts the sampling with the servo motor angle right.
S C R A T C H C O D I N G Activities Operation after judgment using ultrasonic sensor In the 'check_Ultrasonic' script that we created on the previous page, let's create a 'Detect_Ultrasonic' script that was broadcast to determine the ultrasound sensor value at the end. This script is very simple.
126 CLASS 4 Activities Tori Autonomous Vehicle coding Combine all the scripts you've created so far, press the Run Script button, press the button sensor and it will work! The whole script can be found at http://www.robotori.
S C R A T C H S C R A T C H C O D I N C O D I N G G K I K I T T Logic Boost Kart Rider LESSON 8
128 CLASS 4 Making Robot Kart Rider Before you do any further coding, let's quickly learn how to manipulate the model using a wireless remote control. Knowing this way, you can create the model you want and control it with a wireless remote control. The wireless remote control can control the robot by using the light called infrared light. Infrared refers to particles that are invisible to sunlight. So, using infrared rays to control the robot is called infrared communication.
S C R A T C H C O D I N G Making Robot Kart Rider It is an image of the shape of Kart Rider, a racing car game. Create a variety of cart riders to race your robots.
130 CLASS 4 Making a Robot Making Kart Rider 1 1-1 1-2 x2 x1 x6 x2 Make two identical x2 A64 x2 models 1-3 1-4 Figure 1-1 Figure 1-2 2 2-1 A64 A64 x2 A64 Assemble it like the image on the other side 2-2 x2 x2 x2 x2 x4 x2 Assemble it like the image on the other side Assemble it like the image on the other side 2-3 Figure 2-2 x2 x2
S C R A T C H C O D I N G Making a Robot Making Kart Rider 3 3-1 3-2 Figure 2-3 Figure 3-1 x1 x2 x1 4 4-1 4-2 Figure 3-2 Figure 4-1 x3 5 5-1 5-2 Figure 4-2 x2 x2 Make two identical models Figure 5-1 5-3 x2 Assemble with 5-2 model K I T
132 CLASS 4 Making a Robot Making Kart Rider 6-1 6 6-2 x1 x1 A45 x2 x3 x1 x1 Figure 6-1 x3 6-3 Figure 14-5 Battery case assembly location Assemble the models you made in picture 5-3 and 6-2 7 7-1 7-2 Figure 7-1 x1 A45 x2 x2 x1 x2 8 x1 x2 Assemble the models you made in picture 6-3 and 7-1
S C R A T C H C O D I N G Making a Robot Making Kart Rider 9 9-1 9-2 Figure 8 Figure 9-1 x1 x1 Assemble the models you x1 made in picture 8 and 9-1 10 10-1 10-2 Figure 9-2 Figure 10-1 x2 x1 Assemble the models you x4 made in picture 9-2 and 10-1 11 11-1 11-2 Figure 11-1 x2 x2 Make two identical models 12 12-1 x2 Figure 10-2 12-2 A B x4 Assemble the models you Figure 11-2 made in picture 10-2 and 11-1 Figure 12-1 A Figure 12-1 B Assemble the models you made in picture 11-2 and
134 CLASS 4 Making a Robot Making Kart Rider 13 13-1 13-2 Figure 13-1 x1 x2 Figure 12-2 14 14-1 A45 14-2 Figure 14-1 x2 A45 x2 x2 Make two identical models 14-3 x2 14-4 Figure 13-2 Figure 14-2 Figure 7-2 Figure 7-2 14-5 ※ caution 14-6 x1 x1 x1 ※ Setting the operation mode
S C R A T C H C O D I N G Connecting main cell Connecting Kart Rider How should we connect the Kart Rider model with the main cell? Look at the picture below closely. When connecting the motor to the left side of the cart rider, be sure to insert the red line on the upper pin and the black line on the lower pin firmly. When connecting the right motor, please connect the red line to the upper pin and the black line to the lower pin firmly.
136 CLASS 4 Wired/Wireless remote control Using Wired/wireless remote control The wired / wireless remote control can be used as a wired remote control by plugging in a connector or by using a wireless remote control together with a remote receiver after disconnecting the connector Advance Turn right Segment window: Window to display status when setting mode or channel Turn left Servo motor Back Power on/off Mode setting switch 1.
S C R A T C H C O D I N G Wired/Wireless remote control 2. Using a wireless remote control When using a wireless remote, there are few things you have to set up before using. 1) Setting the same channel as the main board and remote control 2) Connect REMOTE RECEIVER and the main board (wireless remote control and REMOTE RECEIVER can exchange signal and control motion) 3) Set main board to ‘F’ mode. Segment window How to set the main board channel 1. Switch 1 is turned off 2.
138 CLASS 4 Wired/Wireless remote control Using wireless remote control Did you set both the main board and the wireless remote control to same channel? Now let’s connect REMOTE RECEIVER and main board. Connect the connection jacks in the order of black, red, and white as shown on the left. Be careful not to connect them in opposite order! Finally, press the mode change switch continuously to set it to 'F' mode.
S C R A T C H C O D I N G Controlling Kart Rider Controlling Kart Rider Now that you've set up your wireless remote control, you can fly your cart rider! The wireless remote control gives the advantage of controlling the robot without connecting it to the computer. However, there are limits to what a robot can do when you think about it.
140 CLASS 4 MEMO
FCC Information to User This equipment has been tested and found to comply with the limits for a Class B digital device, pursuant to Part 15 of the FCC Rules. These limits are designed to provide reasonable protection against harmful interference in a residential installation. This equipment generates, uses and can radiate radio frequency energy and, if not installed and used in accordance with the instructions, may cause harmful interference to radio communications.