
Installation and Operation Guide
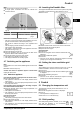
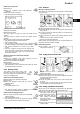

Confirming that the ventilation grid has been cleaned
u
Press menu.
u
Press the navigation arrows until the ventilation grid
is displayed.
u
Press the ventilation grid symbol.
u
Press the navigation arrows until clean ventilation
grid is displayed.
u
Press RESET.
w
The timer is reset. The cleaning interval starts all
over again.
Turning the timer off
If the reminder function is to be switched off the timer can be
turned off.
u
Press menu.
u
Press the navigation arrows until the ventilation grid
is displayed.
u
Press the ventilation grid symbol.
u
Press OFF.
w
The timer is turned off.
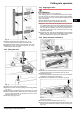
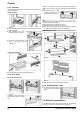
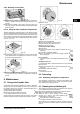
6.4 Cleaning the appliance
WARNING
Risk of injury and damage as a result of hot steam!
Hot steam can lead to burns and can damage the surfaces.
u
Do not use any steam cleaners!
NOTICE
Incorrect cleaning damages the appliance!
u
Do not use cleaning agents in concentrated form.
u
Do not use any scouring or abrasive sponges or steel wool.
u
Do not use any sharp or abrasive cleaning agents, nor any
that contain sand, chloride or acid.
u
Do not use chemical solvents.
u
Do not damage or remove the type plate on the inside of the
appliance. It is important for the customer service.
u
Do not pull off, bend or damage cables or other compo-
nents.
u
Do not allow any cleaning water to enter the drain channel,
ventilation grille or electrical parts.
u
Please use soft cleaning cloths and a universal pH-neutral
cleaning agent.
u
Please use cleaning and care products suitable for contact
with foodstuffs in the appliance interior.
u
Empty appliance.
u
Pull out the power plug.
u
Clean plastic outer and inner surfaces with lukewarm
water and a little washing-up liquid.
NOTICE
Risk of damage from stainless steel care products!
The stainless steel doors and stainless steel side panels
are treated with a premium surface finish.
Stainless steel care products attack these surfaces.
u
Only use a soft, clean cloth to wipe down finished door
and side panel surfaces and painted door and side
panel surfaces. To remove heavy dirt, use a little water or
neutral detergent. Alternatively, you can use a micro-fibre
cloth.
u
Most of the parts can be dismantled for cleaning: see the
relevant chapter.
u
Clean drawers by hand with lukewarm water and a little
washing up liquid.
u
All the other fittings can be put in the dishwasher.
u
Only use a damp cloth to clean the telescopic rails. The
grease in the runners is for lubrication purposes and must
not be removed.
After cleaning:
u
Wipe dry the appliance and items of equipment.
u
Connect the appliance and switch it on again.
When the temperature is sufficiently cold:
u
Put the food back inside.
6.5 Customer service
First of all check whether you can eliminate the fault yourself.
(see 7) If you can't, contact Customer Services. You can find
the address in the enclosed customer service list.
WARNING
Risk of injury if repair work is not carried out professionally!
u
Have any repairs and action - not expressly specified - on
the appliance and mains cable carried out by service
personnel only. (see 6)
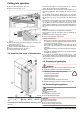
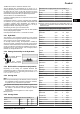
Displaying the appliance description (model and index),
service no. (service) and serial no. (S. no.) on the screen:
u
Press menu.
u
Press the navigation arrows until the appliance infor-
mation symbol is displayed.
u
Press the appliance information symbol.
w
The appliance information is displayed.
u
Note down the appliance
information.
u
To return to the home screen
press the Back symbol.
u
Close the door.
u
Contact customer service and give them the required appli-
ance information.
w
This will help us to provide you with a faster, more accurate
service.
u
Follow any further instructions given by Customer Services.
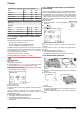
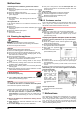
Alternatively you can read off the appliance information
from the model plate:
u
Read off the appliance
name
Fig. 44 (1)
,
service no.
Fig. 44 (2)
and serial no.
Fig. 44 (3)
from the
model plate. The
model plate can be
found on the inside of
the appliance on the
left.
Fig. 44
Licence agreements:
Licences used can be viewed at ©.
u
Press ©.
7 Malfunctions
Your appliance is designed and manufactured for a long life
span and reliable operation. If a malfunction nonetheless
occurs during operation, check whether it is due to a handling
error. In this case you will have to be charged for the costs
incurred, even during the warranty period. You may be able to
rectify the following faults yourself:
Malfunctions
20 * Depending on model and options