Operating and installation instructions fridge with BioFresh 20190315 7088097 - 00 SKBes 43..
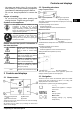
Appliance at a glance 1 Appliance at a glance Contents 1 1.1 1.2 1.3 1.4 1.5 1.6 1.7 1.8 Appliance at a glance............................................ Description of appliance and equipment.................. Appliance range of use............................................. Conformity................................................................ Product data............................................................. External dimensions of the appliance....................... Saving energy........
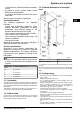
Appliance at a glance - in staff kitchens, bed and breakfast establish- 1.5 External dimensions of the appli- ments, ance - by guests in country houses, hotels, motels and other accommodation, - for catering and similar services in the wholesale trade. All other types of use are not permitted.
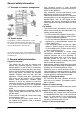
General safety information 1.7 Example of contents arrangement Fig. 3 1.8 Smart device The appliance is ready for integration into a smart home and for extended services. Other options can be selected with a SmartDeviceBox. This is activated via the MyLiebherr customer portal. You will find more information about availability and pre-requisites and the individual options on the website www.smartdevice.liebherr.com.
Controls and displays - Hot steam can lead to injury. Do not use elec- trical heating or steam cleaning equipment, open flames or defrosting sprays to defrost. - Do not use sharp implements to remove the ice. Danger of crushing: - Do not hold the hinge when opening and closing the door. Fingers may get caught. Symbols on the appliance: The symbol can be located on the compressor. It refers to the oil in the compressor and indicates the following danger: Swallowing or inhaling can be fatal.
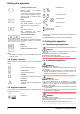
Putting into operation Left/right navigation arrow: Selects options through the menu. and SabbathMode navigates You can scroll through the individual options using the navigation arrows. The first option is displayed again after the last one. Child safety devicex Holiday function Back: Cancels the selection. Temperature unit The display switches to the next higher level or to the home screen BioFresh OK: Confirms the selection. After confirmation the display switches to the home screen.
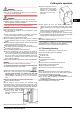
Putting into operation WARNING Fire hazard and danger of damage! u Do not place appliances emitting heat e.g. microwaves, toasters etc. on the appliance! u Align the appliance so that it stands firmly and on a level by applying the accompanying spanner to the adjustableheight feet (A) and using a spirit level. WARNING Blocked ventilation openings pose a risk of fire and damage! u Always keep the ventilation openings clear.
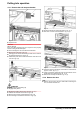
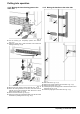
Putting into operation 4.3.1 Remove the soft stop mechanism Fig. 10 u Press the tab with the slotted screwdriver. Fig. 10 (1) u Pull cover out of the catch mechanism. Fig. 10 (2) Fig. 8 u Open the door. NOTICE Risk of damage! If the door seal is damaged, the door may fail to close properly and the cooling will be inadequate. u Do not damage the door seal with the screwdriver! u Remove the outer cover. Fig. 8 (1) u Disengage and release the bearing bracket cover. Remove the bearing bracket cover. Fig.
Putting into operation 4.3.3 Moving the upper bearing parts to the other side Fig. 13 u Remove both screws with the T25 screwdriver. u Lift and remove the bearing bracket. Fig. 12 CAUTION Risk of injury if the door tips! u Take good hold of the door. u Set down the door carefully. u Carefully remove the protective cover. Fig. 12 (1) u Undo the bolt a little with a T15 screwdriver. Fig. 12 (2) u Hold the door and remove the bolts with your fingers. Fig. 12 (3) u Pull the bearing bush out of the guide.
Putting into operation 4.3.4 Moving the lower bearing parts to the other side 4.3.5 Moving the handles to the other side Fig. 15 u Lift the bearing pin completely upward and remove. Fig. 15 (1) u Undo the screws with a T25 screwdriver and remove the bearing bracket Fig. 15 (2) Fig. 16 u Remove the cover and fix it on the other side. Fig. 16 (1) u Place the bearing bracket on the other side and screw in with the aid of a T25 screwdriver. Start with screw 2 at the bottom in the middle. Fig.
Putting into operation 4.3.7 Aligning the door WARNING Risk of injury due to the door dropping out! If the bearing parts are not screwed into place firmly enough, the door may drop out. This may lead to severe injuries. What is more, the door may not close and therefore the appliance may fail to cool properly. u Screw the turn hinges firmly into place with 4 Nm. u Check all of the screws and retighten if necessary.
Putting into operation u Remove the locking device. Fig. 21 (3) u Slide on the cover. Fig. 21 (4) The dimensions apply for an opening angle of 90 °. Spacing angles will vary according to the opening angle. You can purchase a kit to limit the door opening angle to 90° on soft closing appliances. Please contact our customer service team. The appliance can be built into kitchen units. A top cupboard Fig. 23 (2) can be added above the appliance in order to bring the appliance Fig.
Control Note Only use the power connection lead supplied. u A longer power connection lead can be ordered from Customer Service. 4.8 Inserting the FreshAir filter. The supplied FreshAir filter can be used for optimum air quality. The intake is located at the top of the appliance, (see 1) u Remove cover. Fig.
Control 5.2.1 Switching on the child safety device u Press menu. u Press the navigation arrows until the child safety device is displayed. u Press ON. w The child safety device is switched on. 5.2.2 Switching the child safety device off u Press menu. u Press the navigation arrows until the child safety device is displayed. u Press OFF. w The child safety device is switched off. 5.3 Sabbath Mode This function meets the religious requirements on the Sabbath or Jewish feast days.
Control Switching on SuperCool u Press menu. u Press the navigation arrow until SuperCool is displayed. u Press the SuperCool symbol. w The following screen is displayed: Fig. 27 The running time can be set to four levels. Setting the running time: u Press plus or minus. The minus symbol is greyed out when the lowest level is selected. The plus symbol is greyed out when the highest level is selected. u Confirm the required running time with START. w The display switches to the home screen.
Control 5.4.7 VarioSafe The VarioSafe provides space for small items of food and packages, tubes and jars. Using VarioSafe Fig. 30 u The VarioSafe drawer can be taken out and pushed in at two different heights. u The VarioSafe can also be height-adjusted as a whole. Either one or both the boxes can be used. If particularly tall bottles are to be stored, hang only a single box above the bottle rack. u Re-positioning the boxes: Lift them for removal and reposition them as required.
Control The BioFresh section is divided into different zones. The top BioFresh Plus compartment can go down to -2 °C making it particularly suited to fresh seafood and fish. This can be divided into two zones, so the right and left zones of the compartment can be set at different temperatures. An internal fish & seafood compartment lets you split the temperatures. The zone below is a normal BioFresh area. A moisture regulating plate lets you adjust the moisture for the refrigerated food.
Control Guidelines for storage periods at high humidity 0 °C Plums up to 20 days Cranberries up to 60 days Rhubarb up to 13 days Gooseberries up to 13 days Grapes up to 29 days Additional guidelines for BioFresh Plus storage periods for –2 °C Seafood Crabs for -2 °C up to 4 days Mussels for -2 °C up to 6 days Sushi for -2 °C up to 4 days Fish for -2 °C up to 4 days 5.5.7 Setting the temperature in the BioFresh compartment. Recommended refrigerator setting: 5 °C.
Maintenance 5.5.9 Humidity control plate Fig. 39 u To remove the humidity control plate: Having removed the drawers, carefully draw the plate forwards and lower it for removal. u Inserting the humidity control plate: Insert the plate from below into the front and back bracket and push back until it clicks into place. u Remove cover. Fig. 42 5.5.10 Using the Fish & Seafood compartment The Fish & Seafood compartment lets you set different temperatures in the BioFresh Plus compartment.
Malfunctions Confirming that the ventilation grid has been cleaned u Press menu. u Press the navigation arrows until the ventilation grid is displayed. u Press the ventilation grid symbol. u Press the navigation arrows until clean ventilation grid is displayed. u Press RESET. w The timer is reset. The cleaning interval starts all over again. Turning the timer off If the reminder function is to be switched off the timer can be turned off. u Press menu.
Messages Appliance does not work. The appliance is not switched on. Switch on the appliance. The power plug is not properly inserted in the wall socket. Check power plug. The fuse of the wall socket is not in order. Check fuse. The appliance plug does not fit the appliance properly. Check the appliance plug. → u → u → u → u The compressor runs for a long time. → The compressor switches to a low speed when little cold is needed. Although the running time is increased as a result, energy is saved.
Decommissioning Note Details on the message can be displayed again via the menu field. u Press menu. u Press the message symbol. u The display switches to the next message when you press one. After the last active message the display switches to the home screen. Door alarm An audible warning sounds if the door is open for longer than 60 seconds. The door alarm symbol appears on the display. The audible warning stops automatically when the door is closed.
Disposing of the appliance * Depending on model and options 23
Liebherr-Hausgeräte Ochsenhausen GmbH Memminger Straße 77-79 88416 Ochsenhausen Deutschland home.liebherr.