
User Manual
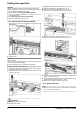
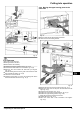
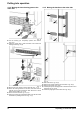
Table Of Contents
- en
- 1 Appliance at a glance
- 2 General safety information
- 3 Controls and displays
- 4 Putting into operation
- 5 Control
- 6 Maintenance
- 7 Malfunctions
- 8 Messages
- 9 Decommissioning
- 10 Disposing of the appliance

WARNING
Fire hazard and danger of damage!
u
Do not place appliances emitting heat e.g. microwaves,
toasters etc. on the appliance!
WARNING
Blocked ventilation openings pose a risk of fire and damage!
u
Always keep the ventilation openings clear. Always ensure
that the appliance is properly ventilated!
If your appliance is not a side-by-side (SBS) appliance:*
NOTICE
Risk of damage due to condensate!*
u
Do not install the appliance directly alongside a further
refrigerator/freezer.
Note
If you have several appliances next to one another, leave a gap
of 70mm between appliances. Otherwise condensation will
build up between the units.*
Fig. 8
*
q
Before you connect the appliance, report any damage
immediately to the delivery company.
q
The floor of the installation site must be horizontal and even.
q
Do not install the appliance in direct sunlight, next to an
oven, radiator or similar.
q
Install the appliance with the rear panel up against the wall
and always use the supplied wall spacers (see below).
q
Only ever move the appliance when it is empty.
q
The surface supporting the appliance must be at the same
level as the surrounding floor.
q
Do not install the appliance on your own.
q
The more coolant there is in the appliance, the larger the
room in which the appliance is installed must be. If the room
is too small, any leak may create a flammable mixture of gas
and air. For each 8 g of coolant the installation space must
be at least 1 m
3
. Information on the coolant is on the model
plate inside the appliance.
u
Remove the protective film from the outside of the appli-
ance.*
NOTICE
Risk of damage from stainless steel care products!
The stainless steel doors and stainless steel side panels
are treated with a premium surface finish.
Stainless steel care products attack these surfaces.
u
Only use a soft, clean cloth to wipe down finished door
and side panel surfaces and painted door and side
panel surfaces. To remove heavy dirt, use a little water or
neutral detergent. Alternatively, you can use a micro-fibre
cloth.
u
Remove the protective film from the decorative trims.
u
Remove all transit supports.
Spacers must be used to achieve the declared energy
consumption and to prevent condensation in the event of high
surrounding humidity. This increases the appliance depth by
about 15 mm. The appliance will work perfectly well without the
spacers but will have a slightly higher energy consumption.
u
If your appliance comes with wall
spacers, mount these on the
back of the appliance, bottom left
and right.
u
Dispose of packaging material (see 4.5) .
u
Align the appliance so that it
stands firmly and on a level by
applying the accompanying
spanner to the adjustable-
height feet (A) and using a
spirit level.
u
Then support the door: Use saddle wrench SW10 to
unscrew the base on mounting block (B) until it makes
contact with the ground, then continue turning it for a further
90°.
When a Side-by-Side appliance (S…) is fitted together with
a second appliance (as a SBS combination):*
u
Proceed according to the Side-by-Side combined fridge-
freezer installation instructions. (Accessories bag of the SBS
freezer/appliance with freezer compartment)*
Note
u
Clean the appliance (see 6.4) .
If the appliance is installed in a very damp environment,
condensate may form on the outside of the appliance.
u
Always see to good ventilation at the installation site.
4.3 Reversing the door
If necessary, you can change the way the door opens:
Ensure that the following tools are available:
q
Torx® 25 (T25)
q
Torx® 15 (T15)
q
Slotted screwdriver
q
Open-ended wrench SW10
q
Spirit level
q
Open-ended wrench supplied with the T25 tool
q
If necessary, a cordless screwdriver
q
Get a stepladder if necessary
q
If necessary, a second person for assembly
Putting into operation
* Depending on model and options 7