
User Manual
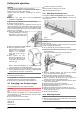
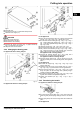

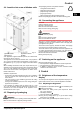
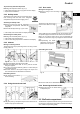
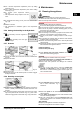
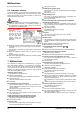
Table Of Contents
- 1 Appliance at a glance
- 2 General safety information
- 3 Controls and displays
- 4 Putting into operation
- 5 Control
- 5.1 Brightness of the temperature display
- 5.2 Child proofing
- 5.3 Door alarm
- 5.4 Temperature alarm
- 5.5 Freezing food
- 5.6 Thawing food
- 5.7 Setting the temperature
- 5.8 SuperFrost
- 5.9 Drawers
- 5.10 Shelves
- 5.11 VarioSpace
- 5.12 Information system
- 5.13 Drawer for herbs and berries
- 5.14 Cold storage accumulators
- 5.15 IceMaker*
- 6 Maintenance
- 7 Malfunctions
- 8 Decommissioning*
- 9 Disposing of the appliance
- l708619601_instructionmanual_SKBbs4210.pdf
- 1 Appliance at a glance
- 2 General safety information
- 3 Controls and displays
- 4 Putting into operation
- 5 Control
- 6 Maintenance
- 7 Malfunctions
- 8 Decommissioning
- 9 Disposing of the appliance
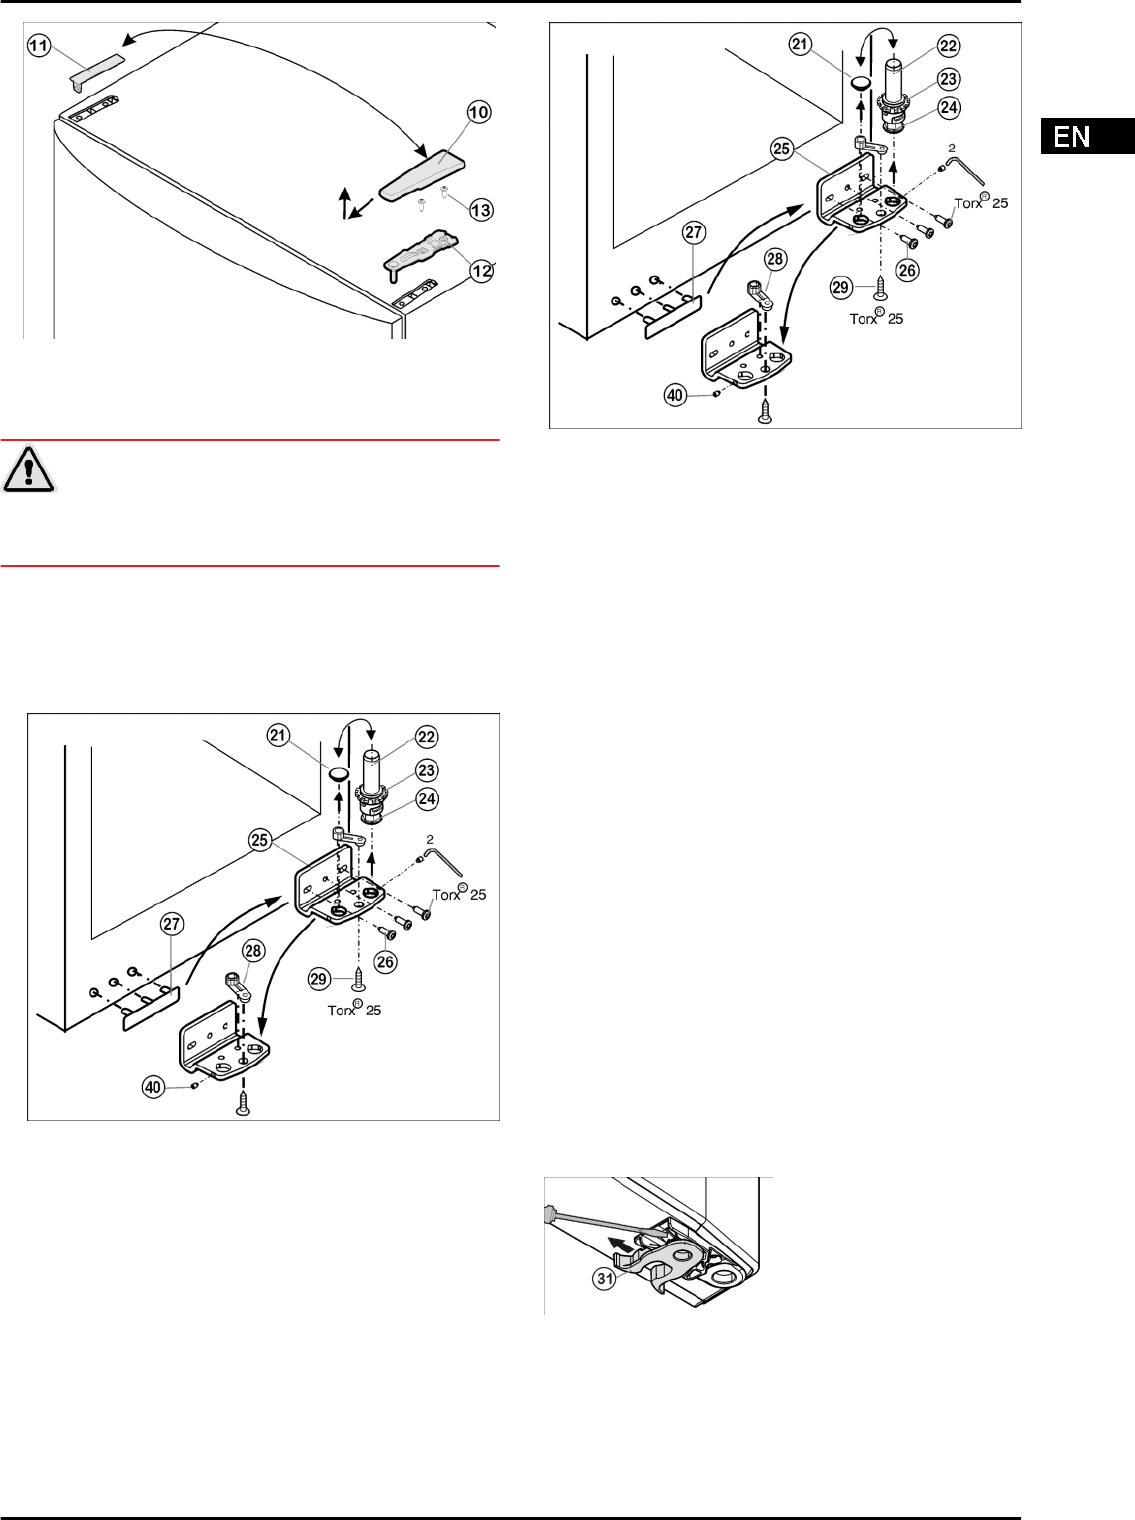
Fig. 6
u
Close the door.
u
Pull off the cover
Fig. 6 (10)
forwards and upwards.
u
Lift off the cover
Fig. 6 (11)
.
CAUTION
Risk of injury if the door tips!
u
Take good hold of the door.
u
Set down the door carefully.
u
Unscrew the upper turn hinge
Fig. 6 (12)
(2x Torx® 25)
Fig. 6 (13)
and raise it for removal.
u
Lift up the door and set it aside.
4.3.3 Changing the bearing parts
For appliances with a closing damper:
Fig. 7
*
For appliances without a closing damper:
Fig. 8
*
For all appliances
u
Using the accompanying Allen key, unscrew the threaded
pin
Fig. 7 Fig. 7 Fig. 7 Fig. 7 Fig. 7 (40)
by about 1 turn.
u
Turn and lift out the bearing pin
Fig. 7 Fig. 7 Fig. 7 Fig. 7
Fig. 7 (22)
together with washer
Fig. 7 Fig. 7 Fig. 7 Fig. 7
Fig. 7 (23)
and adjustable-height foot
Fig. 7 Fig. 7 Fig. 7
Fig. 7 Fig. 7 (24)
.
u
Lift off the stopper
Fig. 7 Fig. 7 Fig. 7 Fig. 7 Fig. 7 (21)
.
u
Unscrew the turn hinge
Fig. 7 Fig. 7 Fig. 7 Fig. 7 Fig. 7 (25)
.
u
Fully unscrew the threaded pin
Fig. 7 Fig. 7 Fig. 7 Fig. 7
Fig. 7 (40)
and screw it in on the opposite side, at the turn
hinge, until it is flush outside with the turn hinge.
For appliances with a closing damper:
u
Unscrew the bearing element
Fig. 7 Fig. 8 (28)
, turn it
through 180° and screw it firmly back into place .
For appliances without a closing damper:
u
Unscrew storage section
Fig. 7 Fig. 8 (28)
and fit it to the
opposing locating bore in the mounting block, then tighten it
down.
For all appliances
u
Re-insert the stopper
Fig. 7 Fig. 7 Fig. 7 Fig. 7 Fig. 7 (21)
into the other hole.
u
Carefully lift off the cover on the handle side
Fig. 7 Fig. 7
Fig. 7 Fig. 7 Fig. 7 (27)
and transfer it to the opposite side.
u
Screw the turn hinge
Fig. 7 Fig. 7 Fig. 7 Fig. 7 Fig. 7 (25)
firmly into place on the new hinge side, possibly using a
cordless screwdriver (with 4 Nm).
u
Re-insert the bearing pin
Fig. 7 Fig. 7 Fig. 7 Fig. 7 Fig. 7 (22)
together with washer and adjustable-height foot.
u
Tighten the threaded pin
Fig. 7 Fig. 7 Fig. 7 Fig. 7
Fig. 7 (40)
.
4.3.4 Transferring the handle
For appliances without a closing damper:
Fig. 9
u
Turn around the spring clamp
Fig. 9 (31)
: Press down the
detent lug and pull the spring clamp up and over to remove
it.
u
Slide spring clamp onto the new hinge side until it clicks into
place.
For all appliances
Putting into operation
* Depending on model and options 7