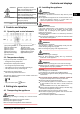
Operating instructions Freezer 030217 7086194 - 01 SGNbs ...
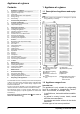
Appliance at a glance Contents 1 Appliance at a glance 1 1.1 1.2 1.3 1.4 1.5 1.6 Appliance at a glance............................................ Description of appliance and equipment.................. Appliance range of use............................................. Conformity................................................................ External dimensions of the appliance....................... Saving energy.......................................................... HomeDialog....................
Appliance at a glance Foreseeable misuse 1.4 External dimensions of the appliThe following applications are expressly ance forbidden: - Storing and refrigerating medicines, blood plasma, laboratory preparations or similar substances and products based on the Medical Device Directive 2007/47/EC - Use in areas at risk of explosions Misusing the appliance may lead to damage to the goods stored or they may spoil.
General safety information 2 General safety information Danger for the user: - This device can be used by children and people with impaired physical, sensory or mental abilities or with a lack of experience and knowledge provided that they are supervised or have received instruction in the safe use of this device, and about the resulting hazards. Children must not play with this appliance. Cleaning and user maintenance work must not be carried out by children without adult supervision.
Controls and displays WARNING identifies a dangerous situation which, if not obviated, may result in death or severe bodily injury. CAUTION identifies a dangerous situation which, if not obviated, may result in minor or medium bodily injury. NOTICE identifies a dangerous situation which, if not obviated, may result in damage to property. Note identifies useful information and tips. 3 Controls and displays 3.
Putting into operation q The more R 600a refrigerant there is in the appliance, the larger the room in which the appliance is standing needs to be. In rooms that are too small, a flammable mix of gas and air may be created if there is a leak. According to the EN 378 standard, every 11 g of R 600a refrigerant requires at least 1 m3 space in the room for the appliance. The amount of refrigerant in your appliance is on the type plate inside the appliance.
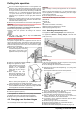
Putting into operation u Pull the soft stop unit out a little, push it in the direction of the handle side and swing it out. u Set the soft stop unit aside. 4.3.2 Detaching the door Fig. 8 * Fig. 6 u Close the door. u Pull off the cover Fig. 6 (10) forwards and upwards. u Lift off the cover Fig. 6 (11). CAUTION Risk of injury if the door tips! u Take good hold of the door. u Set down the door carefully. u Unscrew the upper turn hinge Fig. 6 (12)(2x Torx® 25) Fig. 6 (13) and raise it for removal.
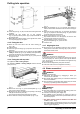
Putting into operation Fig. 12 Fig. 10 u Lift the stopper Fig. 10 (30) out of the door bearing bush and transfer it. u Dismantle the door handle Fig. 10 (32), stoppers Fig. 10 (33) and pressure plates* Fig. 10 (34) and transfer to the opposite side. u When fitting the pressure plates on the opposite side, make sure they snap properly into place.* 4.3.5 Fitting the door u Place the door from above onto the lower bearing pin Fig. 7 (22). u Close the door. u Insert the upper turn hinge Fig.
Putting into operation Use the supplied stainless steel hose (length 1.5 m). Do not reuse old hoses. A 3 m hose is available as an optional extra. This hose must be professionally installed. In the hose connecting piece is a sieve with seal. - Between the hose and the domestic water connection there has to be a stopcock to interrupt the water supply in case of need. - All the fixtures and fittings used for water supply have to comply with the applicable regulations of the respective country.
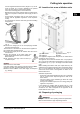
Control The packaging is made of recyclable materials: - corrugated board/cardboard - expanded polystyrene parts - polythene bags and sheets - polypropylene straps - nailed wooden frame with polyethylene panel* u Take the packaging material to an official collecting point. 4.7 Connecting the appliance NOTICE Failure to connect properly Damage to the electronics. u Do not use a standalone inverter. u Do not use an energy saving plug. w The temperature is indicated again in the temperature display.
Control 5.4 Temperature alarm The audible alarm sounds if the freezer temperature is not cold enough. The temperature display and the alarm symbol Fig. 3 (4) flash at the same time. The cause of the temperature being too high may be: - warm fresh food was placed inside - too much warm ambient air flowed in when rearranging and removing food - power failure for some time - the appliance is faulty The audible alarm is automatically silenced, the alarm symbol Fig.
Control 5.14 Cold storage accumulators The cold storage accumulators prevent the temperature from rising too fast in the event of power failure. 5.14.1 Using cold storage accumulators u To store frozen food directly on the shelves: pull the drawer forwards and lift it out. 5.10 Shelves u To remove the shelf: lift up at the front and pull out. u To put the shelf back: simply push in as far as it will go. u Place the cold storage accumulators in the special drawer for herbs and berries to save space.
Maintenance 5.15.3 Setting the water intake time* The opening time of the IceMaker valve can be set if, for example, the water pressure in the pipe is too low or too high. The water intake time can be set in stages from E1 (short intake time) to E8 (long intake time). The intake is preset at E3. u To activate the setting mode: press the SuperFrost button Fig. 3 (8) for about 5 s. w The display indicates c. w Themenu symbol Fig. 3 (3) shines. u Using the Up setting button Fig.
Malfunctions u Clean the ice cube tray and drawer with warm water. If necessary, use mild washing-up liquid. Then rinse. u Slide in the drawer again. u Leave the IceMaker switched off in this position. -or- NOTICE Rinse agent residue in the ice compartment and drawer. Nausea or irritation of the mucous membrane. u Remove rinse agent residue: Discard the first three batches of ice cubes. u Switch the IceMaker on (see 5.15) . 6.
Decommissioning The IceMaker does not make any ice cubes.* The IceMaker is not switched on. Switch on the IceMaker. The water connection is not open. Open the water connection. The water intake to the IceMaker has been interrupted. u Check the water connection (see Putting into operation).* u Check the hosing (see Putting into operation).* → The screen located in the end piece of the water intake hose or the screen located in the connecting piece on the appliance is blocked. u Clean the screens.
Liebherr-Hausgeräte Ochsenhausen GmbH Memminger Straße 77-79 88416 Ochsenhausen Deutschland home.liebherr.
Operating and installation instructions Upright refrigerator with BioFresh compartment 030217 7086196 - 01 SKBbs/KBbs 42 ...
Appliance at a glance Contents 1 1.1 1.2 1.3 1.4 1.5 1.6 Appliance at a glance............................................ Description of appliance and equipment.................. Appliance range of use............................................. Conformity................................................................ External dimensions of the appliance....................... Saving energy.......................................................... HomeDialog..............................................
Appliance at a glance substances and products based on the 1.4 External dimensions of the appliMedical Device Directive 2007/47/EC ance - Use in areas at risk of explosions Misusing the appliance may lead to damage to the goods stored or they may spoil. Climate classifications Depending on the climate classification the appliance is designed to operate in restricted ambient temperatures. The climate classification applying to your appliance is printed on the rating plate.
General safety information 1.6 HomeDialog Depending on model and options, the HomeDialog system can be used to network a number of Liebherr appliances (situated, for example, in the basement) with a main appliance (sited, for example, in the kitchen) and control them via the latter. You will find more information on the benefits, requirements and principle of operation on the internet at www. liebherr.com. 2 General safety information • Do not use any electrical appliances in the interior (e.g.
Controls and displays DANGER identifies a situation involving direct danger which, if not obviated, may result in death or severe bodily injury. WARNING identifies a dangerous situation which, if not obviated, may result in death or severe bodily injury. CAUTION identifies a dangerous situation which, if not obviated, may result in minor or medium bodily injury. NOTICE identifies a dangerous situation which, if not obviated, may result in damage to property.
Putting into operation NOTICE Risk of damage from stainless steel care products! The stainless steel doors and stainless steel side walls are finished with a high-quality surface coating. Stainless steel care products will damage the surfaces. u Use only a soft, clean cloth to wipe the coated door surfaces and side walls. q Cordless screwdriver, if necessary q Second person for fitting work, if needed q Accompanying Allen key size 2 4.3.1 Detaching the soft stop unit.
Putting into operation Fig. 6 u Close the door. u Pull off the cover Fig. 6 (10) forwards and upwards. u Lift off the cover Fig. 6 (11). Fig. 8 * CAUTION Risk of injury if the door tips! u Take good hold of the door. u Set down the door carefully. u Unscrew the upper turn hinge Fig. 6 (12)(2x Torx® 25) Fig. 6 (13) and raise it for removal. u Lift up the door and set it aside. 4.3.3 Changing the bearing parts For appliances with a closing damper: Fig.
Putting into operation Fig. 12 Fig. 10 u Lift the stopper Fig. 10 (30) out of the door bearing bush and transfer it. u Dismantle the door handle Fig. 10 (32), stoppers Fig. 10 (33) and pressure plates* Fig. 10 (34) and transfer to the opposite side. u When fitting the pressure plates on the opposite side, make sure they snap properly into place.* 4.3.5 Fitting the door u Place the door from above onto the lower bearing pin Fig. 7 Fig. 7 Fig. 7 Fig. 7 Fig. 7 (22). u Close the door.
Control 4.4 Insertion into a row of kitchen units The packaging is made of recyclable materials: - corrugated board/cardboard - expanded polystyrene parts - polythene bags and sheets - polypropylene straps - nailed wooden frame with polyethylene panel* u Take the packaging material to an official collecting point. 4.6 Connecting the appliance NOTICE Failure to connect properly Damage to the electronics. u Do not use a standalone inverter. u Do not use an energy saving plug.
Control u To set the display brighter: press the Up setting button Fig. 3 (2). u To set the display darker: press the Down setting button Fig. 3 (3). u To confirm: briefly press the SuperCool button Fig. 3 (7). w The brightness is adjusted to the new value. u To deactivate the setting mode: press the On/Off button Fig. 3 (6). -oru Wait for 5 minutes. w The temperature is indicated again in the temperature display. 5.
Control To prematurely deactivate SuperCool u Briefly press SuperCool button Fig. 3 (7). w The SuperCool symbol Fig. 3 (12) goes out in the display. w SuperCool is deactivated. 5.4.4 Holiday mode 5.4.7 Door racks Moving the storage rack u Remove storage rack according to illustration. The holiday mode saves energy and prevents odour from occurring when the door of the refrigerator compartment stays closed for a lengthy period.
Control For food with an indicated best before date, the date specified on the packaging always applies. 5.5.1 HydroSafe The HydroSafe at the moist setting is suited for storing unwrapped salad, vegetables and fruit with high inherent moisture. When the drawer is well filled, a dewy climate with up to 90% humidity is established. The humidity in the compartment depends on the moisture content of the food stored and on the opening frequency. You can set the humidity yourself. 5.5.
Maintenance u For a warmer temperature adjustment: press Up setting button Fig. 3 (2). u For a colder temperature adjustment: press Down setting button Fig. 3 (3). u To confirm: press SuperCool button Fig. 3 (7). w The temperature slowly adjusts to the new value. u To deactivate the setting mode: press the On/Off button Fig. 3 (6). -oru Wait for 5 minutes. w The temperature is indicated again in the temperature display. 5.5.
Malfunctions u Put the food back inside. u The sound is normal. 6.2 Customer service First check whether you can correct the fault yourself by reference to the list (see Malfunction). If this is not the case, please contact the customer service whose address is given in the enclosed customer service list. A bubbling and gurgling noise. → This noise comes from the refrigerant flowing in the refrigeration circuit. u The sound is normal. A quiet clicking noise.
Decommissioning WARNING Risk of injury due to electric shock! Live parts are located under the cover. u Have the LED interior light changed or repaired only by the customer service or by specialized personnel trained for the purpose. WARNING Danger of injury by LED lamp! The light intensity of the LED illumination corresponds to laser class 1/1M. If the cover is defective: u Do not look into the illumination with optical lenses from the immediate proximity. This can cause injury to the eyes.
Liebherr-Hausgeräte Ochsenhausen GmbH Memminger Straße 77-79 88416 Ochsenhausen Deutschland home.liebherr.