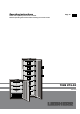
Operating instructions Freezer with explosion-proof interior container Read the operating instructions before switching on for the first time Page 12 GB 7082 273-00 LGex 910
Disposal notes • Keep packaging materials away from children - polythene sheets and bags can cause suffocation! • Please return the packaging to an official collection point. Your old appliance: This contains some reusable materials and should be disposed of properly - not simply with unsorted household refuse. • Discarded appliances should be disabled: Remove the plug, cut through the connection cable and render the catch unusable so that children cannot become trapped inside.
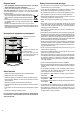
Range of appliance use The interior, which is free from sources of ignition, is used for storing flammable substances in open or closed containers and is therefore classified as a Zone 2 hazardous area. GB Dimensions The appliance is not suitable for use in explosion-hazard areas. For the storage of valuable or temperature-sensitive substances or products the use of an independent, constantly monitoring alarm system is necessary.
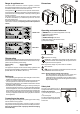
Switching the appliance on and off Connect the appliance to the mains - the display reads OFF. To switch the appliance on: Keep the ON/OFF button pressed for approx. 5 seconds - the display reads ON. No alarm is displayed or sounded when the appliance is switched on for the first time. Calling up the temperature history The maximum and minimum interior temperature are stored electronically. These temperatures can be called up. To call up the temperature: Press for 5 seconds.
Adjusting the alarm parameters The alarm limits (difference to the set temperature) and the alarm delay (delay until alarm goes off) can be adjusted. Press for 5 seconds. Display = 2. LED Display = flashes flashes, which reads HI or LO Display = The audible warning signal sounds. Note The alarm parameters can be adjusted. See Adjusting the alarm parameters. Display = Lower alarm limit Display = Temperature difference in °C and to select the desired setting. 3.
Example of an alarm query Calibrating the control sensor (standard sensor for temperature control) Situation: HACCP flashes in the display. Possible tolerances of the control sensor (the displayed temperature compared to the actual interior temperature) can be offset with this function. Display = Display = There has not been an alarm status with a too high or too low temperature. You must .
GB Product sensor (available accessory) Switching the temperature display between control sensor and product sensor • Connect sensor (see section entitled External alarm) Press The temperature may be measured or recorded at any point in the interior using the product sensor. Activating the sensor Press Display = for 5 seconds. Display = Display = Display = Display = (product sensor) Display = Display = Press for 5 seconds.
Setting the real time clock The alarm limits and sensor calibration values can be reset to the factory settings using this function. Press Pull out the mains plug. for 5 seconds. Display = Display = Keep Display = Display = Set the year by pressing the Display = Display = buttons. Display = Day (1-31) Set the day by pressing the Defrosting buttons.
Malfunctions You may be able to rectify the following faults by checking the possible causes yourself: • Appliance does not function: – Is the appliance switched on? – Is the plug correctly fitted in the mains socket? – Is the fuse intact? • Loud running noise: – Is the appliance set up firmly on the floor? – Does the appliance cause nearby items of furniture or objects to vibrate? Please note that noises caused by the refrigerant circuit cannot be avoided.
Opening for external temperature sensor Model LGUex 1500 Opening for external temperature sensor Model LGex 3410 Remove upper drawer before beginning work. The condenser must be unscrewed to make the sensor cable opening accessible. 1. Drill marked section on the back of the appliance. 1. Unscrew condenser screws (6 pcs.) and fold out condenser at an angle. Important! Make sure that no pipes are bent. 2. Drill marked section at the back of appliance.
Changing over door hinges 1. Unscrew the hinge bracket. Important: The door mounting has a spring mechanism enabling the door to close by itself. The hinge bracket turns to the left when the screws are undone. Installation dimensions (mm) LGUex 1500 GB Version 1 A cross-section of min. 200 cm2 is required in the worktop for ventilation of the rear of the appliance. 2. Pull the door out at the bottom and lift off. 3. Transfer handle and plugs to the opposite side of the door. 4.