Index English (EN) 3 Nederlands 11 Deutsch 19 Français 27 2
EN Table of Contents Index 2 Table of Contents 3 Adding the Device to the App 5 Linking Your Account to Echo 7 Linking Your Account to Google Home 8 Safety Instructions 10 Specifications 10 3
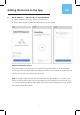
Adding the Device to the App 1 EN DOWNLOAD THE APP Scan the provided QR code to download the app on your smartphone. Available for Android and iOS. 2 ADD DEVICE a. Ensure that the smart bulb is installed properly and switched on. b. The light bulb will start to blink as default when it is lit for the first time. Ensure that the light bulb is Scan this QR code to download the app rapidly blinking (2 times per second). c. Click ‘Add Device’ or ‘+’, choose ‘Add Manually’. d.
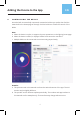
Adding the Device to the App 3 EN ADD DEVICE - ENTER WI-FI PASSWORD a. Select the Wi-Fi which your phone is connected to. b. Please enter the Wi-Fi password and confirm the connection. Network Connection Process If the smart bulb is connecting to the network the app will show that the smart bulb is connecting. Once the smart bulb successfully connects to the network, the app will show that the connection is successful. (See pictures).
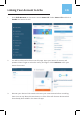
Adding the Device to the App 4 EN CONTROLLING THE DEVICE Once the bulb is successfully connected, rename the bulb as you prefer then find the smart bulb in the home page of the app. Click the bulb icon to have full control of the bulbs. Note: a. When the device is online, it supports shortcut operations on the lighting home page. b. When the device is offline, it displays “Offline” and cannot be controlled. c. Multiple bulbs can be connected at one time and grouped easily. Remarks: a.
Linking Your Account to Echo 1. EN Click ‘Skills & Games’ on the menu. Search ‘Smart Life’. Select ‘Smart Life’ and click to ‘Enable’ the Smart Life skill. 2. You will be redirected to the account link page. Input your Smart Life account and password. Don’t forget to select the country and region. Click ‘Link Now’ to link your Smart Life account. 3. Discover your devices. Echo needs to discover your smart devices before controlling them. You can say ‘Alexa, discover devices.’ to Echo.
Linking Your Account to Echo EN You can also click ‘Add devices’ to find smart devices. Discovered devices will be displayed in the list. Note: Every time you change the device name on the Smart Life app, Echo must rediscover them before controlling them. 4. You can now control your smart devices through Echo. Speak to Echo like this: - Alexa, turn on/off the bedroom light. - Alexa, set the bedroom light to 50 percent. - Alexa, brighten the bedroom light. - Alexa, dim the bedroom light.
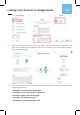
Linking Your Account to Google Home 2. EN Select ‘Smart Life’ from the list, select your region, input your account and password, and then click ‘Link Now’. After assigning rooms for your devices, your devices will be listed in the Home Control page. 3. You can now control your smart devices through Google Home. Speak to Google with the following commands: - OK Google, turn on/off the bedroom light. - OK Google, set the bedroom light to 50 percent. - OK Google, brighten the bedroom light.
Safety Instructions EN TURN POWER OFF BEFORE INSPECTION, INSTALLATION, OR REMOVAL. SUITABLE FOR DAMP LOCATIONS BUT NOT DIRECTLY EXPOSED TO WATER OR WEATHER. THIS DEVICE IS NOT INTENDED FOR USE WITH EMERGENCY EXIT FIXTURES OR EMERGENCY EXIT LIGHTS. WARNING: THIS PRODUCT OPERATES AT A FREQUENCY WHICH MAY NOT BE SUITABLE FOR PHOTOSENSITIVE EPILEPSY. WARNING: RISK OF ELECTRIC SHOCK. DISCONNECT THE MAIN POWER AT THE FUSE OR CIRCUIT BEFORE INSTALLATION OR SERVICING THE FIXTURE.
NL Table of Contents Index 2 Inhoudsopgave 11 Het apparaat toevoegen aan de app 12 Uw account aan Amazon Echo koppelen 14 Uw account aan Google Home koppelen 16 Veiligheidsinstructies 18 Specificaties 18 11
Het apparaat toevoegen aan de app 1 NL DOWNLOAD DE APP Scan de meegeleverde QR-code om de app te downloaden op uw smartphone. Beschikbaar voor Android en iOS. 2 APPARAAT TOEVOEGEN a. Zorg ervoor dat de slimme gloeilamp correct is geïnstalleerd en is ingeschakeld. b. De gloeilamp zal standaard beginnen te knipperen Scan deze QR-code om de app te downloaden wanneer deze voor de eerste keer brandt. Zorg ervoor dat de gloeilamp snel knippert (2 keer per seconde). c.
Het apparaat toevoegen aan de app 3 NL APPARAAT TOEVOEGEN - WI-FI WACHTWOORD INVOEREN a. Selecteer de Wi-Fi waarmee uw telefoon is verbonden. b. Voer het Wi-Fi-wachtwoord in en bevestig de verbinding. Netwerk Verbindings Proces Als de slimme lamp verbinding maakt met het netwerk zal de app laten zien dat de slimme lamp verbinding maakt. Zodra de slimme lamp succesvol verbinding maakt met het netwerk, zal de app laten zien dat de verbinding succesvol is. (Zie afbeeldingen).
Het apparaat toevoegen aan de app 4 NL HET APPARAAT BEDIENEN Zodra de lamp met succes is aangesloten, hernoem de lamp zoals u wilt en vind de slimme gloeilamp op de startpagina van de app. Klik op het gloeilamp icoon om volledige controle te hebben over de gloeilamp Opmerking: a. Als het apparaat online is, ondersteunt het snelkoppelingen op de startpagina van de verlichting. b. Wanneer het apparaat offline is, wordt “Offline” weergegeven en kan het niet worden bediend. c.
Uw account aan Amazon Echo koppelen 1. NL Klik op ‘Vaardigheden & spelletjes’ in het menu. Zoek ‘Smart Life’. Selecteer ‘Smart Life’ en klik om de Smart Life vaardigheid ‘In te schakelen’. 2. Je wordt doorgestuurd naar de account link pagina. Voer uw Smart Life account en wachtwoord in. Vergeet niet het land en de regio te selecteren. Klik op ‘Nu linken’ om uw Smart Life account te linken. 3. Ontdek uw apparaten. Echo moet uw slimme apparaten ontdekken voordat hij ze kan bedienen.
Linking Your Account to Echo NL U kunt ook klikken op ‘Apparaten toevoegen’ om slimme apparaten te vinden. Ontdekte apparaten worden weergegeven in de lijst. Opmerking: Telkens wanneer u de naam van het apparaat in de Smart Life-app wijzigt, moet Echo ze opnieuw ontdekken voordat ze worden bestuurd. 4. U kunt nu uw slimme apparaten bedienen via Echo. Spreek als volgt tegen Echo: - Alexa, zet het slaapkamerlicht aan/uit. - Alexa, zet het slaapkamerlicht op 50 procent.
Uw account aan Google Home koppelen 2. NL Selecteer ‘Smart Life’ in de lijst, selecteer uw regio, voer uw account en wachtwoord in, en klik vervolgens op ‘Nu koppelen’. Nadat u kamers aan uw apparaten hebt toegewezen, worden uw apparaten vermeld in de Home Control-pagina. 3. U kunt nu uw slimme apparaten bedienen via Google Home. Spreek tot Google met de volgende commando’s: - OK Google, zet het slaapkamerlicht aan/uit. - OK Google, zet de slaapkamerverlichting op 50 procent.
Veiligheidsinstructies NL SCHAKEL DE STROOM UIT VOOR INSPECTIE, INSTALLATIE OF VERWIJDERING. GESCHIKT VOOR VOCHTIGE LOCATIES, MAAR NIET DIRECT BLOOTGESTELD AAN WATER OF WEERSINVLOEDEN. DIT APPARAAT IS NIET BEDOELD VOOR GEBRUIK MET NOODUITGANGARMATUREN OF NOODUITGANGLAMPEN. WAARSCHUWING: DIT PRODUCT WERKT OP EEN FREQUENTIE DIE MOGELIJK NIET GESCHIKT IS VOOR LICHTGEVOELIGE EPILEPSIE. WAARSCHUWING: RISICO OP ELEKTRISCHE SCHOKKEN.
DE Inhaltsübersicht Index 2 Inhaltsübersicht 19 Hinzufügen des Geräts zur App 21 Verknüpfen Ihres Kontos mit Amazon Echo 23 Verknüpfen Ihres Kontos mit Google Home 24 Sicherheitshinweise 26 Technische Daten 26 19
Hinzufügen des Geräts zur App 1 DE LADEN SIE DIE APP HERUNTER Scannen Sie den bereitgestellten QR-Code, um die App auf Ihr Smartphone herunterzuladen. Verfügbar für Android und iOS. 2 GERÄT HINZUFÜGEN a. Vergewissern Sie sich, dass die intelligente Glühbirne richtig installiert und eingeschaltet ist. b. Die Glühbirne beginnt standardmäßig zu blinken, Scannen Sie diesen QR-Code, um die App herunterzuladen wenn sie zum ersten Mal eingeschaltet wird.
Hinzufügen des Geräts zur App 3 DE GERÄT HINZUFÜGEN - W-LAN-PASSWORT EINGEBEN a. Wählen Sie das Wi-Fi, mit dem Ihr Telefon verbunden ist. b. Geben Sie das Wi-Fi-Passwort ein und bestätigen Sie die Verbindung. Netzwerkverbindungsprozess Wenn die Glühbirne mit dem Netzwerk verbunden ist, zeigt die App an, dass die Glühbirne eine Verbindung herstellt. Sobald sich die Glühbirne erfolgreich mit dem Netzwerk verbunden hat, zeigt die App an, dass die Verbindung erfolgreich war. (Siehe Bilder).
Hinzufügen des Geräts zur App 4 DE STEUERUNG DES GERÄTS Sobald die Glühbirne erfolgreich verbunden ist, benennen Sie die Glühbirne nach Belieben um und finden Sie die intelligente Glühbirne auf der Startseite der App. Klicken Sie auf das Glühbirnensymbol, um die volle Kontrolle über die Glühbirnen zu haben. Beachte: a. Wenn das Gerät online ist, unterstützt es Tastenkombinationen auf der Beleuchtungs-Startseite. b. Wenn das Gerät offline ist, zeigt es “Offline” an und kann nicht gesteuert werden. c.
Verknüpfen Ihres Kontos mit Amazon Echo 1. DE Klicken Sie im Menü auf “Fertigkeiten & Spiele”. Suchen Sie nach “Smart Life”. Wählen Sie “Smart Life” und klicken Sie auf “Aktivieren”, um die Fähigkeit “Smart Life” zu aktivieren. 2. Sie werden auf die Seite mit dem Kontolink weitergeleitet. Geben Sie Ihr Smart LifeKonto und Ihr Passwort ein. Vergessen Sie nicht, das Land und die Region auszuwählen. Klicken Sie auf “Jetzt verknüpfen”, um Ihr Smart Life-Konto zu verknüpfen. 3. Erkennen Sie Ihre Geräte.
Verknüpfen Ihres Kontos mit Amazon Echo DE Sie können auch auf “Geräte hinzufügen” klicken, um intelligente Geräte zu finden. Die gefundenen Geräte werden in der Liste angezeigt. Hinweis: Jedes Mal, wenn Sie den Gerätenamen in der Smart Life App ändern, muss Echo die Geräte neu erkennen, bevor Sie sie steuern können. 4. Sie können nun Ihre intelligenten Geräte über Echo steuern. Sprechen Sie mit Echo wie folgt: - Alexa, schalte das Licht im Schlafzimmer ein/aus.
Verknüpfen Ihres Kontos mit Google Home 2. DE Wählen Sie “Smart Life” aus der Liste aus, wählen Sie Ihre Region, geben Sie Ihr Konto und Kennwort ein und klicken Sie dann auf “Jetzt verbinden”. Nachdem Sie Ihren Geräten Räume zugewiesen haben, werden Ihre Geräte auf der Home Control-Seite aufgelistet. 3. Sie können nun Ihre intelligenten Geräte über Google Home steuern. Sprechen Sie mit den folgenden Befehlen zu Google: - OK Google, schalte das Licht im Schlafzimmer ein/aus.
Sicherheitshinweise DE SCHALTEN SIE DEN STROM VOR DER INSPEKTION, INSTALLATION ODER DEMONTAGE AUS. GEEIGNET FÜR FEUCHTE STANDORTE, DIE JEDOCH NICHT DIREKT DEM WASSER ODER DER WITTERUNG AUSGESETZT SIND. DIESES GERÄT IST NICHT FÜR DIE VERWENDUNG MIT NOTAUSGANGSBELEUCHTUNGEN ODER NOTAUSGANGSLEUCHTEN VORGESEHEN. WARNUNG: DIESES PRODUKT ARBEITET MIT EINER FREQUENZ, DIE MÖGLICHERWEISE NICHT FÜR LICHTEMPFINDLICHE EPILEPSIE GEEIGNET IST. WARNING: GEFAHR EINES STROMSCHLAGS.
FR Table of Contents Index 2 Table des matières 27 Ajout de l’appareil à l’application 28 Lier votre compte à Amazon Echo 32 Connexion de votre compte à Google Home 32 Instructions de sécurité 34 Spécifications 34 27
Ajout de l’appareil à l’application 1 FR TÉLÉCHARGER L’APPLICATION Scannez le code QR fourni pour télécharger l’application sur votre votre smartphone. Disponible pour Android et iOS. 2 AJOUTER UN APPAREIL a. Assurez-vous que l’ampoule intelligente est correctement installée et allumée. b. L’ampoule se met à clignoter par défaut lorsqu’elle Scannez ce code QR pour télécharger l’application est allumée pour la lorsqu’elle est allumée pour la première fois.
Ajout de l’appareil à l’application 3 FR AJOUTER UN APPAREIL - ENTRER LE MOT DE PASSE WI-FI a. Sélectionnez le Wi-Fi auquel votre téléphone est connecté. b. Saisissez le mot de passe Wi-Fi et confirmez la connexion. Processus de connexion au réseau Si l’ampoule intelligente se connecte au réseau, l’application indiquera que l’ampoule intelligente se connexion. Une fois que l’ampoule intelligente s’est connectée au réseau, l’application indique que la connexion est réussie. que la connexion est réussie.
Ajout de l’appareil à l’application 4 FR CONTRÔLE DE L’APPAREIL Une fois l’ampoule connectée, renommez-la comme vous le souhaitez, puis trouvez l’ampoule intelligente sur la page d’accueil de l’application. Cliquez sur l’icône de l’ampoule pour avoir le contrôle total des ampoules. Remarque: a. Lorsque l’appareil est en ligne, il prend en charge les opérations de raccourci sur la page d’accueil de l’éclairage. b. Lorsque l’appareil est hors ligne, il affiche “ Hors ligne “ et ne peut pas être contrôlé. c.
Lier votre compte à Amazon Echo 1. FR Cliquez sur “Compétences et jeux” dans le menu. Cherchez “Smart Life”. Sélectionnez “Smart Life” et cliquez sur pour Activer la compétence Vie intelligente. 2. Vous serez redirigé vers la page de lien de compte. Saisissez votre compte Smart Life et votre mot de passe. N’oubliez pas de sélectionner le pays et la région. Cliquez sur “Lien maintenant” pour lier votre compte Smart Life. 3. Découvrez vos appareils.
Lier votre compte à Amazon Echo FR Vous pouvez également cliquer sur “Ajouter des appareils” pour trouver des appareils intelligents. Les appareils découverts seront affichés dans la liste. Remarque : Chaque fois que vous changez le nom d’un appareil dans l’application Smart Life, Echo doit le redécouvrir avant de le contrôler. 4. Vous pouvez maintenant contrôler vos appareils intelligents via Echo. Parlez à Echo comme suit : - Alexa, allume/éteint la lumière de la chambre à coucher.
Connexion de votre compte à Google Home 2. FR Sélectionnez “Smart Life” dans la liste, sélectionnez votre région, saisissez votre compte et votre mot de passe, puis cliquez sur “Lien maintenant”. Après avoir attribué des pièces à vos appareils, ces derniers seront répertoriés sur la page de contrôle de la maison. 3. Sélectionnez “Smart Life” dans la liste, sélectionnez votre région, saisissez votre compte et votre mot de passe, puis cliquez sur “Lien maintenant”.
Instructions de sécurité FR COUPEZ LE COURANT AVANT L’INSPECTION, L’INSTALLATION OU LA DÉPOSE. CONVIENT AUX ENDROITS HUMIDES, MAIS N’EST PAS DIRECTEMENT EXPOSÉ À L’EAU OU AUX INTEMPÉRIES. CE DISPOSITIF N’EST PAS DESTINÉ À ÊTRE UTILISÉ AVEC DES LUMINAIRES DE SORTIE DE SECOURS OU DES LAMPES DE SORTIE DE SECOURS. AVERTISSEMENT : CE PRODUIT FONCTIONNE A UNE FREQUENCE QUI PEUT NE PAS CONVENIR À L’ÉPILEPSIE PHOTOSENSIBLE. AVERTISSEMENT : RISQUE DE CHOC ÉLECTRIQUE.